


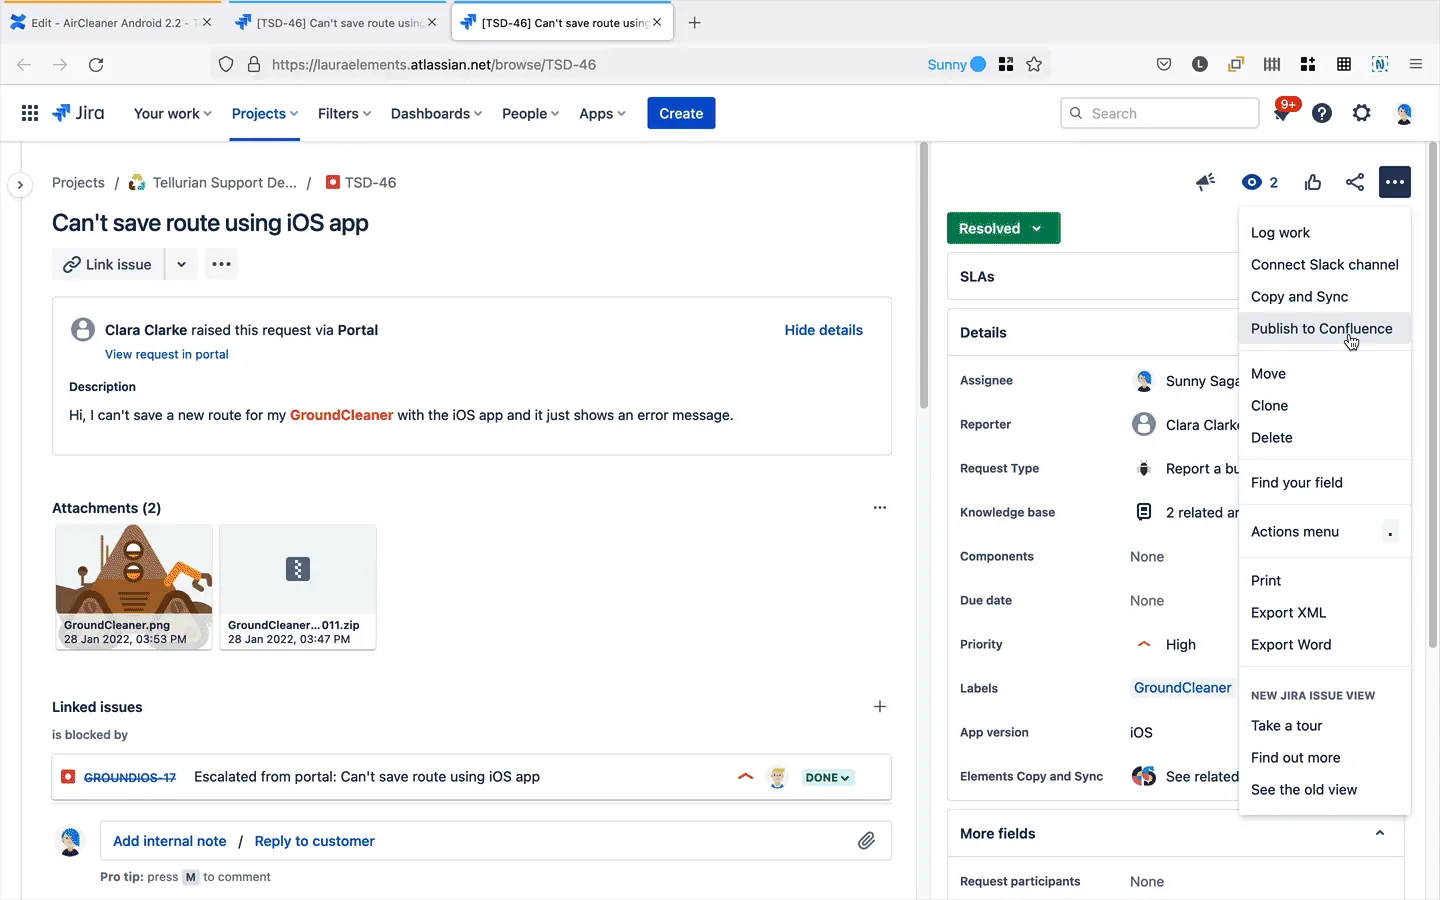
Your Scrum or Kanban board is set up, complete with Epics, User Stories, Tasks, and Bugs for the sprint. There’s no doubt about it: Jira Software is a valuable tool for your engineering team. However, Jira alone might not be the best at documenting decisions, sharing wireframes or mock-ups, or summarizing progress for colleagues who do not use Jira daily.
By using Confluence alongside Jira Software throughout the entire software development process, you can build an internal knowledge base that sets your team up for success. Get inspired by the following suggestions on how to use Jira Software and Confluence together to achieve a shared understanding, and support the successful release of your software.
Enhancing agile development with Jira and Confluence integration
Jira Software excels at tracking distinct tasks for upcoming releases, but it falls short in creating a comprehensive shared history and knowledge base. That’s where Confluence performs: it organizes and shares ideas, content, and files critical for your project. If your project resources are scattered across Word documents, Drive, SharePoint, or other platforms, your team is likely wasting time locating necessary materials. By synchronizing Jira and Confluence, you can streamline this process, ensuring all project information is centrally located and easily accessible. This integration not only saves time but also enhances project efficiency.
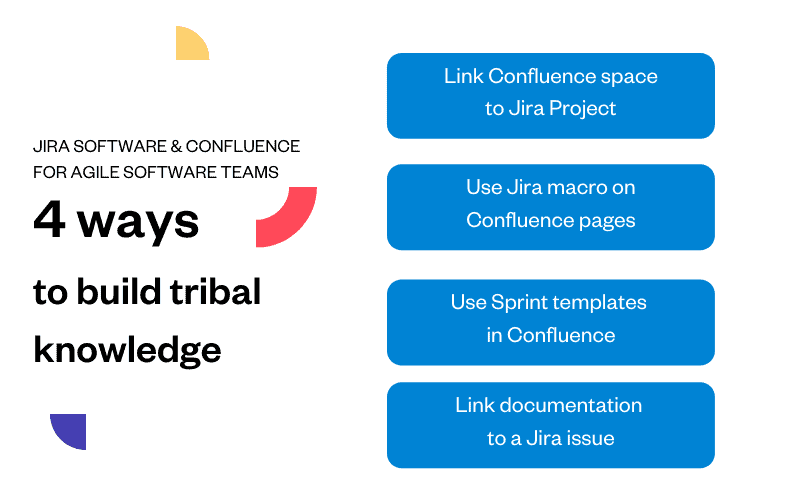
Building tribal knowledge: 4 key strategies for agile software teams:
1. Structured knowledge organization
- Hierarchical page organization: Establish a clear hierarchy of pages for each team or project within Confluence and link this space directly to your Jira project. This setup enhances accessibility, allowing team members to access relevant pages directly from Jira, which optimizes navigation and efficiency.
2. Transparent project updates
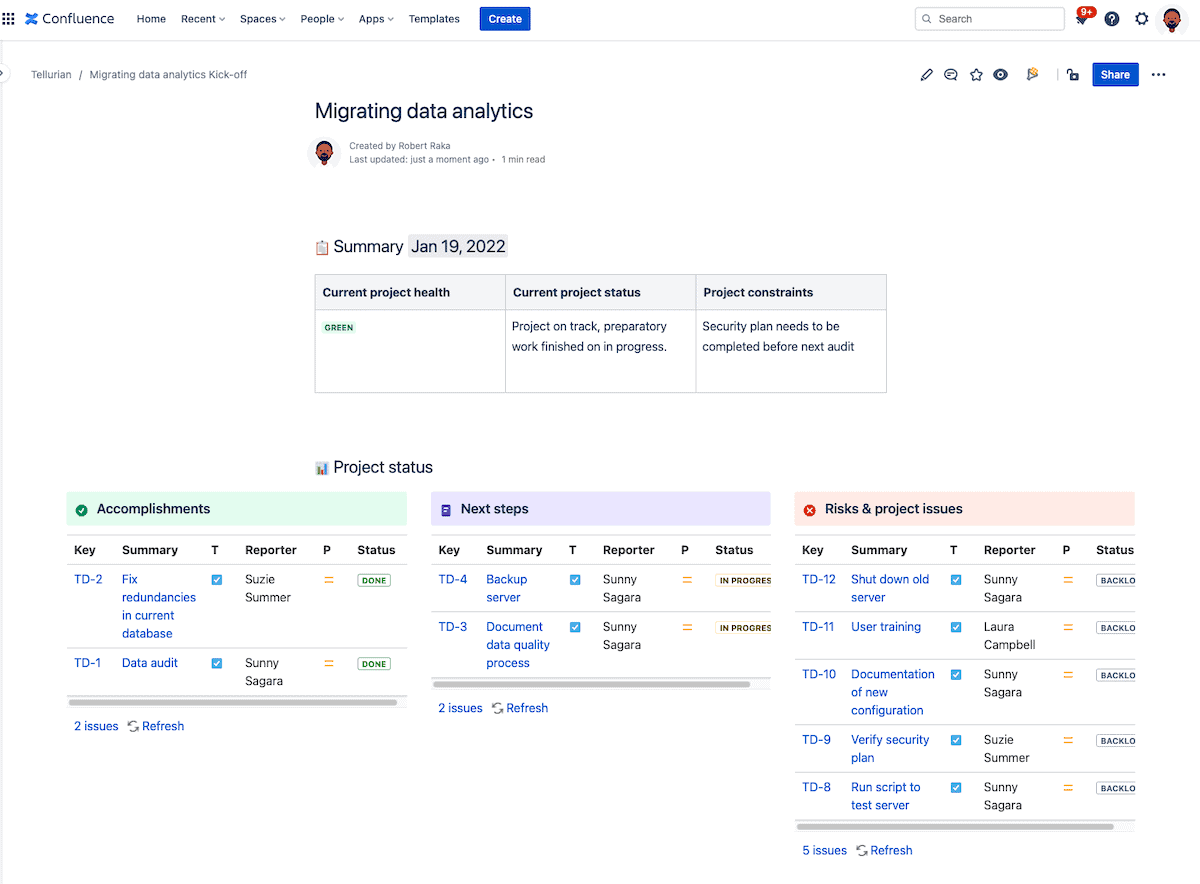
- Project update pages: Develop a dedicated page in Confluence using Jira macros to display real-time issue statuses. This approach ensures that even stakeholders who do not use Jira regularly can stay updated on project progress, enhancing decision-making and project transparency.
3. Streamlined sprint processes
- Sprint planning and retrospective templates: Leverage Confluence templates for sprint planning and retrospectives to document necessary actions and reflect on completed sprints. This structured documentation aids in maintaining clarity and focus throughout the sprint cycle, promoting continuous improvement and alignment with agile methodologies.
4. Integrated documentation and tracking
- Linking documentation to issues: Integrate your documentation effectively by linking Confluence pages to Jira issues, enhancing team productivity by keeping all related information accessible within the Atlassian ecosystem. This seamless integration ensures that team members can access relevant documentation, roadmaps, or issue data directly from Confluence, facilitating a more organized and efficient workflow.
Simplified cloud integration
- Automatic app links on Cloud: For teams utilizing cloud-based platforms, integrating Jira and Confluence is straightforward with automatic app linking. Simply connect your Jira project with your Confluence space to seamlessly view, create, and modify project-related documentation directly from Jira.
By adopting these strategies, agile software teams can significantly boost their productivity and collaboration. Integrating Jira and Confluence not only simplifies project management but also strengthens the foundation of knowledge sharing and operational transparency essential for agile success.
Important points to remember:
Pages must be included under Pages in Confluence to be accessible from Jira.
While Jira displays Pages, it does not show Blogs.
Centralizing all project-related documents and content in Confluence optimizes your knowledge management. Future team members and non-Jira using colleagues will thank you, we promise.
Jira Software and Confluence for Product Management
Integrating Confluence with Jira Software brings vast opportunities for Product Managers and enhances the success of software releases.
Jira and Confluence for effective requirements management
Utilize Jira and Confluence as your agile toolkit for ongoing requirements management throughout your product development lifecycle.
Confluence comes equipped with a dedicated blueprint or template for requirements management, allowing you to hit the ground running. This setup enables you to easily gather, share, and iterate on feedback. Stakeholders can engage directly by commenting on the text, the page, or making edits themselves—with all changes trackable via the page history.
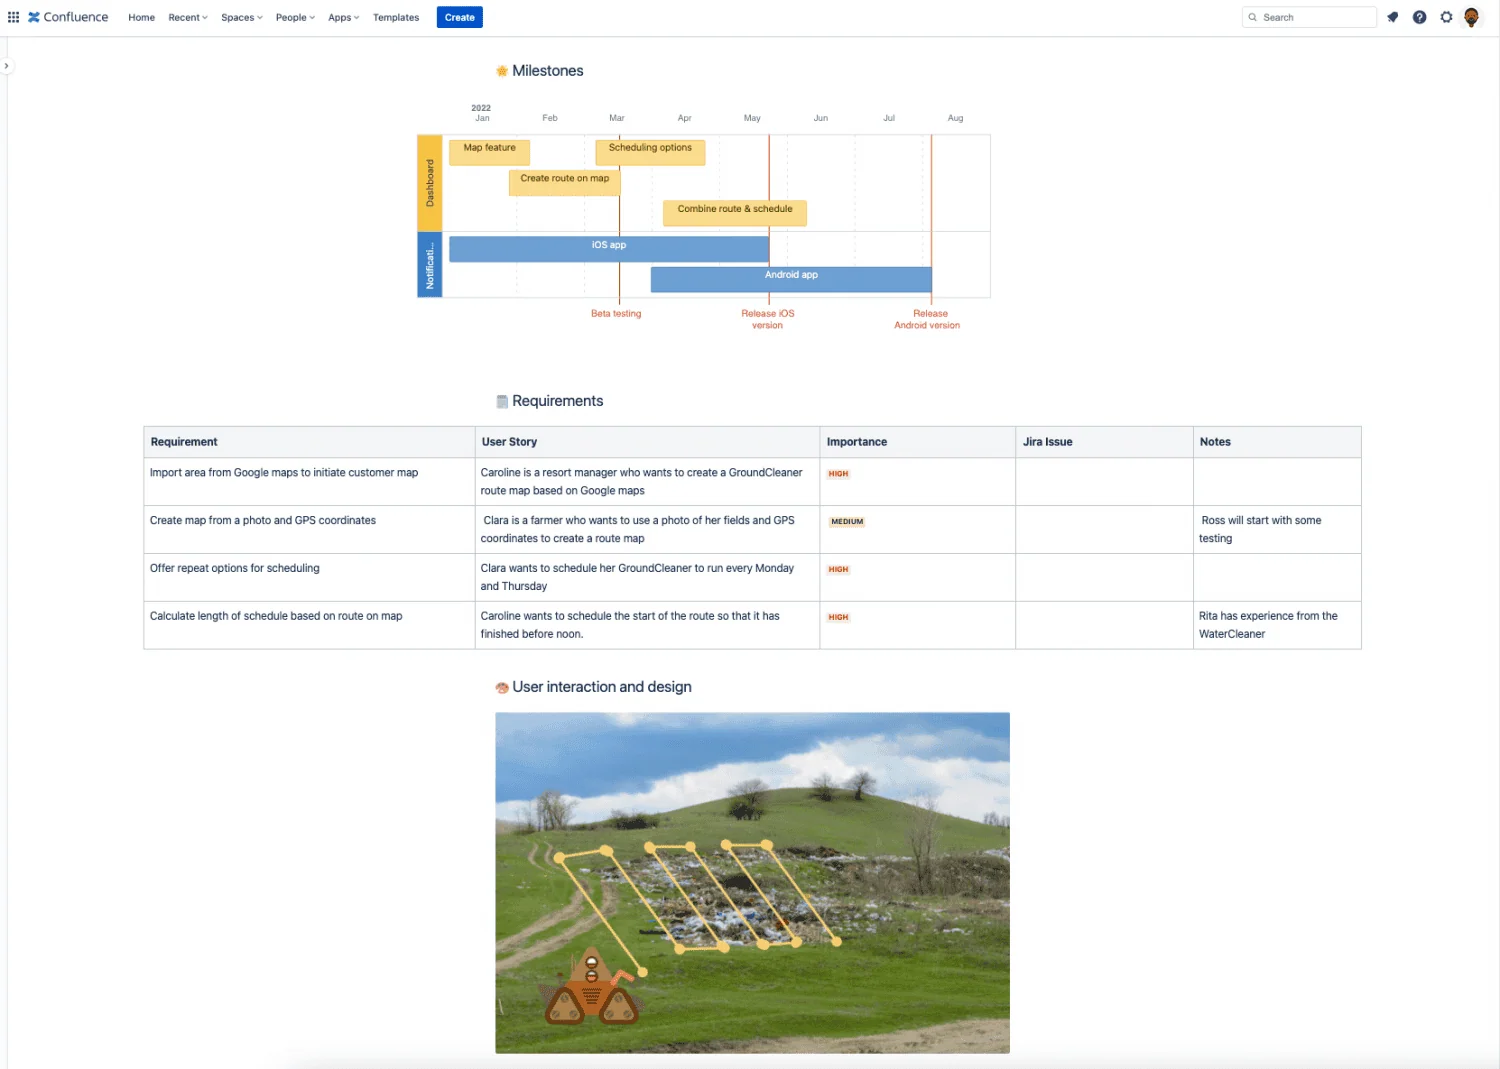
As the requirements are detailed, you can start creating User Stories for them in Jira directly from Confluence by highlighting the text.
Incorporating wireframes, mockups, or prototypes into a Confluence page is streamlined with various apps, centralizing all your work in one place. Team members can comment on these visuals just as they would on text or other images.
Confluence enhances visibility by automatically generating a summary page from your requirements management blueprints. This feature provides a quick overview of the status across all your projects, making it easier to track progress and updates.
Discuss, debate build consensus with DACI
Have you ever puzzled over a decision made months ago by people no longer on your project? The DACI framework offers a structured approach to document decision-making processes effectively.
The DACI (Driver, Approver, Contributors, Informed) template in Confluence is specifically designed to consolidate all essential information for discussing and debating pending decisions. This template facilitates:
- Documenting inputs: Clearly outlines all the information required to address the decision at hand.
- Evaluating options: Lists the advantages and disadvantages, alongside the potential impact of each proposed solution.
By using the DACI template, you not only build consensus for the selected solution but also preserve this knowledge for future reference. For instance, when deciding on the best approach to develop a new feature or resolve a bug, you can create a dedicated page in Confluence. Import the relevant details from the Jira issue using Elements Publish recipe, then begin detailing each potential option, ensuring all decision-making is transparent and accessible.
Check out the Atlassian play for tips on how to use the DACI framework with your colleagues. Once you’ve come to a decision, don’t forget to update the status so that anyone looking at the decision log with the list of DACI pages will know at a glance if a decision has been taken.
A slight alternative is the RACI, or Responsible, Accountable, Consulted, and Informed.
- Responsible is those who will complete the work.
- Accountable is the final approver of the work.
- Consulted and Informed are the same.
Managing Jira Software release notes in Confluence
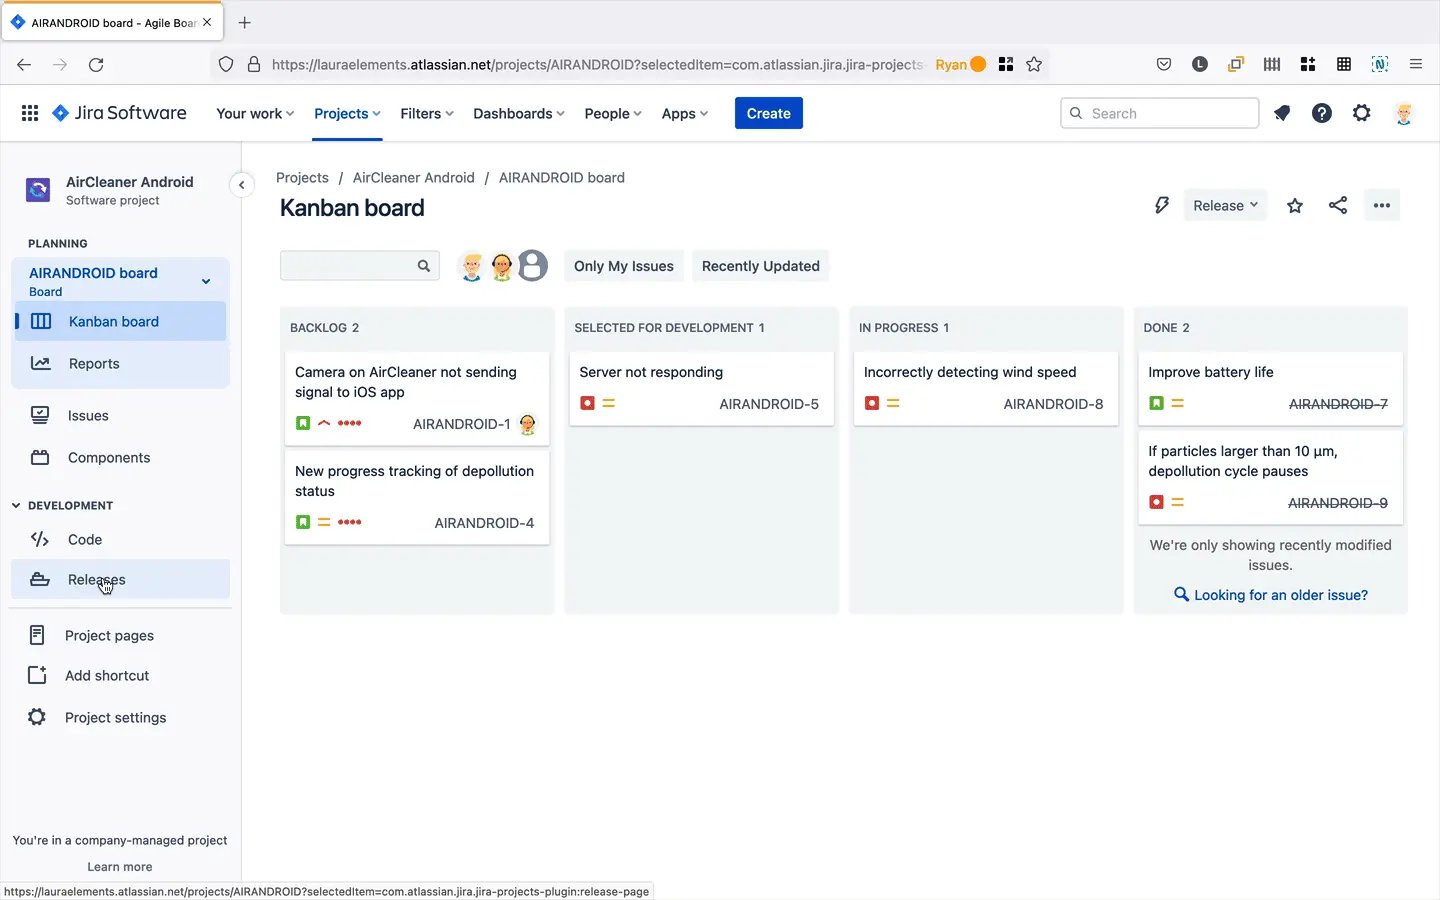
Jira Software allows for project organization using versions, which introduces the capability to automatically generate release notes. These notes compile all issues within a version into a categorized list by issue types.
To publish release notes, you have two options: directly from Jira or through Confluence.
In Jira Software, navigate to ‘Releases’ in the left-hand panel. For detailed instructions on generating a release note, refer to the relevant Atlassian documentation.
You can then copy all the changes associated with your release and paste them into a document you’re creating in Confluence.
From Confluence, click on create and then from the Templates in the side navigation menu select “Jira report”. When you click “Use” select “Change log”.
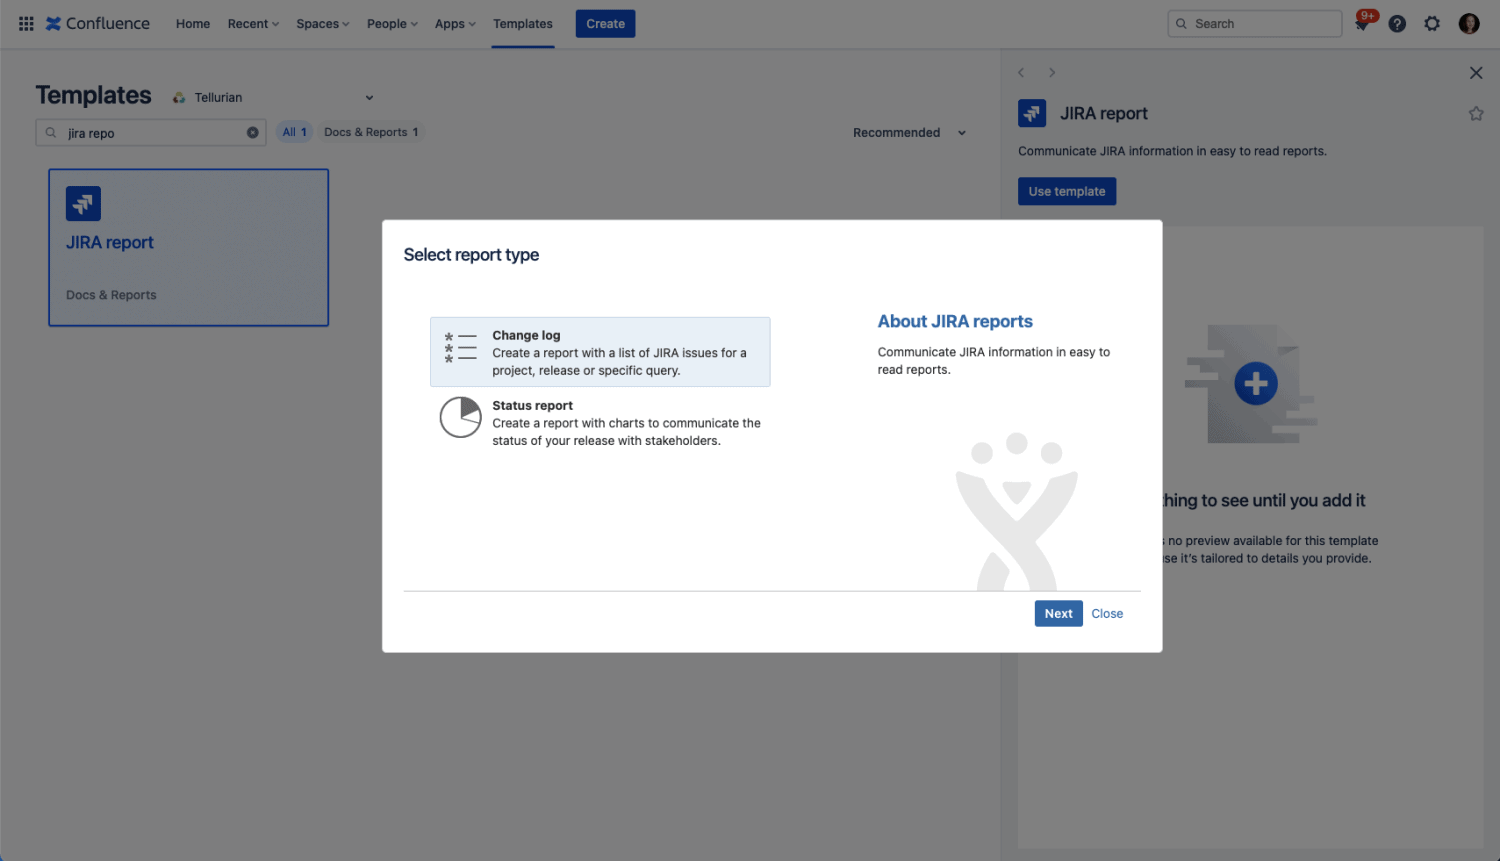
Then you’ll need to select the project and version. Confluence will automatically fetch all the issues and create your release note.
⚠️ You are launching a new page under the currently open parent page to provide the latest updates. To avoid having to move the page after creating it, make sure you open the right parent page before creating a new page and using the Jira Report template.
Incident management: post-mortems with Jira and Confluence
You’ve pushed a change to production, and it didn’t go as planned. To refine your change management process, gathering everyone for a thorough analysis is essential. Atlassian’s Confluence offers numerous templates to compile all necessary information for continuous improvement and even includes a guide for conducting these meetings.
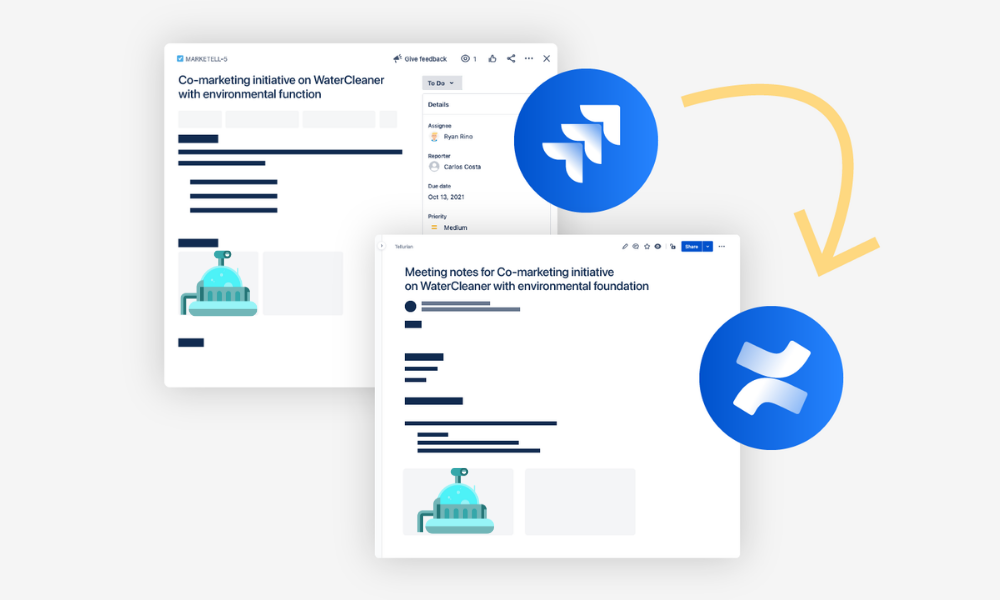
However, creating a post-mortem document in Confluence can be labor-intensive, as it often involves manually transferring bug details from Jira Software. To simplify this process, the app Elements Publish automates the transfer of information from your Jira Software issue directly into a new post-mortem page in Confluence.
With everything prebuilt, your dev team can focus on the root cause analysis, not copying and pasting.
Driving Success in Software Development Teams:
Using Jira Software and Confluence together throughout your software development process builds essential tribal knowledge for team success. Whether enhancing sprint retrospectives, managing product requirements, or streamlining incident management, integrating Confluence with Jira Software ensures that all decisions are well-documented and accessible, even to stakeholders not using Jira. To start leveraging both tools effectively, explore our guide on 8 ways to integrate Jira and Confluence or try the Elements Publish app for seamless documentation management.
Is your company transitioning to agile methodologies? “Jira and Confluence integration is now a strategic move for businesses exploring the Atlassian ecosystem. Jira excels in software development, IT Service Management (ITSM), and has recently expanded into business task tracking. Concurrently, Confluence serves as an ideal content management system for corporate intranets, product documentation, and customer knowledge bases. If you’ve been inspired by our explanation of why you should use Jira and Confluence together but don’t currently have the tools integrated, read on.
Why set up a Jira and Confluence integration?
Integrating Jira and Confluence can revolutionize the way teams collaborate, reducing silos of information and processes. By linking these powerful tools, you enhance team productivity and leverage their full capabilities seamlessly. With this integration, teams can effortlessly publish Jira issues to Confluence pages, integrate their Jira roadmaps into Confluence, or even create Jira issues directly from Confluence.
Discover more benefits in our detailed guide on 8 effective ways to utilize Jira and Confluence together.
If your organization already utilizes both Jira and Confluence but hasn’t integrated them, doing so can streamline workflows and significantly reduce the need to toggle between systems, thus minimizing user frustration and optimizing time management.
How to integrate Jira with Confluence?
The process to follow depends on the hosting you are using: Cloud or On-Premise versions Server or Data Center. (BTW, if you aren’t sure if you are on Cloud or Server/Data Center, look at your url or the bottom of your page as explained in this Community article).
Differences between a Jira and Confluence integration in Cloud versus Server/Data Center
What are the main differences?
- If you are on Cloud and have added Jira and Confluence to the same site, the integration is done automatically
- If you are on Server or Data Center, you have to configure the integration manually.
Configuring Jira and Confluence to work together on these platforms involves specific steps to ensure seamless collaboration and functionality between the two systems.
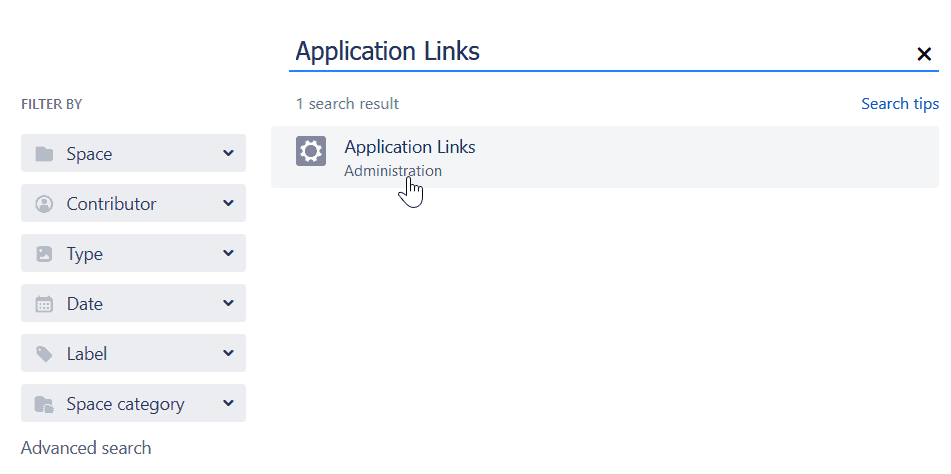
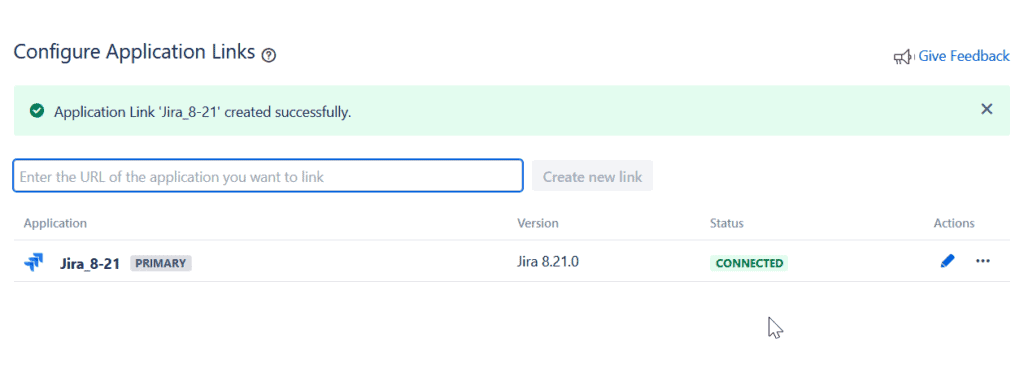
As explained in Atlassian’s documentation, the integration can be done with the bundled app Application Links that allows you to connect Atlassian products to each other. Here are the 4 steps, starting from Confluence.
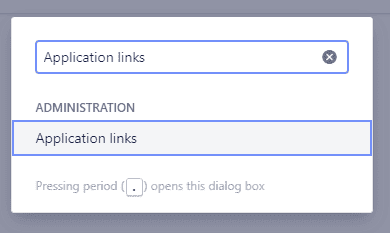
1. Go to your general configuration and with a quick search, you can choose Application Links.
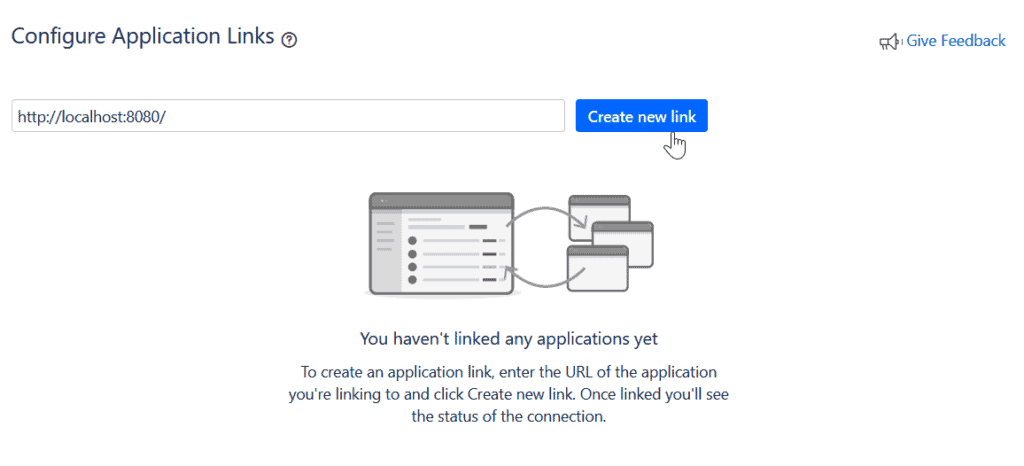
2. Enter the URL of the Atlassian product you want to link (in this example, Jira).
3. Follow the different steps inside the wizard to configure the link.
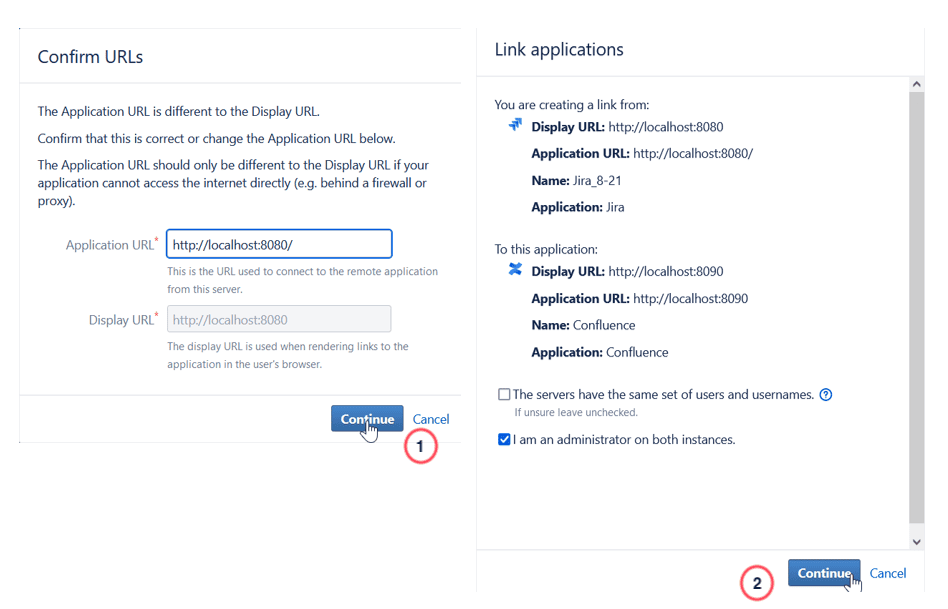
4. You will be redirected from Confluence over to Jira to confirm the app link in the other direction (and then sent back to Confluence to finish the process).
[vc_row][vc_column][vc_column_text css=”.vc_custom_1622193388776{border-top-width: 2px !important;border-right-width: 2px !important;border-bottom-width: 2px !important;border-left-width: 2px !important;padding-top: 20px !important;padding-right: 40px !important;padding-bottom: 20px !important;padding-left: 40px !important;background-color: #f5f5f5 !important;border-left-color: #f5f5f5 !important;border-right-color: #f5f5f5 !important;border-top-color: #f5f5f5 !important;border-bottom-color: #f5f5f5 !important;}”]
⚠️ When you are configuring the Application Link you will have a choice between the option “The servers have the same set of users” which will use an OAuth authentication, or the option “I am an administrator on both instances” which creates a one-way link. When you use a one-way link, you will be in a read-only operating mode.
If you run into any problems, check out the troubleshooting guide provided by Atlassian.
[/vc_column_text][/vc_column][/vc_row]
Jira and Confluence integration in Cloud
Working with Jira and Confluence Cloud is straightforward. When both tools are used on the same site, integration is automatic upon activation of both products. This seamless setup ensures that you can start leveraging the combined capabilities of Jira and Confluence without any additional configuration.
If you are using Jira Software, you can quickly connect your Jira project with a Confluence space or page using the feature “Project Pages“:

If you need to link Jira and Confluence instances that are hosted on different Cloud sites, you will need to configure an app link.
Remote App Links on Jira Cloud
To set up your link between different Cloud sites, find Application Links through the administration panel (try the shortcut “GG” to pull up an administration panel you can search from).
From this point, copy/paste the url of the site and product you want to link:

If you are not the admin of the remote Cloud instance, a popup window will open in which you will have several options to configure this new link:

Otherwise, you’ll just be directed to the remote instance to confirm the link, then returned to your original instance. That’s it, you just integrated remote Jira and Confluence Cloud instances.
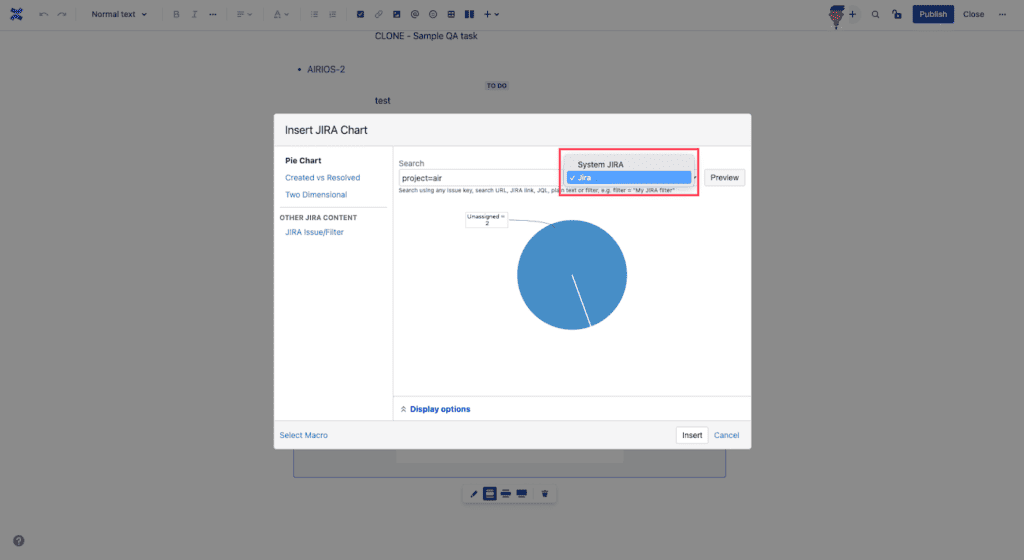
Your team can easily use the new Jira and Confluence integration: the remote Jira is accessible for example in the Confluence Jira chart with only a few clicks.
Maximize the benefits of your Jira and Confluence integration
Integrating Jira and Confluence sets the stage for more streamlined project management and boosts team productivity. This synergy ensures that the right information is accessible in the appropriate context, processes are optimized for efficiency, and potentially, your delivery timelines are accelerated.
Ready to practice? Try publishing your Jira Roadmap to Confluence, creating issues directly from Confluence, or even publishing issue data to a Confluence page. Learn more in our article 8 ways to use Jira and Confluence together.
Trello, Bitbucket, Opsgenie: you’re probably familiar with tools from the Atlassian suite, but today we’ll take a deeper look at the using Jira and Confluence together. Confluence is great for working on content, and Jira is built for task tracking, but together they provide even more help to your team. If your team is only working with Jira or just with Confluence, you might wonder how you can use them together. We’ll take a closer look at 8 ways you can use Jira and Confluence together and bring out the best in the tools and your team.
Using Jira and Confluence together
Integrate tools to centralize organizational data, avoiding scattered files and emails. Jira and Confluence streamline management for various content types.This integration is supported by a variety of templates that make setup quick and easy, enhancing both Confluence and Jira practices.
Benefits of using Jira and Confluence together
- Enhanced Cross-Team Communication: Linking Jira to Confluence ensures that technical details housed in Jira are readily accessible to teams operating within Confluence. This connectivity not only simplifies access but also fosters collaboration across technical and non-technical groups. According to Atlassian, “66% of Jira software customers who use confluence said that it helped them to boost communication between development and non-technical teams.”
- Increased Speed of Delivery: By replacing other documentation tools like SharePoint or Google Docs with Confluence, teams using Jira can accelerate project execution. Seamless access to necessary documentation within Confluence allows software development teams to operate more efficiently. According to Atlassian, “76% of Jira Software customers said they shipped projects faster after adding Confluence.”
- Improved Reporting for Business Teams: Jira’s robust reporting capabilities are well-utilized by developers and project managers who track progress with tools like sprint burn-down charts and status pie charts. By integrating these reporting features into Confluence, business teams gain easier access to critical data without needing to navigate complex interfaces, thus making strategic information more accessible and actionable.
How to use confluence and Jira together
Here are eight practical ways to integrate Confluence and Jira to enhance team collaboration. These examples will demonstrate how using these tools in tandem can streamline communication, accelerate project delivery, and strengthen team unity.
Example 1: Displaying Jira issues on a Confluence page
Confluence enables you to showcase details from Jira issues. You have the option to display individual issues, an issue count (based on a filter), or a table (also based on a filter). When you opt to display Jira issues in a table format on Confluence, you can tailor the display settings and select the specific data you wish to view and its arrangement, including the issue key, summary, due date, assignee, etc. By integrating Jira issues individually or via a filter onto a Confluence page, tasks are visible alongside related notes or project documentation. No jumping back and forth between tools!
Example 2: Create reports with Jira Charts
Enhance your retrospective pages or end-of-quarter reports by incorporating Jira Charts into your Confluence pages. This visual integration allows for impactful presentations and comprehensive data analysis.

Jira Charts will assist you in emphasizing essential data from Jira and sharing your findings within context by embedding them alongside explanations, useful macros, and supporting images or illustrations.
Example 3: Publish your Jira Roadmap to Confluence
Showcase your Jira roadmap on Confluence to provide all departments with access, allowing them to visualize team progress and enhance transparency regarding your product roadmap.
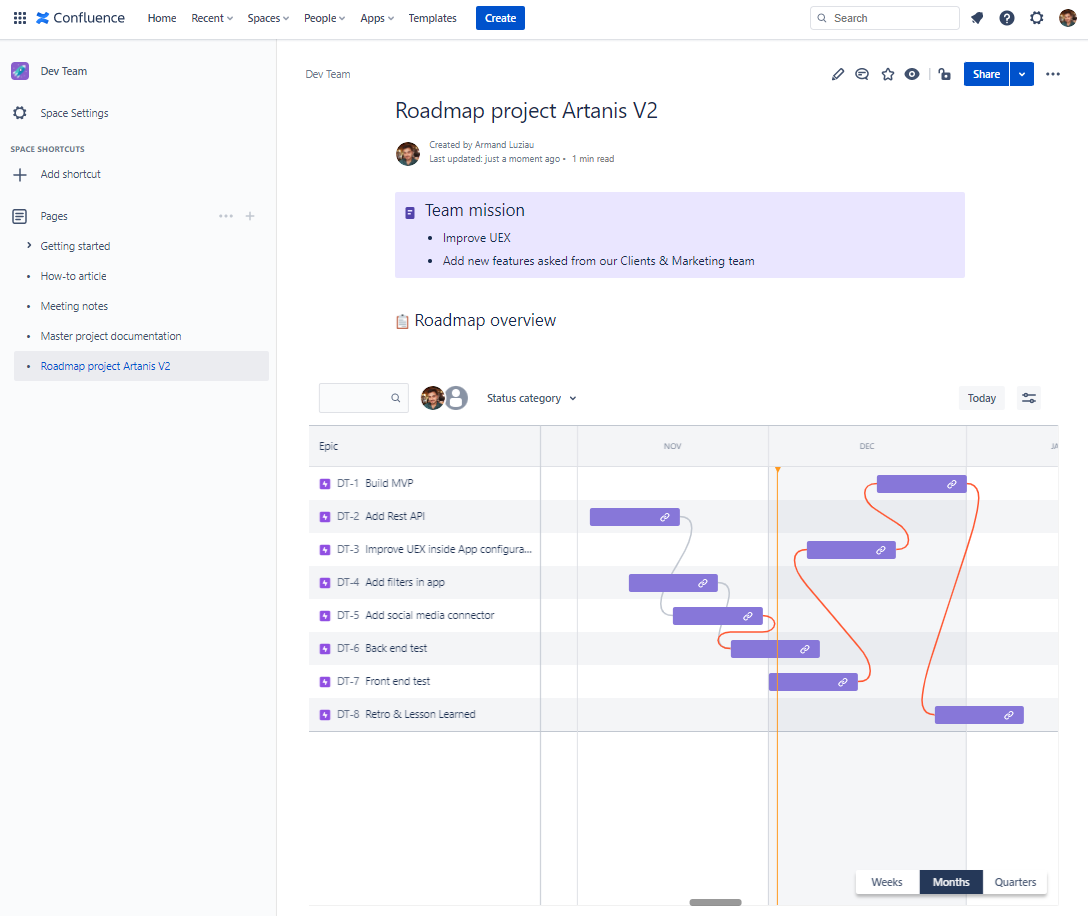
Embed your roadmap in Confluence for a comprehensive view while adding notes, wireframes, or other essential team information.
Discover how to maximize the use of Jira and Confluence with Elements Publish.
Example 4: Add a shortcut to a Jira project on Confluence
Integrate a direct link from a Confluence space to one or more Jira projects to facilitate quicker navigation. This Jira Confluence integration allows users to access the relevant Jira project directly from the Confluence space they are using, reducing the number of clicks required.
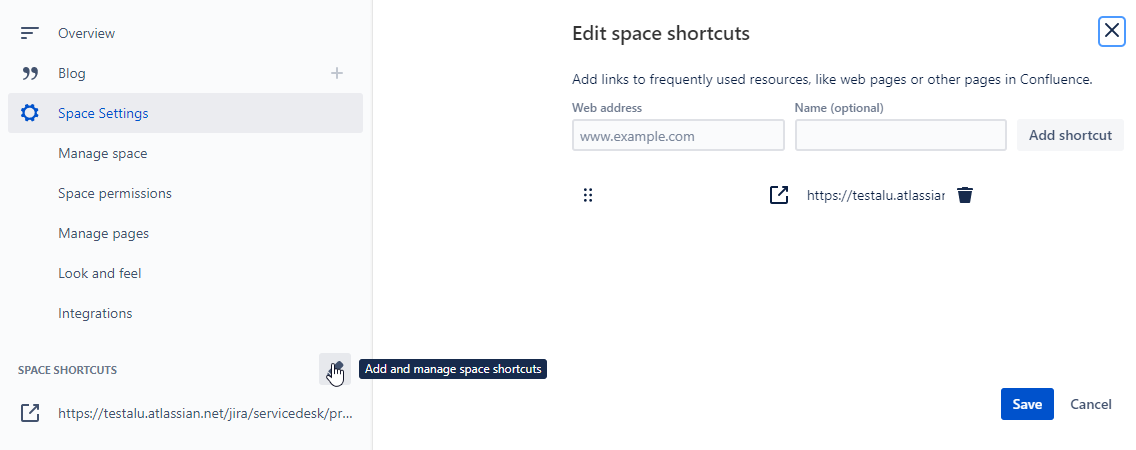
If your Jira instance hosts dozens or hundreds of projects, this shortcut will be highly valued by your users.
Example 5: Create issues directly from Confluence
Enhance your workflow with the ability to create Jira issues directly within Confluence. Highlight, select the issue type, and choose the project to create it.
This seamless Jira Confluence integration is ideal for those collaborating on Confluence pages that list tasks, product requirements, or bugs, allowing for swift conversion into Jira tasks. This feature streamlines processes, making it a best practice in Confluence integrations.
Example 6: Add links to Confluence pages from an issue
As your use of Confluence expands, navigating the increasing number of spaces and pages can become challenging for team members.
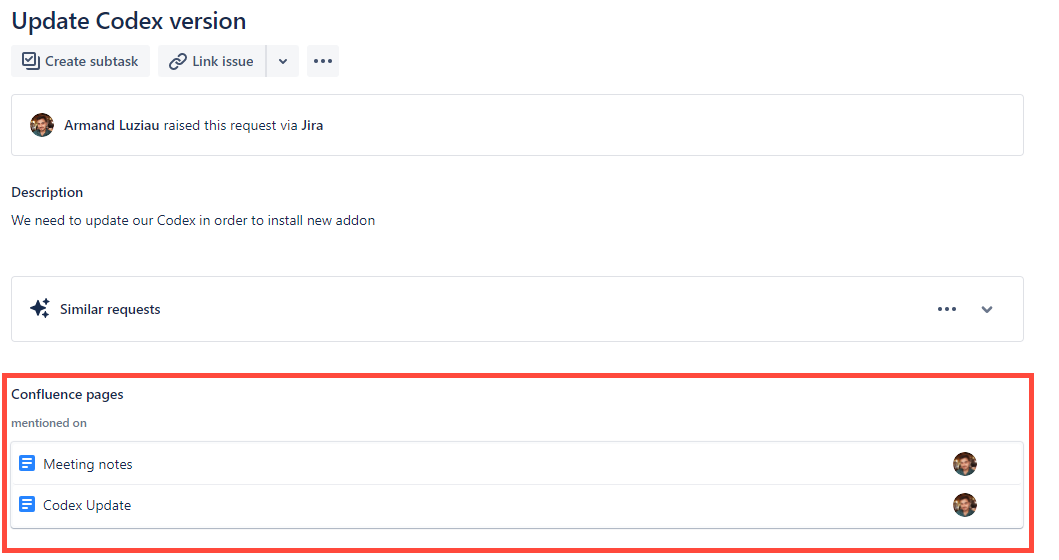
By implementing a direct link from a Jira issue to a related Confluence page, you facilitate easy access to additional information, reference materials, or relevant documents for anyone working on the issue. This Jira and Confluence integration ensures that team members can contribute effectively to the correct documents, enhancing productivity and ensuring continuity across platforms.
Example 7: Access Confluence project pages directly from Jira Software
When working within Jira Software, accessing relevant Confluence pages doesn’t require switching platforms. You can explore existing project pages directly from your Jira Software project thanks to the seamless Jira Confluence integration. Additionally, when you link your Jira Software project to a Confluence workspace, you can easily create a new, empty page. This integration enhances efficiency by allowing continuous access between Jira and Confluence, streamlining workflow and improving project management practices.
Similarly, you can compose a public Knowledge Base article directly from a request by enabling this feature in JSM.
Example 8: Publish issue data to Confluence
Want to turn your Jira issue into a Confluence page? Or include certain issue data on a page without having to copy & paste each field or download and re-add attachments? What about archiving an incident for a post-mortem? You can publish issue data, including attachments and labels, to a Confluence page with the Cloud app Elements Publish.
If you are on Data Center the on premise version of Elements Copy & Sync allows you to create Confluence pages with issue data.
Get your team using Jira and Confluence together
Enhance cross-team communication, accelerate project delivery, and streamline information retrieval by integrating Jira and Confluence. If you want to go further into the Jira and Confluence integration, check out the guides provided by Atlassian on using Confluence with Jira Software or Confluence with Jira Service Management. To learn more about publishing issue data to Confluence pages, check out our walk through of Elements Publish.
Jira and Confluence have probably come across your radar if you’re looking to help your company move beyond an old system like managing requests by email or passing around Word documents. You want to change the culture to be more agile, to use modern techniques for workflow management and project management. Both Jira and Confluence are great to keep track of what you are working on, the status of them, and for your stakeholders to get an at-a-glance update.
But why should you use one over the other? Or should you use both Jira and Confluence? Let’s cover the basic differences and similarities of the tools and explain why and how your team should use them.
What this guide covers
What is the difference between Jira and Confluence?
Jira is a task management solution that allows you to track and manage issues throughout the lifecycle of each task. Jira can help with everything from software development to incident management or even HR processes, whereas Confluence is a wiki-based content management tool that allows you create and organize information collaboratively. Organizations commonly use Confluence for knowledge bases, product documentation, or intranets. Both are inspired by agile methodologies and are built around collaboration, but where Jira is great at tracking the status of individual tasks in standardized views, Confluence is great at bringing broader information together with an emphasis on visual presentation and creativity.
Let’s take a quick look at the major features of Jira and Confluence.
Features
Jira
Jira comes in a 3 main flavors: Jira Software, Jira Service Management, and Jira Work Management. They all share core components and logic and allow you track issues, but each is geared towards specific needs or teams.
Jira Software: Powerful and flexible, Jira Software is built for software teams using agile methodologies, and includes functionalities for sprint planning, bug tracking, and release management. Jira Software allows you to track affect and fix versions, plan epics and user stories, and analyze your sprint burn down.
Jira Service Management: The ITSM solution from Atlassian, Jira Service Management is a support desk for customers or employees to raise requests. Agents can then manage requests in queues and make sure everyone gets the help they need. JSM provides out of the box configurations for IT service management like service requests, incident management, and change management, but can also be used for facilities management, HR, or even legal teams that need to manage incoming requests.
Jira Work Management: Jira made for business teams: Jira Work Management includes calendar views, Excel-like list views, and basic forms so business teams like marketing, HR, or sales can track tasks in Jira with features adapted to their needs. JWM is only offered on Cloud, though on premise users have a similar experience with Jira Core.
Confluence
Confluence provides your organization a place to organize ideas, content, and files for all your activities. Since Confluence takes care of version control, you can treat it as your one source of truth and rest assured it will always be the up to date version. Favorite features include the search power, content organization and permission management, and the easy WYSIWYG editor.
Limitations
Jira: If you are looking for more traditional project management software, perhaps that includes project cost tracking, Jira wasn’t built for that (although there are apps on the Marketplace to add that kind of functionality). Jira is really good at tracking and reporting on individual tasks, but for a broader vision of a project or version planning, it’s better to work in Confluence.
Confluence: Confluence does include the possibility to assign tasks, but tasks are either “To do” or “Done”. If you need to keep track of a more complex workflow, Jira is a better option. Similarly, if you need to track how much time was spent on a task, Jira is a better option than Confluence.
Pricing
Atlassian sets the price of both tools based on the number of users and is digressive, but Jira is a bit more expensive per user. You can adjust how many users have access to each tool so you only pay for what you need. Jira Service Management pricing is different because it’s based on the number of agents replying to requests (customers or employees creating the requests are free).
Get an estimate for how much it would cost your organization with the Atlassian Cloud pricing calculator
Don’t forget to budget for apps so you can customize Jira and Confluence for the specific needs of your organization.
Jira vs. Confluence: Comparison Chart
Cloud versions
| Feature | Jira | Confluence |
|---|---|---|
| Assigning tasks |  | |
| Workflow management | |  |
| Personal dashboard | | |
| Templates | | |
| Support desk | | |
| Knowledge management | | |
| Access control/permissions | | |
| Collaborating/commenting | | |
| Roadmap planning | Very detailed | Basic |
| Project management | | |
| Calendar view of tasks | Jira Work Management only | |
| External app integrations (AD, CRM, Google Drive…) | with apps | with apps |
| Time tracking | | |
| Native reporting | | Premium only |
Why use Jira and Confluence together?
By using Jira and Confluence together, you benefit from their complementarity: Jira to keep track of distinct tasks individuals need to work on, and Confluence share and organize all of the ideas, content, and files you collaborate on with your colleagues.
Single source of truth
By using collaborative tools that allow everyone on your team to create, update, and share information in real time, you’ll be able to treat Jira and Confluence as your single source of truth. Whether you need to know which bug fixes are in QA review, where the most up to date documentation pages are, or the roadmap for the marketing team, Jira and Confluence allow everyone to access the same information.
Break down communication barriers
Software developers may spend more time in Jira, and business teams more time in Confluence, but by integrating the tools, everyone can access the information they need from the rest of your organization. Instead of information siloed by team, everyone can access what they need. Imagine the flow of ideas when UX designers, Product managers, and Marketing can work from the same page, instead of sharing each update or comment separately.
Improve efficiency
When requirements are listed in Confluence, and linked to Jira issues, and those issues also link to product documentation in Confluence, there’s no searching for information or struggling to make tools talk to each other. Teams that use Jira and Confluence together are more efficient because they spend less time keeping track of work and more time on the work.
How to integrate Jira and Confluence
For Cloud users, integrating Jira and Confluence is automatic as soon as you have both products on the same site. If you only have Jira or Confluence, you can add another product is just a few steps:
Step 1: Open the Settings menu from next to your user icon on the top right of Jira or Confluence, and select Billing.
Step 2: Once in your Atlassian Admin, click on Products in the top menu (between Directory and Security).
Step 3: You will see the products you currently have. Click on “Add Product” and follow the set up wizard to add the additional product to your site.
If you are using Jira or Confluence on premise (Server or Data Center hosting), you will need to go to ![]()
![]() > General Configuration > Application links, Enter the URL of the application you want to link to, and configure with OAuth (with impersonation) authentication. Read Atlassian documentation for more details.
> General Configuration > Application links, Enter the URL of the application you want to link to, and configure with OAuth (with impersonation) authentication. Read Atlassian documentation for more details.
[vc_row][vc_column][vc_column_text css=”.vc_custom_1622193388776{border-top-width: 2px !important;border-right-width: 2px !important;border-bottom-width: 2px !important;border-left-width: 2px !important;padding-top: 20px !important;padding-right: 40px !important;padding-bottom: 20px !important;padding-left: 40px !important;background-color: #f5f5f5 !important;border-left-color: #f5f5f5 !important;border-right-color: #f5f5f5 !important;border-top-color: #f5f5f5 !important;border-bottom-color: #f5f5f5 !important;}”]
✅ Check out our guide on how to integrate Jira and Confluence
[/vc_column_text][/vc_column][/vc_row]
How to use Jira and Confluence together
A picture’s better than a thousand words, right? So here are two examples of how to use Jira and Confluence together for project management or requirements management.
Confluence and Jira for project management
Let’s take an example project you might be familiar with: migrating applications.
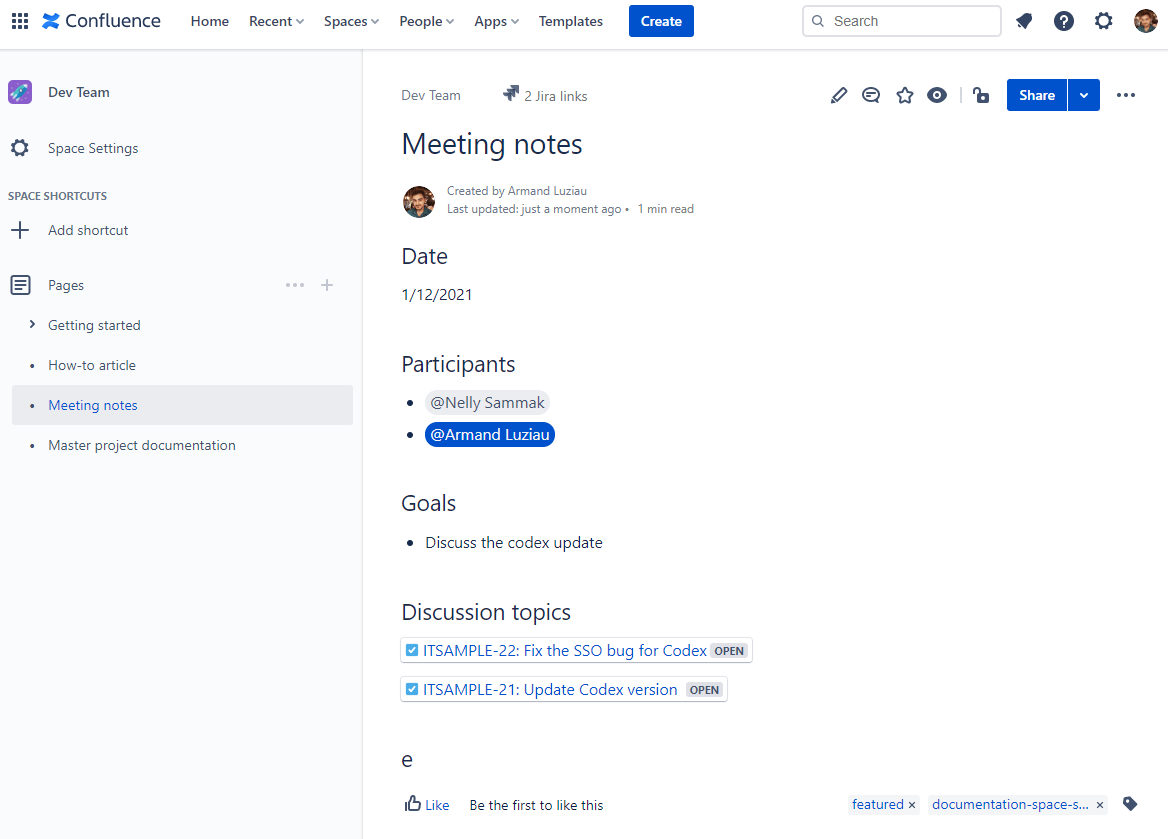
Many teams will start off with kick-off planning in Confluence, where you can take advantage of page templates like Project Plan, Meeting Notes, or DACI, tag everyone involved in the meeting, and start noting tasks, deadlines, and action items.
From there, you can create Jira issues for the tasks and assign them. If you are the Project Manager, you can track and share progress of the various tasks by using a filter to display all the issues related to the project on a Confluence page.
As the migration project continues, the team can use Confluence for functional specifications, technical documentation, and feedback on the migrated tool, with everyone on the team able to see, comment, and collaborate on those documents. Any files or assets needed can be added to each page, so team members don’t have to remember where to look on a shared drive. If configurations or features need to be reviewed once the application has been migrated, you can use a ‘Review’ status in your Jira workflow and assign the issue to a team member.
Jira and Confluence for requirements management
Create, share, get feedback, update, rinse and repeat: Jira and Confluence are the agile solution to requirements management throughout the life of your product development.
Confluence ships with a blueprint, or template, for requirements management, so you can get started right out of the gate. You can then solicit feedback and comments from multiple stakeholders, who can either comment the text directly, comment the page, or update it themselves (you can always check the page history to see the changes).
If you have customer interviews or other research that is useful background information, you can link those pages directly from your requirements management page.
As the requirements are detailed, you can start creating User Stories for them in Jira directly from Confluence by highlighting the text.
If you need to include wireframes, mockups, or prototypes on a Confluence page, there are multiple apps that allow you to do that so everyone can keep all your work together. Team members can even comment mock ups just like text or other images.
Confluence automatically creates a page summarizing the main details from all your requirements management pages if you use the blueprint, so you can see at a glance the progress of all your different projects.
Get your team on Jira and Confluence
You want an agile, modern solution for your team, and Jira and Confluence provide that. By using them together, you’ll get the most out of both tools and see the benefits: a single source of truth, breaking down communication barriers between teams, and improved efficiency. The whole really is more than the sum of the parts! Curious to learn some concrete examples of the different ways you can use Jira and Confluence together?
We at Elements like a challenge, so naturally participating in Atlassian’s Codegeist is something we look forward to each year. What is Codegeist? It’s the annual developer contest that helps teams unleash their potential by building Atlassian apps. In 2020 we submitted beta versions of our Jira cloud apps Elements Connect as well as Elements Copy & Sync. We were in the starting blocks this spring, waiting for the 2021 contest. Finally this summer (for us in the northern hemisphere 😉 ) they announced it! Check out the Codegeist 2021 details and project gallery over on Devpost.
But this year it was all on Forge 😮 (okay we weren’t actually that surprised; Forge is the future of apps for Atlassian). Here’s the behind the scenes experience of our submissions SkillQuest and Office Manager.
What is Forge?
Forge is Atlassian’s new developer framework, and since it will probably be the main developer platform in the future for Atlassian apps, we actually didn’t wait for Codegeist to start to get our hands dirty. With some developers, we started “Forge Sessions”, a dedicated time to learn and explore Forge by creating apps with a real purpose. Once the Codegeist was announced, we figured it was a good opportunity to propose some of our most advanced prototypes.
Our experience developing on Forge
What we liked
Right away, we liked working with Forge because it is so fast to get a functioning app deployed on our Atlassian products. The Forge environment is really developer friendly (our thought is that non-developers are targeted by this framework). Also the fact you don’t have to worry about the infrastructure really gives you peace of mind. Forge provides Function as a Service (FaaS) to developers. All you need is to write a Javascript / Typescript function with your business logic inside, then register its name to your app manifest. Forge will automatically deploy it into an isolated FaaS environment.
What was frustrating
But we couldn’t help feeling frustrated by some lack of functionalities due to the framework being so recent. As an example, some cool locations like the Jira general pages or post installation pages are not available yet. Some new comers, like UI Kit (which allow you to build interfaces for your application) would require more components to address more common use cases. We also ran into several Forge APIs that don’t have a Typescript declaration (or are not completely typed) which can slow down development.
Even though Forge doesn’t contain all the features of is big brother, Atlassian Connect, the team is really reactive (with at least one release each two weeks) and some of the missing features are already listed on the Forge Roadmap.
Testing Forge Storage
During the process of creating an application with Forge, our plan was to not use an external backend (using a Cloud provider). Everything should be handled by Forge functions, in order to deeply test the possibilities of the framework and to quickly develop our prototypes. Note that it’s possible to build Atlassian Connect apps on Forge, to use feature of both frameworks, but it’s still in beta. This approach lead us to work heavily with a new feature: the Forge Storage, a place to store dictionaries of data, which are dedicated to our app and a tie to an Atlassian instance. Again, the Forge Storage API is recent and doesn’t provide a lot of advanced features (like advanced query or results sorting) but can be used anyway.
In the end, our Elements developers worked on 6 apps, and we submitted SkillQuest and Office Manager early September 2021. It was a bit tricky since the contest ran during our summer and some team members were on vacation, but we’re proud of what we were able to submit.


For anyone looking to give Forge a try, some knowledge of Javascript / Typescript and some basic concepts of Jira and Confluence are necessary to be able to create an app. It should be noted that the Atlassian community for Forge was really reactive and a big help for anyone developing on Forge.
What we learned along the way
The great thing about participating in Codegeist was that we learned just how fast you complete an app with Forge.
One of the most challenging features we worked on was the Office Manager office editor was the most complex part. We had to go back to trigonometric math and transformation matrix; that’s not something we do often when developing Jira add-ons!
Retrospectively, we wouldn’t do it the same way. It was really fun to do and a great opportunity to play with HTML Canvas, but unfortunately it’s now very complex to add some features to the map. It we had to redevelop the office editor, we’d check for third-party library first and if nothing match our need, develop by our own with maintainability as a priority.
For the future
At Elements, we will continue with our Forge sessions, and we want to explore the “Connect on Forge” app side to prepare a potential migration of our existing Atlassian Connect apps. We plan on utilizing what we learned through our participation in Codegeist by bringing everyone on our team up to speed on Forge. We’ve created a sample app developers create as an exercise so they familiarize themselves with all the features on Forge.
To learn Forge, our developers have to connect Jira to Cat as a Service so that cute cats are automatically added to new issues. The goal of the exercise is create an app with this structure that uses:
- main forge features like Forge Storage, Forge bridge and Forge API;
- and also Forge triggers to automatically generate a cat picture once the issue is created;

with an end result that looks like this.
You probably already use Jira and Confluence together, for example adding a link to a Confluence page to a Jira issue or creating a Jira issue by highlighting text on a Confluence page.
But what about creating a Confluence page from a Jira Cloud issue? We’re thrilled to share that it’s now possible with our new app for Jira Cloud: Elements Publish to Confluence.
Elements Publish to Confluence simplifies the process of creating a Confluence page directly from Jira, 0 scripting or webhooks required, and it can be set up in minutes for teams using Jira Software, Jira Service Management, or Jira Work Management.
Create a Confluence Page from Jira
Elements Publish to Confluence lets you design templates to publish issue data to Confluence as part of your team processes. Each recipe allows you to design a different page, specify where it will be created in Confluence, and from which Jira issues it can be used.
When creating your template, you can insert issue data, specify whether or not labels and attachments should be copied from Jira to the Confluence page, and also decide if you want a link added.
In Jira create Confluence page from template
It’s easy to set up a recipe in Elements Publish to Confluence.
Step 1: Define where the recipe will be available
Do you want to create a page for bug analysis? Make your recipe only available for bug issues. Need to publish issue details for a post-mortem? Set the issue type then the status to resolved (tip: you can trigger the recipe when the issue is resolved). Want to create a page for marketing campaign notes? Make the recipe only available in the Marketing project.
Step 2: Define where the page will be created
If we could read your mind, we would. But for now you need to chose the Confluence space and the parent page where you want the new page to be created.
You can also activate in the Target tab the option to automatically add a link to the Confluence page in your Jira issue.
Step 3: Design your page
Finally the good stuff!
The in-app text editor lets you configure the content and layout of your document. With the wysiwig editor, it’s easy to insert data from your Jira issue into your Confluence page, and you know what your page will look like. To provide a complete picture of what is in the Jira issue, you can also copy attachments and labels to your Confluence page.
Is your team already using Confluence templates, like the ones provided by Atlassian or maybe one you created? No worries, you can keep using them: you can inject Jira data into any existing Confluence template.
💡 Tip: set up the page title combining static text like “Bug analysis of:” with details from the issue like the summary or key. Your page title will be dynamically created each time the recipe is used.
Activate your recipe, and you’re ready!
Trigger Confluence page creation automatically from Jira with a post-function
Has your team forgotten to create and link the bug analysis/post-mortem/knowledge base article AGAIN?
Make it easy for everyone by adding a recipe as a post-function to a workflow transition. When Jira users transition the issue, the new page will automatically be created in Confluence. This is a perfect opportunity to use the issue summary to dynamically create the page title since users won’t be able to modify the page title when the recipe is triggered by a transition.
If you have several post-functions already added to your workflow transition, you may want to add a few seconds delay to the execution of the Elements Publish to Confluence recipe to optimize the performance of your instance.
Publish to Confluence: post-mortems, meeting notes, marketing campaigns & more
Elements Publish to Confluence can help lots of different teams that need to regularly create pages with details from Jira, no matter whether they are using Jira Software, Jira Service Management, or Jira Work Management. Here are some of our favorite use cases:
- Bug analysis: insert details from bugs raised on your support portal onto a Confluence page so team members can add details and analysis
- Post-mortem: add the recipe as a post-function to a workflow transition and automatically create a post-mortem in Confluence and insert details from your Jira issue when you transition the incident to closed
- User story details: insert details from the User story and Epic onto a pre-formated Confluence page to add details
- Release details: automatically generate a Confluence page with all the details from a release ticket when you transition it to done by adding the recipe as a post-function
- Knowledge Base article: apply labels from the Jira issue to your Confluence page and make information easily searchable
- Meeting notes: use the dynamic page title option to generate a page for notes based on the summary of the issue and activate the link option so meetings notes are easy to find from the issue
- Marketing campaign: insert all the campaign details and collaterals from your Jira issue onto a Confluence page and get started on the details of your marketing campaign
- Employee onboarding: new hire request received on Jira Work Management? Publish all the details on a Confluence page where the manager or team members can add details
- RFP process: Jira Work Management forms are perfect for the RFP process, and everything submitted can be easily published to a Confluence page for the next step in the process
Have you made it this far only to realize this won’t work for you because you are on Jira Server or Data Center? We’ve got you covered: our on premise version of Elements Copy & Sync allows you to create Confluence pages.
Start creating pages from Jira
Sound like something your team would like? Get started with a free trial, then let us know what you think.
What do you do when it’s been 15 months since your entire team has been in the office, and you also want to improve your web application security skills? A hackathon!

With Covid restrictions lifting and the vaccination rate increasing, the Elements engineering team organized an in person, in office hackathon focused on security vulnerabilities, with a little help from the local pizzeria 😉
Preparing the hackathon
Security is a big priority for our teams, and Elements’ participation in Atlassian Bug Bounty means engineers are regularly working to improve our apps’ security. But why wait for bugs to be found when you can develop your skills as a team? Software developer Houssem Aloulou had previously participated in and helped organize Hackfests during his studies in Tunisia, and had lots of ideas about how Elements could hold its own hackathon. Focused on web application security, Houssem prepared the event using the Catch the flag (CTF) format.

“I chose the Catch the Flag format because it’s culture is really rich, with a focus on the experience, where collaborating and sharing knowledge between team members is the main focus.”
Ready, set, code!
On Monday June 21, 19 Elements engineers were randomly split into 5 different teams to work on the 9 challenges. Equipped with fun t-shirts and snacks, engineers worked from 10 am to 4pm.
Each challenge earned teams a number of points based on the difficulty, and with half an hour to go before the end of the day, team <script>alert(*La Bamboche*)</script> finished all 9 challenges, with team ILOVEYOU in a strong second place just 2 minutes later.

Houssem explains how he set up the challenges: “I took examples from real security problems we have faced, and wanted participants to think about the impact of those kinds of bugs. The challenges used several servers with several vulnerabilities, and the team that exploited the vulnerability found the flag.”
Each challenge earned teams different points, based on the difficulty, but using hints reduced the earn-able points. Some people tried to get Houssem to reveal a few secrets, but his lips were sealed! An hour before the end of the event, the team scores were hidden so teams didn’t know how close the competition was.

Looking back, and to the future
What did participants have to say about the event?
“A playful way to increase awareness around the different types of attacks and also to work as a team.”
“Inter-squad teams, working together, the escape game feeling: overall a great way to commit to memory the most important topics related to security.”
Based on the feedback, we hope to repeat the event in the future, potentially with more diverse challenges including server breach, man in the middle or other topics.
Sound like an event you’d like to participate in? We’re hiring!
Cloning and moving is the most time efficient solution to make existing information useful for other people or additional situations within Jira. A classic example is issue escalation, where you need to clone an issue from your support portal to a software team. Or maybe you have issues created regularly by internal employees, and you want to be able to clone an issue to another project based on a custom field.
What are the options for automating a process to clone and move Jira issues based on a custom field? We’ll take a look how you can clone and move Jira issues based on a custom field with native Jira options, as well as with an app. We’ll also see how automating copies as part of a workflow transition with Elements Copy & Sync can help your team.
Jira out of the box clone and move options
Issues can be cloned and moved individually with native Jira features available from the action menu. The manual process is fully detailed in our Ultimate guide to clone and move Jira issues.
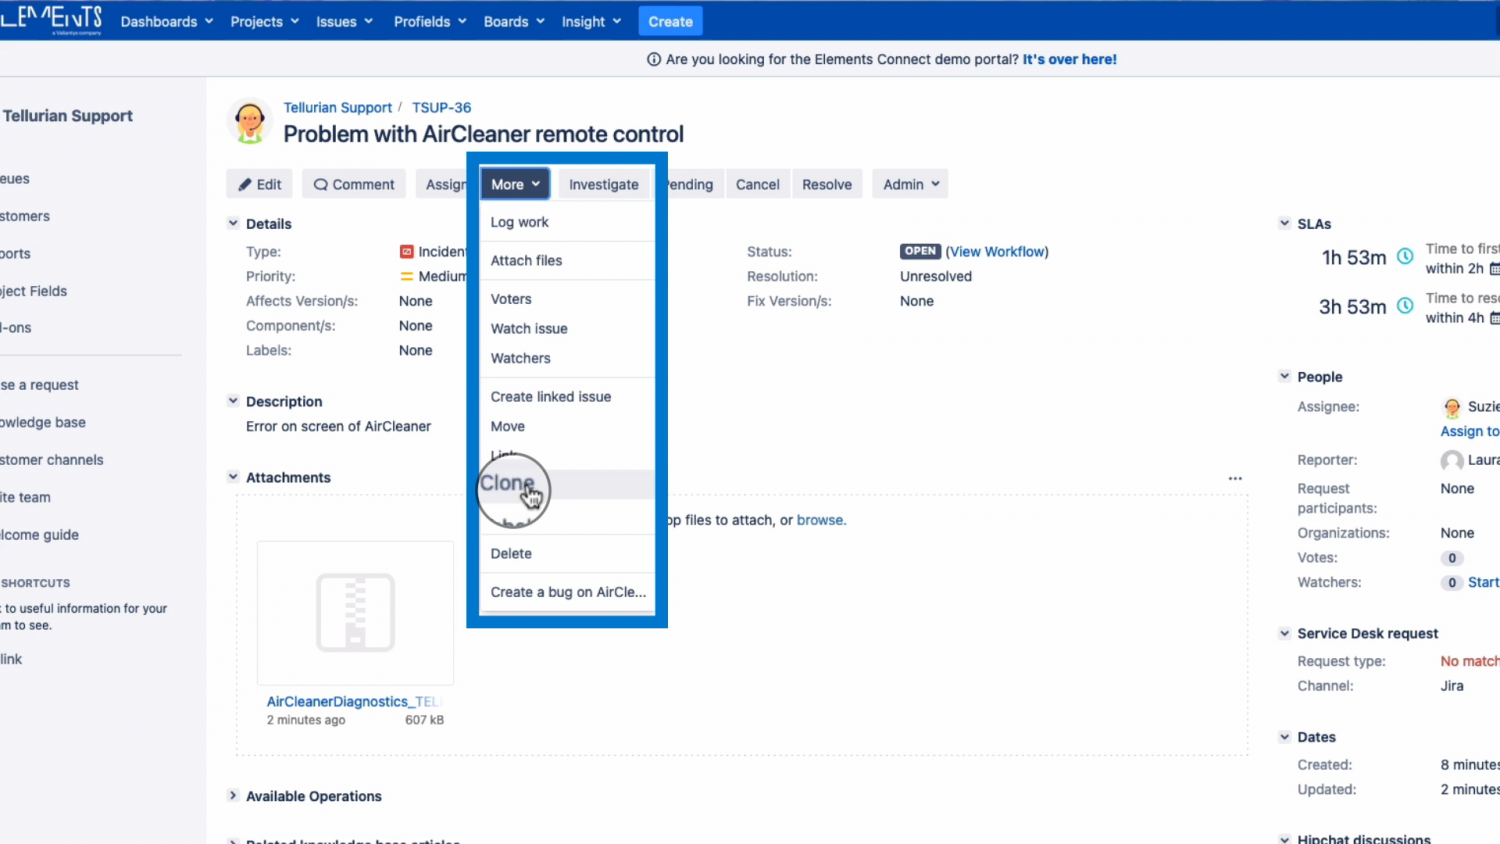
How frequently do you need to clone and move issues? If it’s just a couple times a month, this could be the best option. Jira users would just need to check the details in the issue, and move the clone manually. Note you can’t see the issue details after you click on Move, so if you need to select a project based on those details, make a mental note beforehand.
How to clone issue to a different project based on a custom field
Looking to make the process automatic? Or reduce the risk of errors? You can streamline the process (and prevent moving issues to wrong projects) by using an Elements Copy & Sync operation (Server or Data Center) or recipe (Cloud). It works by
- setting a project picker custom field,
- launching the Copy & Sync operation/recipe, and
- creating a linked clone in the right project.
Let’s look at how you can set this up on Jira Server or Data Center. If you are on Jira Cloud, follow this Elements Copy & Sync Cloud tutorial.
Step 1: Create a project picker custom field
From your Jira admin, create a new custom field, selecting “Project Picker” from among the Advanced field types. Give it a clear and understandable name that is unique to your Jira instance, and save.
Step 2: Add project picker custom field to issue screens
Don’t forget to associate your custom field to all the various screens where you’ll need it, like the view/edit screen. New custom fields are added to the end of the tab on the create issue screen, so you may need to adjust the order of your fields.
Step 3: Configure Copy & Sync operation
If this is your first time configuring Elements Copy & Sync, you will need to create a field mapping before creating your operation.
Once you have a field mapping, you can create a copy operation. When configuring the operation, instead of selecting one project or a category of projects, select “From Custom Field”, and then chose the project picker custom field that is displayed.
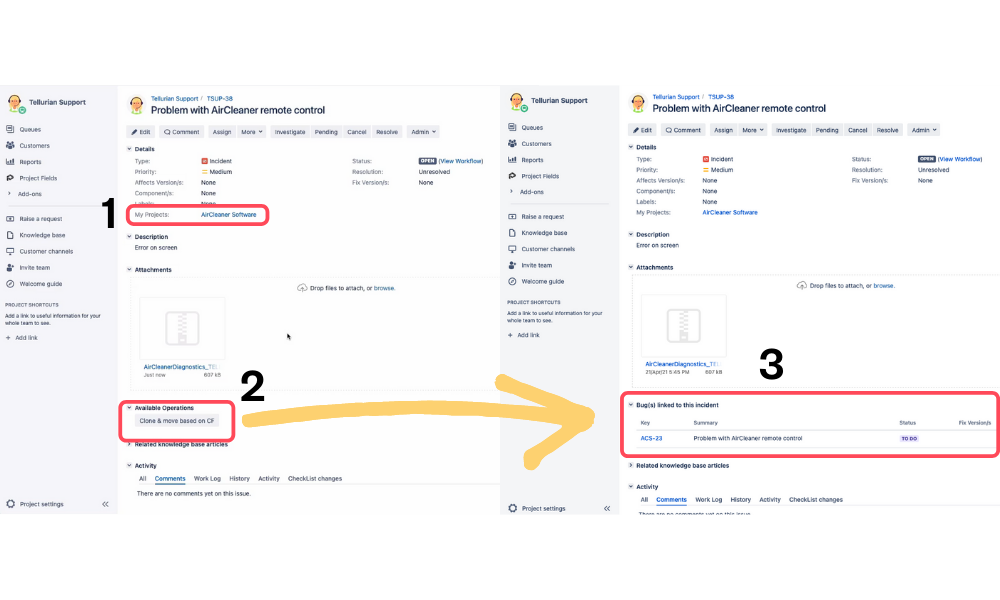
Step 4: Clone and move issue based on your custom field
From your issue, make sure your project picker field has a value, then click on the Elements Copy & Sync operation button to create the clone in the right project. In this example, the operation also adds a link between the clone and original issue.
Trigger clones as part of a workflow and create on transition
Copy & Sync operations can be added as post functions to workflow transitions to make the process even smoother. Elements Copy & Sync will automatically clone issues to the right project when you transition issues.
To add an Elements Copy & Sync operation to a transition, you will need to edit your workflow and add a post-function.
Once you’ve published your new workflow, you probably want to add the project picker custom field to the transition screen that will trigger the operation so that it’s easy for agents to update the field. This is what that process could look like:
This example also includes an Elements Copy & Sync Data Panel on the incident issue, which helps you customize the information you display from linked issues (for comparison, the cloned issue in the software project has the native linked issue panel).
Using the operation as part of a workflow transition was smooth and easy: support agents can follow their usual process and transition issues, then go back to their queues. All the important information from the source issue has been cloned in to the right project for the software developers.
Automated cloning and moving is a recipe for success
The combination of native Jira project picker custom fields with the app Elements Copy & Sync is a recipe for success for cloning and moving issues to different projects (you could even say it makes it a piece of cake 😉 ). All Jira users can confidently clone and move issues based on a custom field, without worrying about remembering which project to chose. Adding the clone and move operation to a workflow transition means reducing the risk of errors as well. You can even compare the number of clicks required to manually clone and move an issue versus using Elements Copy & Sync!
Curious how a real company implemented Elements Copy & Sync to escalate issues from a support portal?
Clone Jira issues across projects, teams and instances
TL;DR
- Three ways to clone Jira issues: native Jira clone, Automation for Jira, or a dedicated app like Elements Copy & Sync.
- Clone vs duplicate: a clone is a copy of a work item; a duplicate flags that two work items report the same thing.
- Native options are free but manual; Automation adds control but has global-rule execution limits and no attachment cloning.
- Copy project across instances: you can copy a Jira project from one instance to another and keep work items synchronized across Jira Cloud sites.
- Permissions matter at scale: restrict who can clone and where, using roles, JQL conditions, or recipe triggers.
There are many reasons you might need to clone Jira issues: escalating a ticket from a service desk to a software project, replicating tasks across teams, or bulk cloning issues in Jira to migrate an entire project. Sometimes it’s simply about sharing issue details with someone who lacks access to the source project.
Jira includes native clone and move features, but they fall short the moment your needs go beyond a simple one-off copy: no bulk operations, no comment syncing, no cross-instance support.
In this guide, we cover every option to clone and move Jira issues, from native features to Automation to dedicated apps, so you can find the right approach whether you need to copy a Jira project from one instance to another, build reusable Jira project templates, or streamline a recurring workflow.
When should you clone an issue to another project?
Cloning issues is the most time-efficient way to make existing information useful for other people or additional situations in Jira. Common scenarios include:
- Move work items from the designer’s board to the developer’s project
- Share a bug or change request from a support portal with an engineering team
- Clone between company-managed and team-managed spaces
- Move or clone issues from instance A to B, and vice versa
- Replicate an epic for multiple teams that each have a project
- Clone a task from the current project to add it to an epic in another project
- Migrate all the issues from one project to another
You already hold a lot of information from a customer or an employee, and you have likely spent time configuring those fields. Reusing that data helps your whole team get more out of Jira.
What is the difference between cloning and duplicating in Jira?
In Jira, a clone is a work item created by copying another work item. A duplicate is a work item that repeats another, typically flagged when two reporters raise the same bug and the later reporter doesn’t know it already exists.

The words are synonyms in everyday language, but in Jira they are two distinct link types that serve different purposes: clone records that one item is a copy of another, while duplicate marks redundant reports.
How do you clone issues in Jira?
Methods fall into two categories: native Jira features (native cloning or Jira Automation) or Atlassian Marketplace apps.
Option 1: How to natively clone a Jira issue
To clone a Jira issue, open the issue, select Clone from the Actions menu.

Jira creates a copy prefixed with “CLONE” at the start of the new summary and lets you optionally include links. No other options are available.

To move the work item, select the destination project and item type, map the statuses, then update any fields. If the new item has required or custom fields (like a story-points estimate on a Story), you may need to complete them before finishing. On Jira Cloud a clone link to the original remains after the move, you can remove it.

When moving a work item with custom fields, make sure the fields exist on the target project and even then you may be prompted to set values. Between team-managed and company-managed spaces, you may not be able to clone everything, since team-managed spaces are self-contained and don’t share custom fields.
Pros and Cons of using Jira native cloning feature
| Pros | Cons |
| Free, built in, nothing to configure ahead of time | Manual and click-heavy for every clone |
| Clones most fields and attachments | No comment cloning; no synchronization |
| Simple for small instances/teams | Error-prone and slow at scale (many projects/users) |
Native cloning is free, built-in, and requires zero configuration, making it a perfectly valid option for small teams with occasional, straightforward needs.
That said, it shows its limits quickly: no bulk cloning, no comment or time tracking sync, no support for copying a Jira project from one instance to another, and a multi-step process that becomes error-prone when repeated across many projects or by multiple team members. If any of those constraints apply to your situation, Automation or a dedicated app will serve you better.
Option 2: How to clone Jira issues with Automation
Automation is included in Jira Cloud. It can clone an issue, or create a new work item in a different space and copy values across. Get started from the Automation template library, which includes a rule that clones an issue to another project and links the two when an item is transitioned.
Automation clones won’t copy attachments, links, or comments by default, though you can build additional rules to sync comments.

Pros and Cons of using Jira Automation
| Pros | Cons |
| Included in Jira Cloud; large community | Global rules (multi-project) have monthly execution limits |
| Strong control over which fields are cloned | Complex cloning (multiple fields or full hierarchy) requires to set up several rules |
| Can trigger manually or automatically | Advanced field values need JSON; no attachment cloning |
Jira Automation is a solid middle ground, more powerful than native cloning, and already included in Jira Cloud. It works well for teams with structured processes that can be fully automated, like triggering a clone on a workflow transition.
That said, the setup complexity is real: configuring custom field mapping requires writing valid JSON, rules need ongoing maintenance, and attachments cannot be cloned at all. More advanced workflows, like cloning a project with its subtasks or escalating an issue to another project, require chaining multiple rules together, which adds significant complexity and technical overhead. Execution limits on global rules (those spanning multiple projects) can also be a constraint at scale. For straightforward, fully automated triggers, Automation does the job but if your team needs flexibility, field mapping without code, or attachment copying, it’s worth considering a dedicated marketplace app.
Read more about what to choose between Jira Automation and Elements Copy & Sync depending on your specific use case
Option 3: How to clone Jira issues with Elements Copy & Sync
Apps add flexibility, and Elements Copy & Sync balances robust features with friendly configuration. You first build a recipe: conditions for which work items can be copied (space, item types, priority), where the clone is created (space and item type, fixed or user-selectable), and what is cloned (fields, attachments, comments). Field mapping makes it easy to copy, for example, the Description of the source into the Environment field of the new item.

Once a recipe is active, you can run it either from the Actions menu, as a workflow post-function so cloning happens during a transition or from an Automation rule. Read more about recipe triggers.
Escalate a Jira issue from your support team to your dev team
When a customer raises a request that requires engineering work, you can configure a recipe to instantly clone the JSM issue into the right Jira project, with all relevant fields, attachments, and comments copied across, and changes synchronized in both directions as the issue progresses.
Check the demo on issue escalation
Bulk clone many Jira issues at once
Need to replicate an entire project setup? You can bulk clone multiple Jira issues at once (epics, stories, tasks, and subtasks) reusing existing project structures as templates. This is useful for onboarding new clients or launching repeatable projects while reducing manual error.
Follow the step-by-step guide to bulk clone Jira issues
Copy a Jira project from one instance to another
Work doesn’t always stay in one Jira instance. You can clone and synchronize issues across multiple Jira Cloud sites. It is useful when you copy a Jira project from one instance to another, coordinate with external partners, or work across subsidiaries, keeping key information aligned with live updates when items change.
Read more on how to clone and sync Jira issues across different instances
Automatically synchronize cloned issues
What sets Elements Copy & Sync apart from native cloning and most other apps is that any cloned issue can be kept synchronized with its source. When a field is updated, a comment is added, or an attachment is changed on the original issue, those changes are automatically reflected on the clone and you can configure synchronization to go in one direction or both. This is a game changer for cross-team workflows where multiple people need to work on linked issues without manually keeping them up to date.

Check how to synchronize cloned Jira issues
Pros and Cons of using Elements Copy & Sync
| Pros | Cons |
| Fine-grained recipe configuration: fields, attachments, comments | Paid add-on |
| Automatic synchronization between source and cloned issues | Initial recipe setup required |
| Works across multiple Jira Cloud instances | |
| Bulk clone epics, stories, tasks, and subtasks at once | |
| Post-function option: cloning runs in the background, no extra clicks | |
| Guided process reduces user error |
Elements Copy & Sync is the right choice when cloning is a recurring part of your workflows, not a one-off action. If you need to escalate issues between teams, bulk clone Jira issues to replicate a project structure, copy a Jira project from one instance to another, or simply ensure that cloned issues stay automatically synchronized, it covers what neither native cloning nor Automation can handle on their own. The upfront recipe configuration is minimal compared to the time it saves at scale.
How do you control who can clone issues in Jira?
With a handful of users, controlling cloning may not feel essential. As adoption spreads; say from 10 projects to 60, the risk of cloning the wrong item or moving a clone to the wrong space rises, creating clean-up work.
Native Jira
In Jira Cloud, there is no dedicated clone permission: any user with the Create Issues permission can clone an issue, with no way to restrict this by role or user group out of the box.
Automation
Rule conditions can check whether a user exists or belongs to a group before executing, limiting cloning to a subset of users.
Elements Copy & Sync
You can restrict which work items can be cloned (by type, priority, status, or a JQL filter) and where, plus set permissions by user, group, or role.

See the recipe triggers and user-restriction settings in the documentation.
How do you clone an issue from Jira Service Management to Jira?
Here is a common scenario to clone an issue from JSM to Jira: a customer raises a request on a Jira Service Management portal that requires the development team. The bug details need to be cloned and moved into the developers’ project so they can add it to a sprint.
With a recipe-based approach, the recipe might be available for all item types on the support desk that are In Progress, creating the clone in one of three pre-selected spaces as a Bug with a “blocks” link. The recipe summary shows whether fields, comments, and attachments are copied, and whether synchronization is active so later changes on the support desk flow to the clone.
Two extras help in this situation:
- Show the cloned item’s status on the customer portal so requesters stay informed (users need permissions on the linked items).
- Synchronize fields, comments, and attachments from the JSM item to the software item, in the direction you choose, so developers receive new information the customer adds later.
Watch how to clone a Jira issue from Jira Service Management to Jira.
What are the best practices for managing cloning in Jira?
- Assign users to the correct roles or groups, especially if you limit move permissions by role.
- Review custom fields across projects so the cloned item stays coherent in its new project.
- Check the source and destination workflows.
- Ask project admins how users should clone and move: individually, choosing the target themselves, invisibly via post-function, or in bulk?
- Test any clone-and-move app in a staging instance first.
By picking the option that fits your needs, you optimize your instance for users and simplify instance administration.
Frequently asked questions about cloning Jira issues
Can you clone a Jira issue to another project?
Yes. Clone the issue from the Actions menu, then use Move to send the copy to another project, mapping statuses and required fields. Automation rules and apps can also clone directly into another project, including as a workflow post-function.
Can you bulk clone Jira issues?
Native Jira clones one work item at a time. To bulk clone, replicating epics, stories, tasks, and subtasks together, you need Automation rules or an app such as Elements Copy & Sync, which can clone entire project structures at once.
How do you copy a Jira project from one instance to another?
Native move works within a single instance only. To copy a Jira project from one instance to another, use an app that clones and synchronizes work items across Jira Cloud sites, keeping fields, comments, and attachments aligned with live updates.
Does cloning a Jira issue copy comments and attachments?
Native cloning can copy attachments but not comments. Automation copies neither by default. A recipe-based app can copy fields, attachments, and comments, and keep them synchronized.
Watch Alex Ortiz video on how to clone a Jira issue from Jira Service Management to Jira