There are lots of reasons you might need to clone and move a Jira issue: escalating a ticket from a service desk project to a software project, replicating a task from one Jira project to another, bulk clone Jira issues to migrate a project or maybe making issue details available to someone who doesn’t have permissions on the original project.
While cloning an issue and moving it are available out of the box in Jira, there are other solutions to consider. By understanding the different options to clone and move, you can get the most out of Jira and optimize your processes.
Let’s look at the ins and outs of cloning in Jira.
What we’ll cover in this guide to cloning and moving
- When to clone an issue to another project
- Jira clone vs duplicate
- How to clone and move issues in Jira
- Permissions: how to control cloning and moving in your Jira instance
- Use case: cloning and moving from Jira Service Management to Jira Software
- Pro tips checklist for managing how users clone and move issues in Jira
When to clone an issue to another project
Cloning and moving is the most time efficient solution to make existing information useful for other people or additional situations within Jira. There are lots of use cases where it might make sense to clone an issue to another project:
- move issues from the Designer’s board to the Developer’s project
- share a bug or change request from a support portal with an engineering team
- need to clone between Company managed and Team managed projects
- move/clone issues from instance A to B, and vice versa
- replicate an epic issue for multiple teams that each have a project
- clone a task from current project to add it to an epic in another project
- migrate all the issues from one project to another one
After all, you already have lot of information from a customer or an employee, and you probably spent time configuring all those fields. Make sure that information is used again and help your entire team leverage the power of Jira!
Jira clone vs duplicate
Jira has its own jargon, so just to be clear, when linking two issues on JIRA, what is the difference between one issue “cloning” another, and an issue “duplicating” another?

The words are synonyms in many situations, but when we’re talking Jira, a clone is an issue that was created by copying another issue, and a duplicate is an issue that repeats another issue. For example, a duplicate happens often when two clients raise the same bug: often the second/third/nth person doesn’t know that it’s already been reported.

There are a number of links you can add between issues, and clone and duplicate are two on the list that may seem to be identical, but actually serve a different purpose.
How to clone and move issues in Jira
The methods to clone and move issues basically fall under two main categories: native Jira functionalities, or add-ons.

In the add-ons category, you can choose from solutions like Automation (which now is included free with Jira Cloud), or other apps available on the Atlassian Marketplace.
Let’s take a look at the pros and cons of various solutions to get a better idea of the situations for which they are the most suited.
Option 1: Native Jira options to clone and move issues
Every Jira instance offers out of the box the clone feature and the possibility to move issues. Both clone and move are available from the Actions menu.

To clone an issue, just select clone from the Actions menu. Jira automatically adds “CLONE” to the beginning of the summary of the new issue, and you can activate the option to clone attachments if you want. No other options are available.
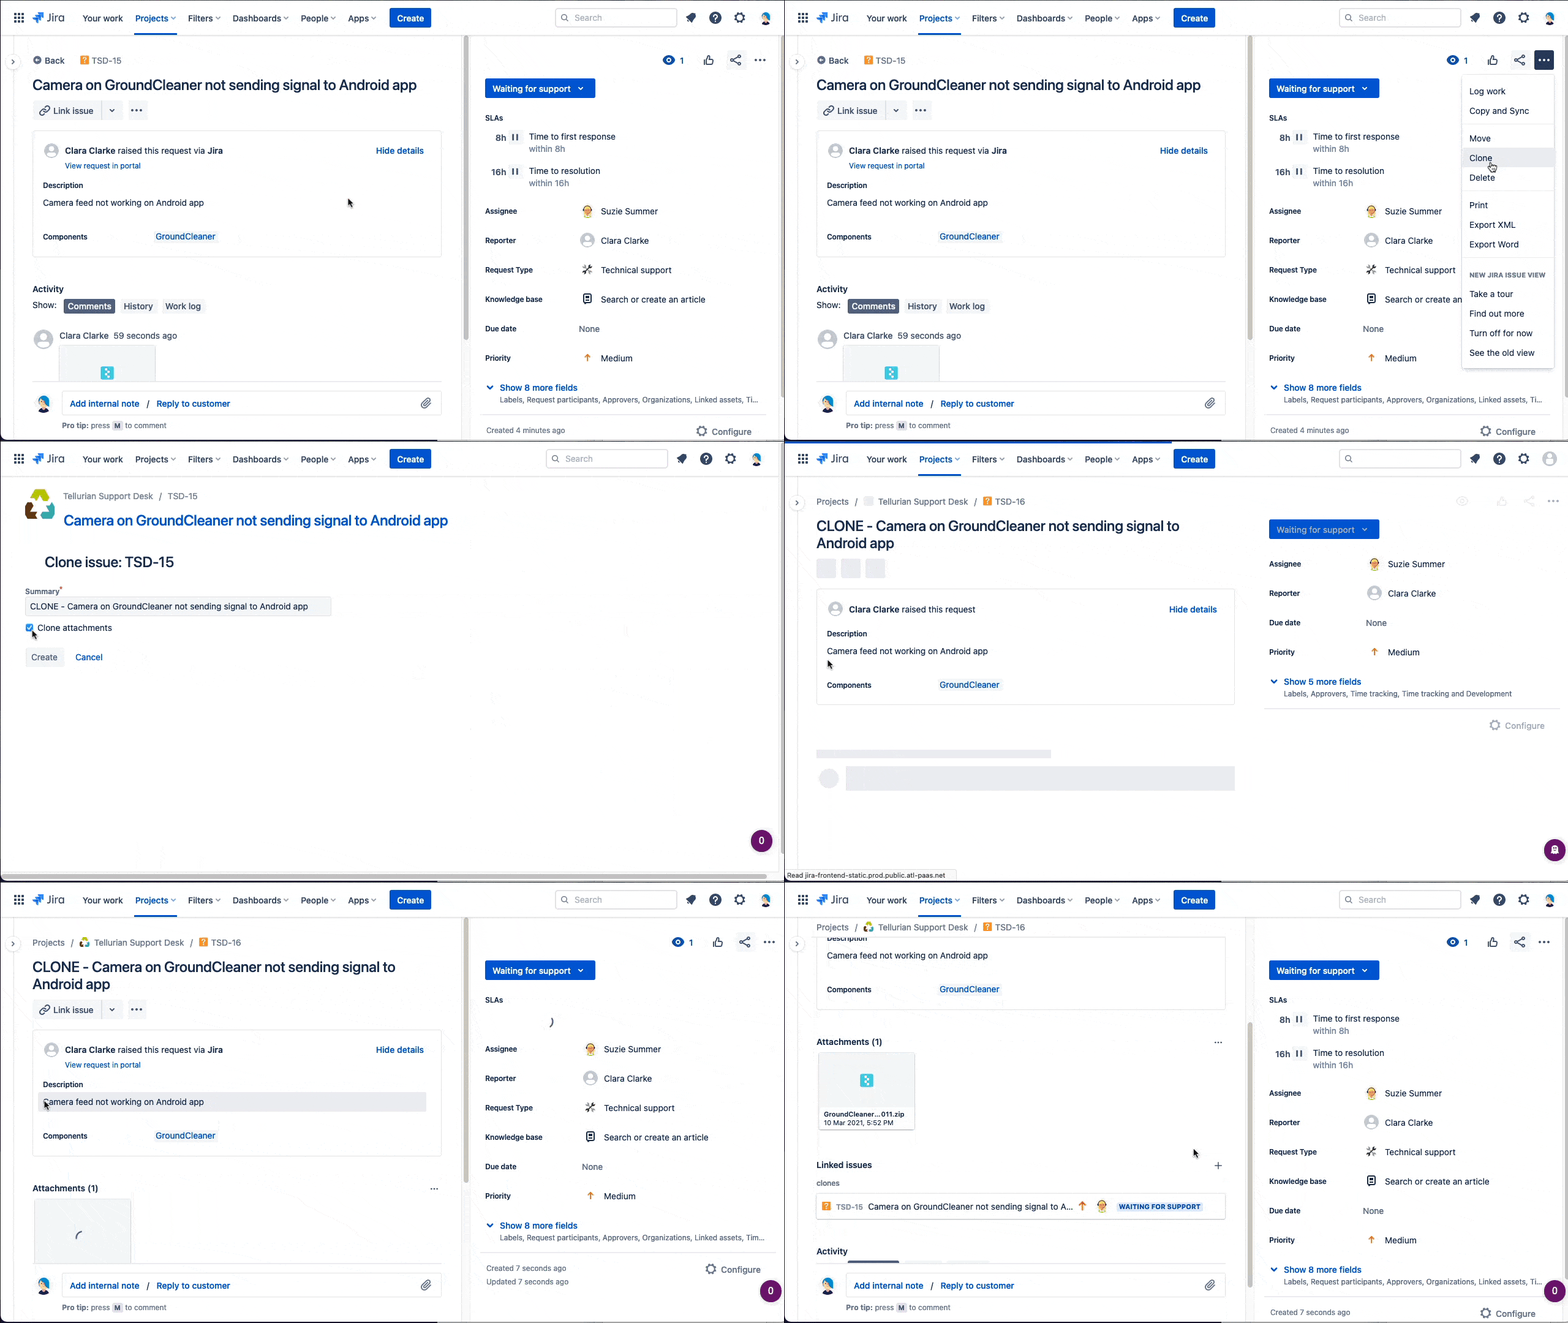
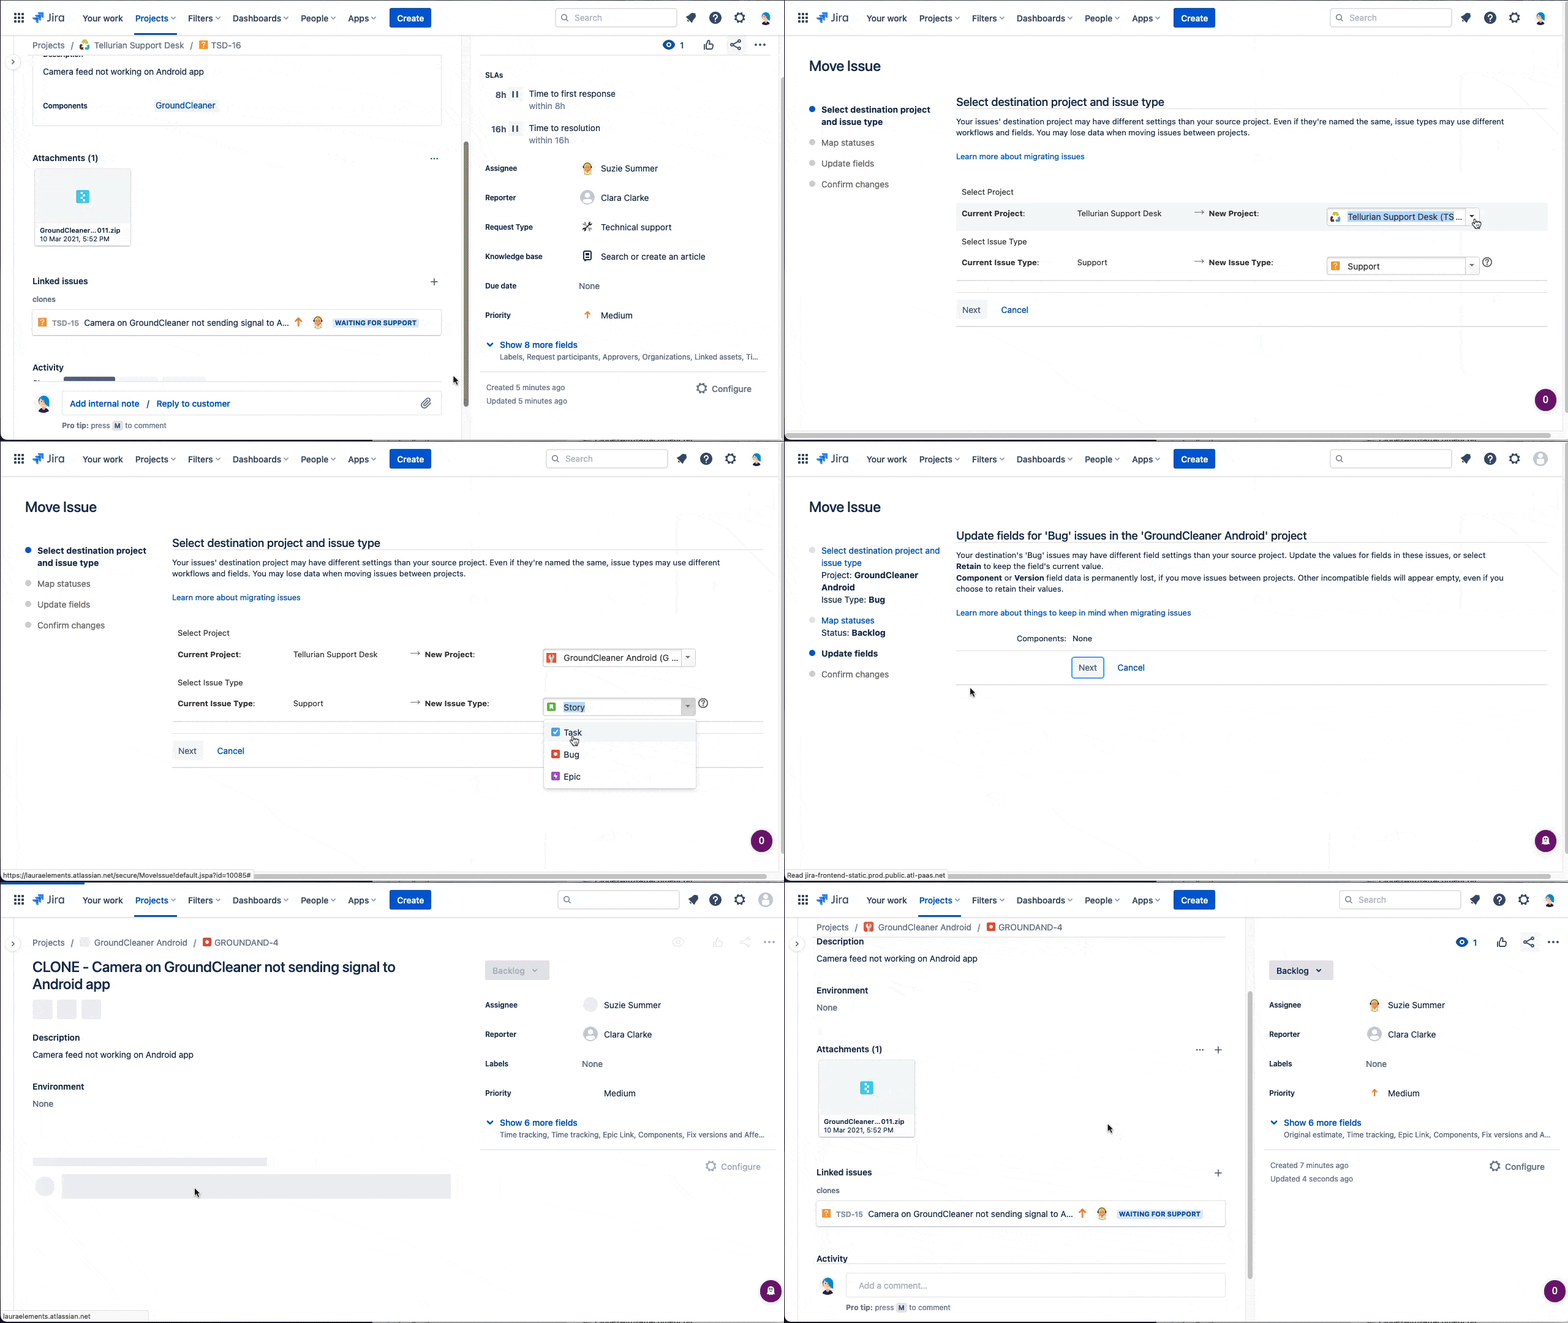
You can then move this issue to another project. First you need to select the destination project and the issue type. The drop down field to select the project shows you first the projects you selected recently, and then below all of the projects you have access to in the instance. After confirming the target project and issue type, you have to map the statuses, and then update any fields. If your new issue has any custom or required fields (like a story points estimate for a Story issue), you may need to complete that before you can finish moving the issue.
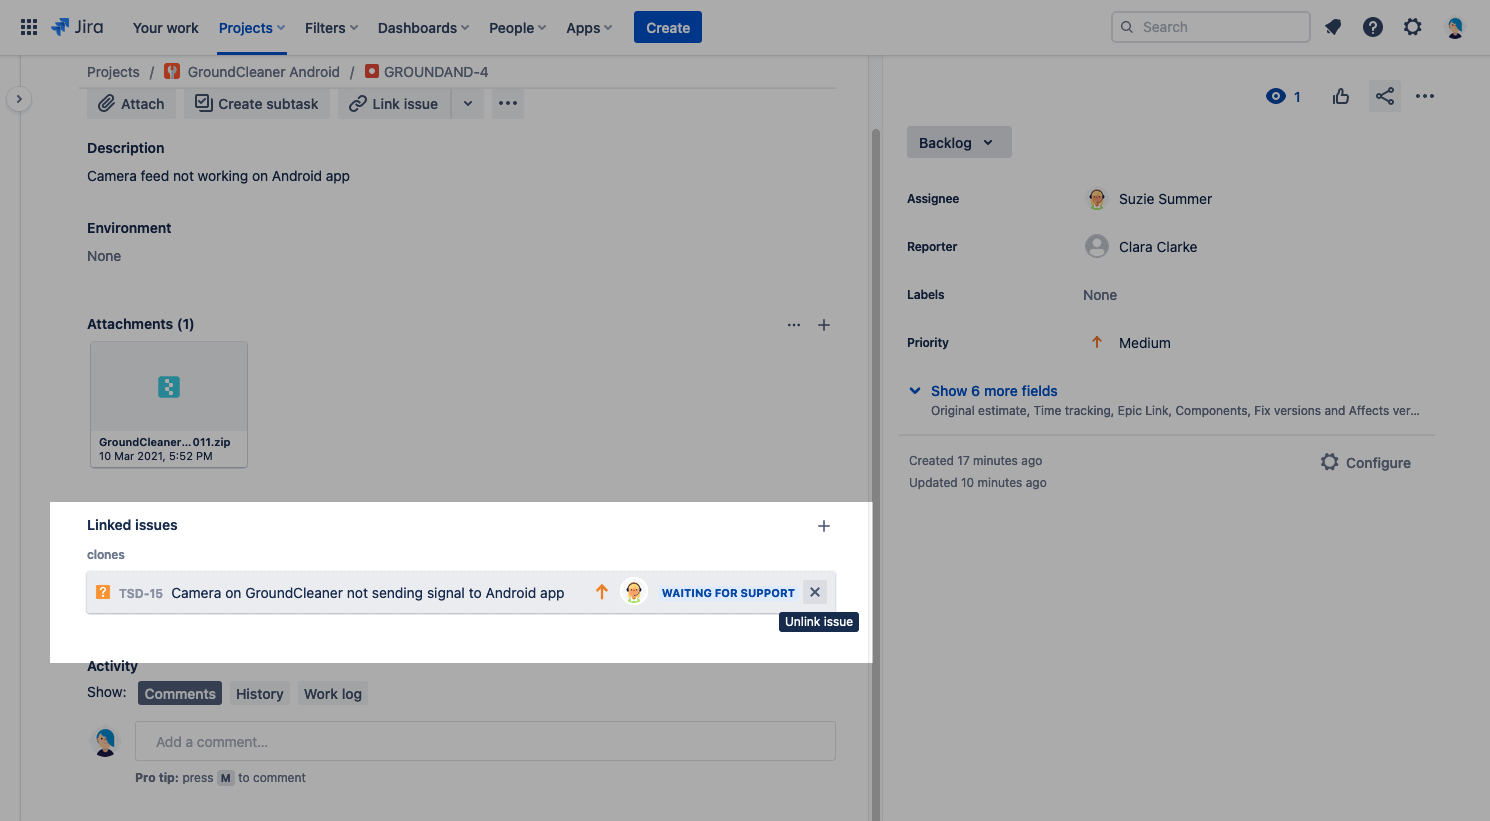
Once you’ve moved your issue on Jira Cloud, you will still have the clone link to the original issue, so if you don’t want that you can remove it. If you are using Jira on premise, you won’t have this clone link.
When moving an issue that has custom fields to another project, you need to make sure the custom fields exist on the target project. Even if the custom fields do exist, you may still be prompted to set values for them in order to finish moving the issue. If you are using Jira Cloud and trying to clone and move between Team managed and Company managed projects, be aware that you may not be able to clone everything from the issue since Team managed projects are self-contained and do not share custom fields with other projects.
Want to better manage your custom fields in Jira? Check out our guide to custom fields in Jira.
Pros and cons to native Jira options to clone and move issues
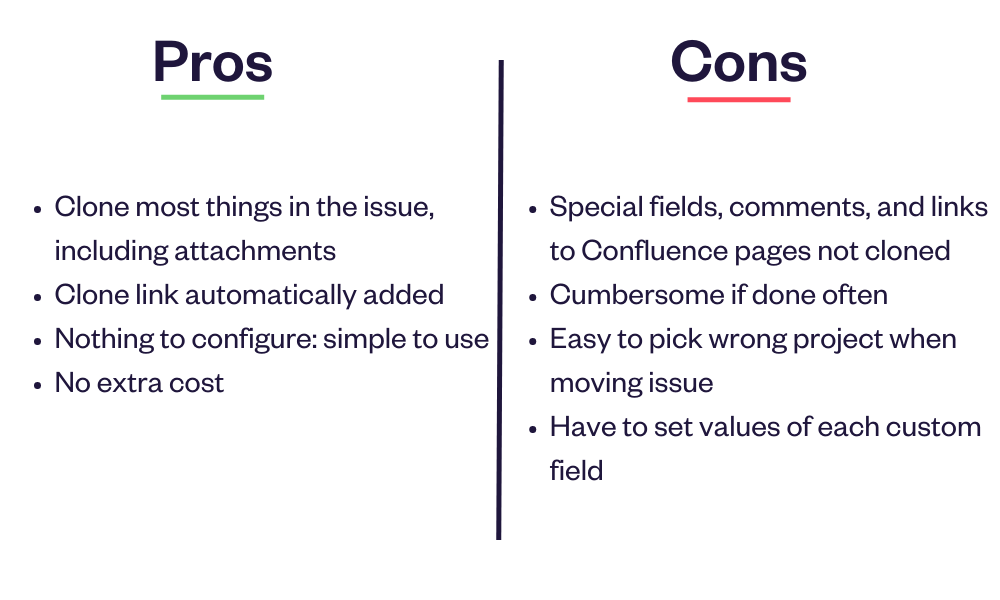
Built in cloning in Jira lets you clone most things from the issue, including attachments, and it’s relatively simple to use.
Moving issues with the native Jira function is pretty straightforward too. There’s nothing to configure ahead of time, you make all the choices each time you want to clone and move an issue.
But this process can be really cumbersome if you
- need to do this regularly,
- need several team members to do this,
- have dozens or hundreds of projects on your instance,
- want changes on the original issue to be synchronized to the clone
- or need to clone time tracking, comments, or links to Confluence pages.
Or maybe you just want custom fields to be cloned without having to set values each time. Let’s not even count the number of clicks you need to do to clone and move one issue with 2 custom fields and then remove the clone link!
When to go with native Jira functionalities
For a small instance with a small team, cloning and moving with the native Jira options is a solution without any added cost or configuration, but the risk of error and time spent on the process only increases when you have lots of projects or a larger team cloning and moving. This solution works to clone attachments, some custom fields, but not comments.
Option 2: Automation options to clone and move issues
Automation is now included in Jira Cloud instances, as well as being a paid app for on premise instances, and you might already be using it for other use cases (like automatically closing a Service Management issue if the customer doesn’t reply for a certain number of days).
Automation can be configured to clone an issue, or to create a new issue in a different project and copy values between the two issues.
You can get started using Automation for Jira Cloud by getting some automations from the template library.
The template library includes an example automation
When issue is transitioned → clone issue to another project and link the two issues
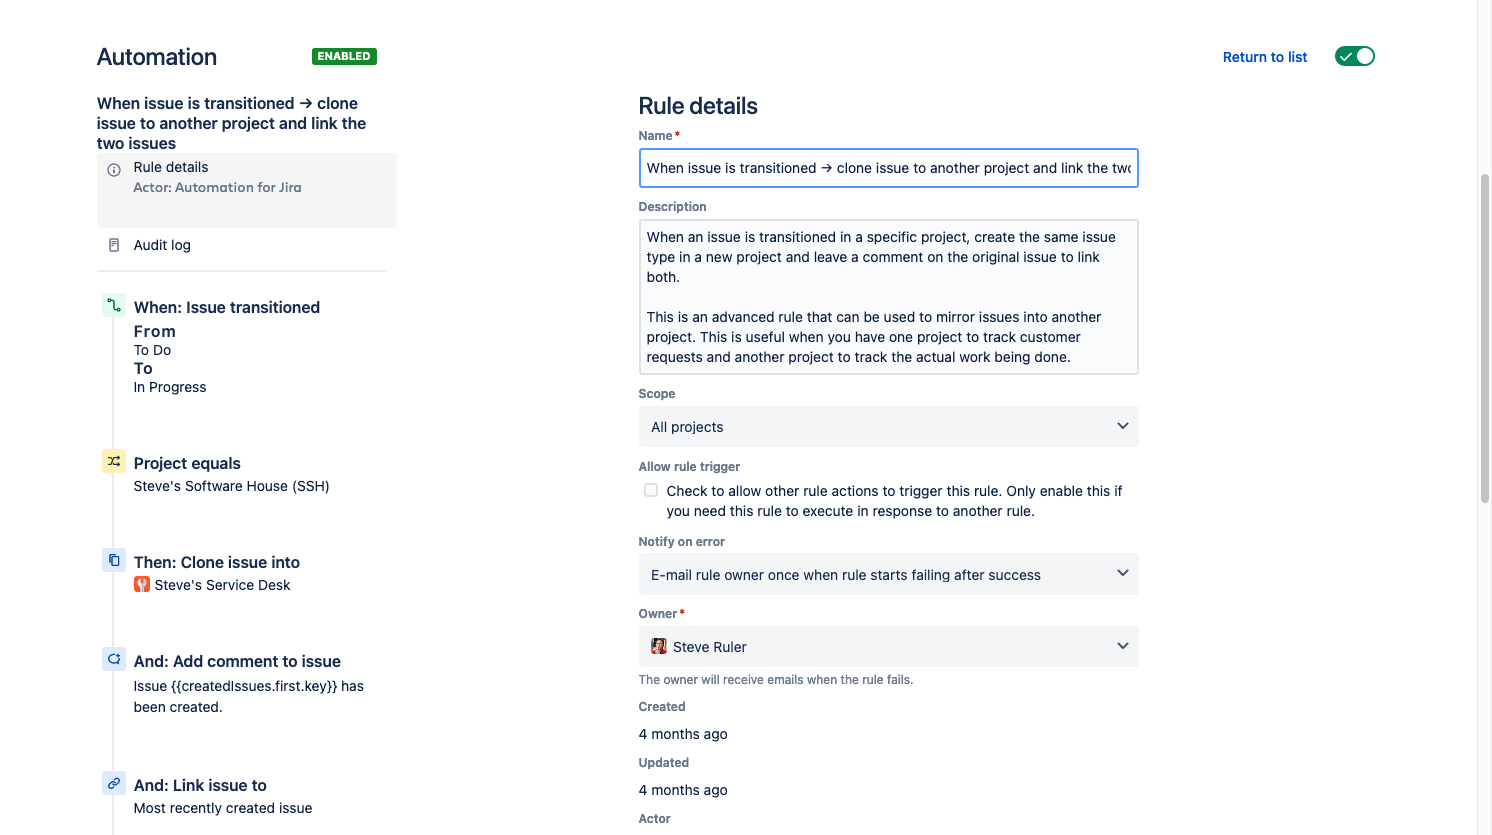
If you are using Jira on premise (Server or Data Center), the documentation on how to clone an issue with Automation is available here. The clone made with Automation for Jira will not copy attachments, issue links, or comments, but you could configure additional rules to sync comments, for example.
Pros and cons to Automation for Jira to clone and move issues
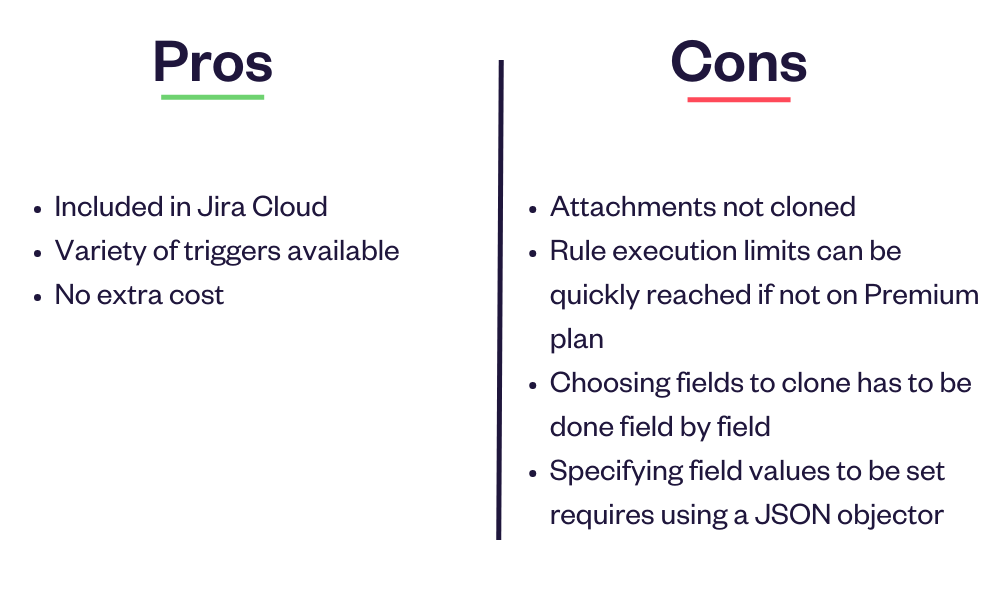
Automation for Jira is now included in Jira Cloud instances, and you might already be using it for other use cases. It’s a powerful app with a large community.
But “now included in Jira Cloud” comes with some important caveats:
- While an automation to clone issues within just one project can have unlimited executions, an automation rule that is applied to more than one project, it’s considered a global rule and will be limited.
There are some additional caveats that rules to create issues are not counted even if the issue is created in a different project.
Setting up an automation rule is also not the most intuitive task. Choosing which fields you want to clone has to be done field by field. And specifying additional field values to be set using a JSON objector is another way of saying “we hope you are ready to spend lots of time on the documentation”.
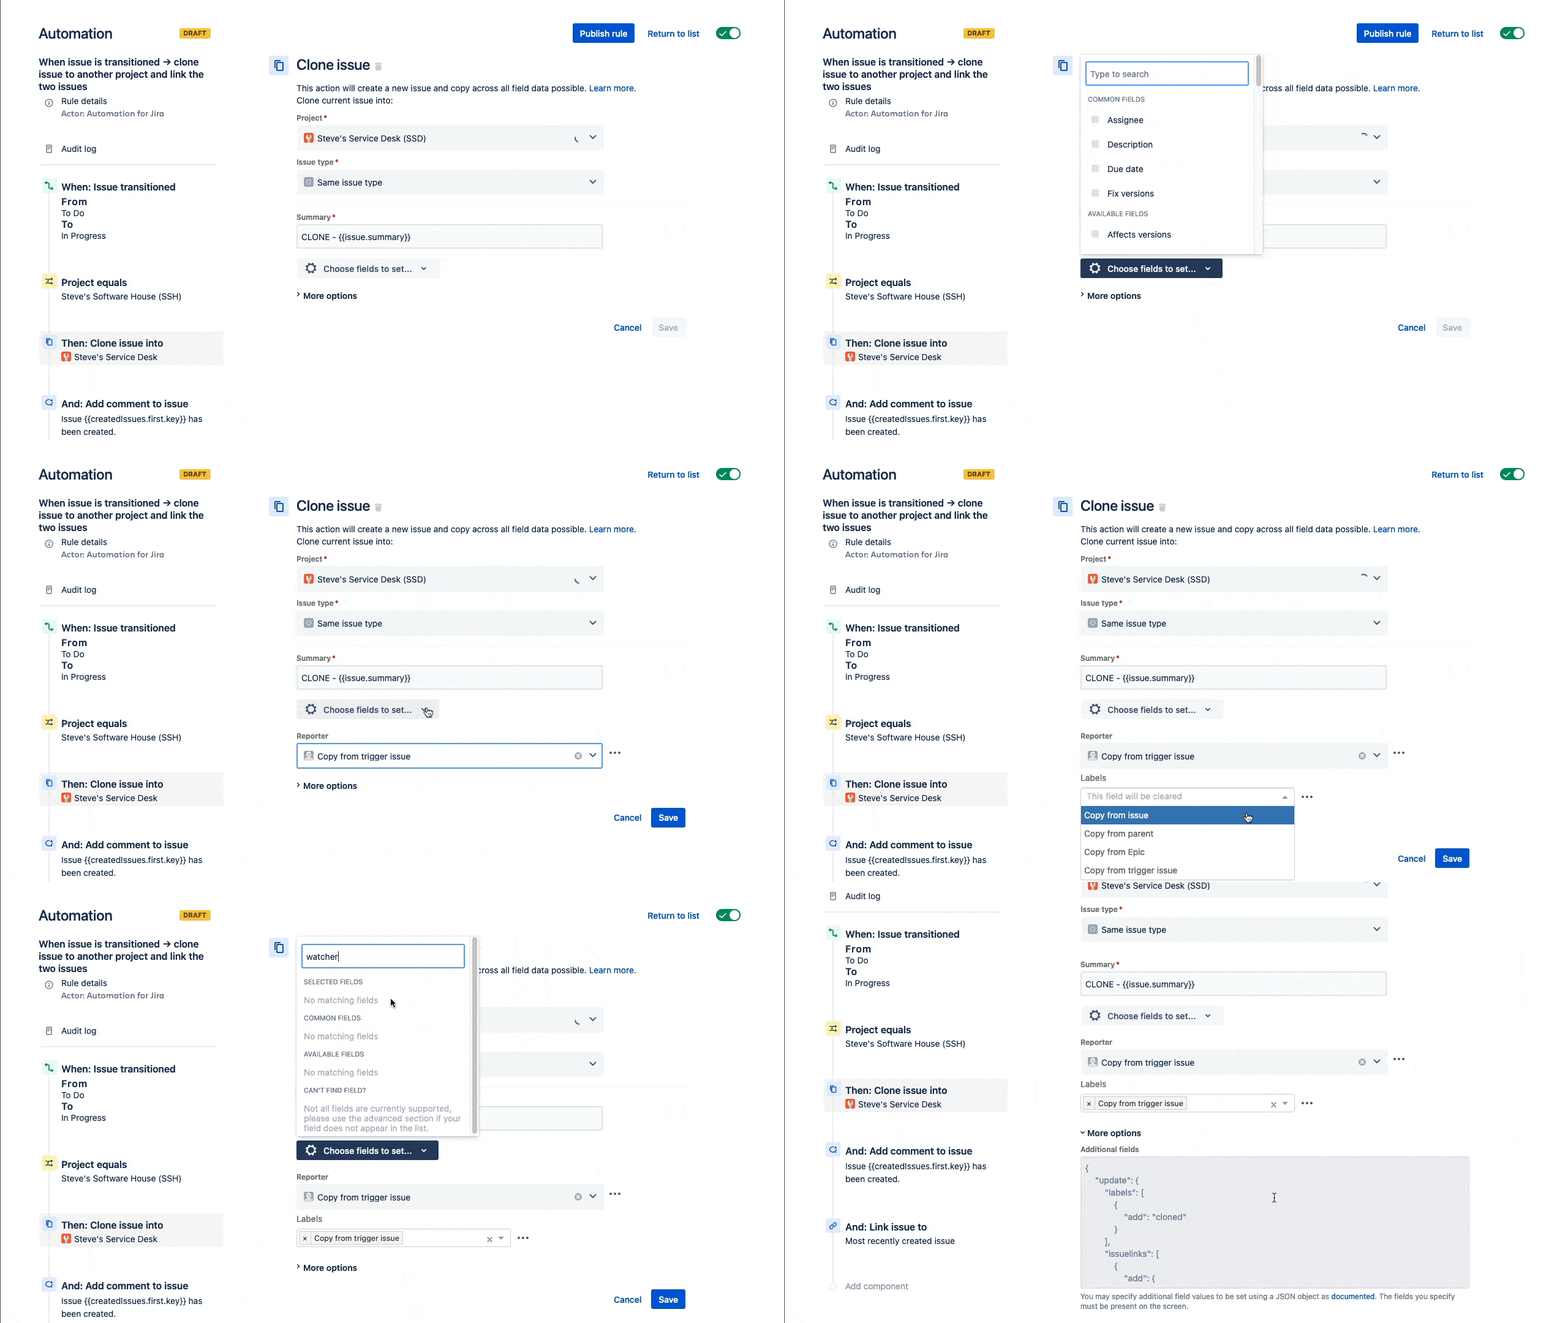
You can trigger rules manually or automatically so either users decide when to execute the automation or it’s executed automatically, but Automation is at its most powerful when everything is triggered automatically.
When to go with Automation for Jira app
If specifying valid JSON objects for advanced field cloning is a piece of cake and your team has structured and complex processes for using Jira, Automation could be the right solution for you. You will have more control over cloning custom fields compared to the native options, but you will need to spend considerable time configuring and maintaining your rules. You will also lose the possibility to clone attachments.
Option 3: Clone and move plugin Elements Copy & Sync
A number of apps allow more flexibility to clone and move issues to better meet your needs, and Elements Copy & Sync offers a balance of robust features with user friendly configuration.
In order to clone and move an issue, you will need to first configure a recipe, which lets you specify conditions for the issues to be copied (projects, issue types, priority, etc), conditions for where the clone will be created (project and issue type). This can be a set project or issue type, or a selection the user can chose from. To complete the recipe, you need to specify what will be cloned: fields, attachments, and comments. You can chose to clone all available fields, or only some, for instance excluding certain custom fields. The field mapping options are really easy to use to copy information to different fields, for example copying the Description or Root cause of the source issue to the Environment field on the new issue.
Once you have activated your recipe, you can select it from the Elements Copy & Sync window available through the Actions menu. You can also add the recipe as a post-function so it clones an issue to another project as part of a workflow transition.
Bulk clone hundreds of issues
Need to replicate an entire project setup? With Elements Copy & Sync, you can bulk clone multiple Jira issues at once: including epics, stories, tasks, and subtasks. Ideal for onboarding new clients or launching repeatable projects, this feature helps you save time and avoid human error by reusing existing project structures as templates.
Watch video on how to bulk clone Jira issues
Read more about bulk cloning Jira issues
Clone and sync across Jira Cloud sites
Work doesn’t always stay within one Jira instance. With Elements Copy & Sync, you can clone and synchronize issues across multiple Jira Cloud sites. Whether you’re managing projects with external partners or coordinating across subsidiaries, this functionality ensures key information stays aligned across environments with live updates when issues change.
Learn how to clone issues across separate Jira instances
Pros and cons to clone and move plugin Elements Copy & Sync
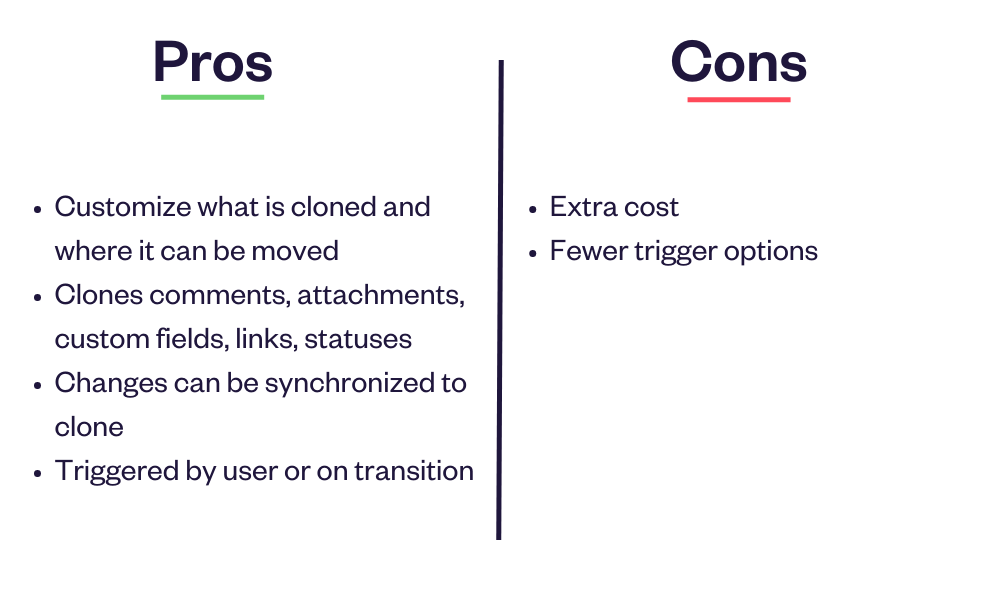
Using an app like Elements Copy & Sync allows you to configure
- very specific clone and move recipes,
- specifying which fields to copy (and where),
- whether or not you want attachments and comments copied, and
- if set as a post-function it executes in the background for no extra clicks for your user.
Users are guided in what they clone and move, with a streamlined process, so the risk of error is drastically reduced compared to the native functionalities. Configuring recipes is much easier than configuring automation rules, especially if you want to modify which custom fields you clone. If you are using Jira on premise, Elements Copy & Sync lets you create remote issues as well. You can copy attachments and comments with the app.
As an add on, there is an added cost to take into consideration.
When to go with Elements Copy & Sync app
If you want to streamline your clone and move processes to reduce errors and want app configuration and maintenance to require a minimum amount of time, Elements Copy & Sync could be the right solution for you.
Permissions: how to control cloning and moving in your Jira instance
With a handful of users, controlling who can clone and move issues on your instance might not seem like an essential need. But as the adoption of Jira spreads throughout your company, the risk of mistakes increases too. What if from the original 10 projects, you now have 60? Cloning the wrong issue or moving a clone to the wrong project is an easy mistake to make, which then requires additional clean up work and regular vigilance.
Setting permissions with native Jira clone and move options
For setting cloning permissions, you can remove cloning options for all users on Jira on premise, but you can’t deactivate cloning for only a subset of users with the OOTB functionalities. You can set move issues permissions based on roles, but users need to have create issue permissions in the project where they are moving the issue.
Setting permissions with Automation
Conditions can be set on rules to check whether a user exists or is in a specified group before executing an automation, which can let you limit issue cloning to a subset of users.
Setting permissions with Elements Copy & Sync
Elements Copy & Sync Cloud lets you restrict which issues can be cloned based on issues details (like the type, priority, or a specific JQL filter) and restrict where it can be cloned. If you only want certain issue types or issues of a certain priority or in a certain status to be able to be cloned as part of an escalation process, you simply need to set up the recipe with that criteria, and users will only be able to use the recipe when the issue meets all the criteria.
You can also set permissions based on roles. You can define specific permissions on the user, group or role (on premise only) of the person who is triggering the clone.
See how this works on the Activation tab with the on premise version, or the Triggers tab in cloud version.
Use case: cloning and moving from Jira Service Management to Jira Software
Here’s a pretty common use case for teams looking to clone and move an issue: a customer raises a request on a Jira Service Management portal, and it requires the work of the software team. The details of the bug the customer reported need to be cloned and moved into the software developer’s project where they can add it to their next sprint.
Using Elements Copy & Sync for issue escalation
This is how Elements Copy & Sync can be used to clone and move issues easily for issue escalation.
Here is the summary of the recipe that has been set up.
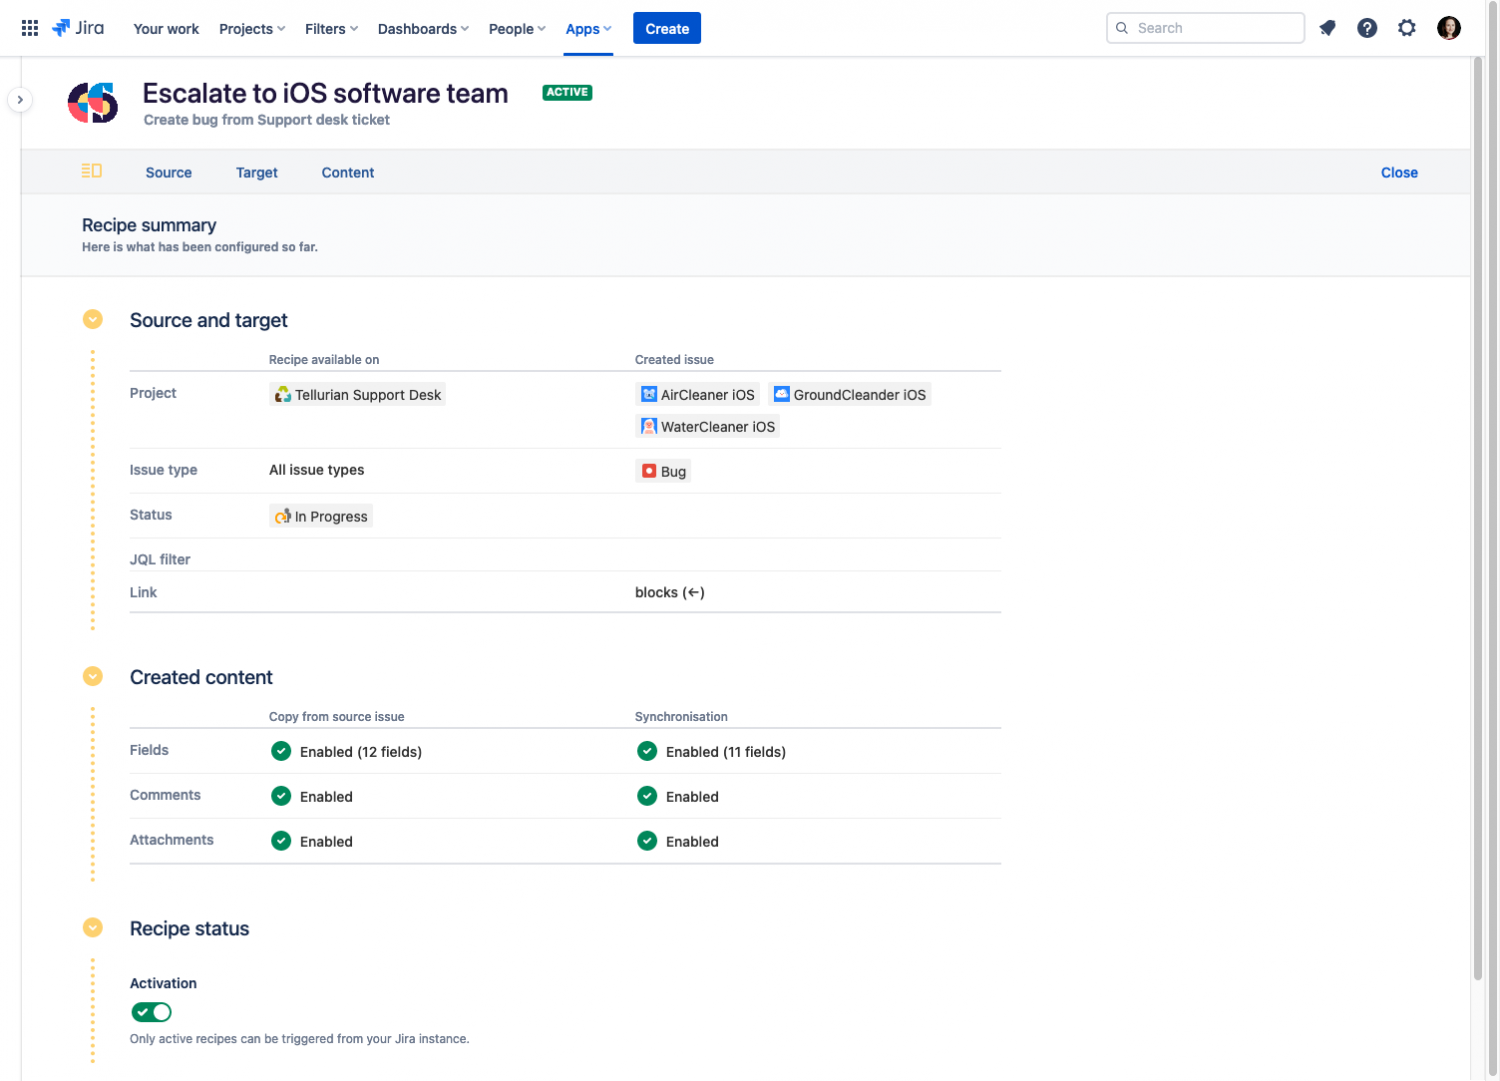
As you can see on the Source and target section, the recipe is available for all issue types on the Tellurian Support Desk that are In Progress, and creates the clone in one of three pre-selected projects, as a bug, and with the link ‘blocks’.
In the Created content section, there’s a quick view of whether fields, comments, and attachments from the source issue will be copied, and synchronization has also been activated (any changes in the original ticket on the support desk like a field change or new attachment will be synchronized to the clone).
This is what it looks like for an agent using the recipe from Jira Service Management:
Beyond strictly cloning and moving the issue from the service desk to the software project, there are also a couple things that would be handy in this situation that are available with Elements Copy & Sync:
![]()
Having the status of the cloned issue visible on the customer portal so they can stay informed of the progress. Your users will need to have permissions on the linked issues.
![]()
Having fields, comments and attachments synchronized from the JSM issue to the Software issue so the developers get any new information the customer might add to the issue after the initial clone was done. You can choose which way information is synchronized.
Watch Alex Ortiz video on how to clone a Jira issue from Jira Service Management to Jira
Pro tips checklist for managing how users clone and move issues in Jira
- Make sure Jira users are correctly assigned to roles or groups, especially if you are going to limit move issue permissions based on those roles
- Look at the custom fields in the different projects to make sure the cloned issue in a new project remains coherent
- Check your source et destination workflows
- Ask your project admins or heavy Jira users how they want users to be able to clone and move issues: individually? choosing the target project themselves? invisibly in the background as a post-function? in bulk?
- Try any clone and move app in a staging instance first
By picking the best option for your needs to clone and move Jira issues, you can make sure you’ve optimized your instance for your users and simplified your job taking care of the instance.
Read our article on how to clone and move Jira issues based on a custom field


