


Teams all have their specific needs when it comes to capturing data in Jira custom fields. As a Jira admin, it is your job to ensure issue creation screens do not turn into endless forms nobody wants to fill in, while still collecting the information that matters. Select lists, which reduce the complexity of providing data by guiding the users with a limited number of predefined options they can choose from, can seem like a miracle solution to many of your custom fields needs.
But, they’re not a panacea and going beyond native Jira custom fields is sometimes necessary, notably if you want to create dynamic drop down lists.
In this article, we’ll review:
Custom select lists in Jira: the pros and cons of the native options
When you need to limit users to chose from a list of options in a custom field, you have several possibilities in Jira. We’ll discuss each one of them, their pros and cons, and the situations in which they best apply.
Radio button
Radio buttons allow users to select one option from a list. Custom radio buttons created by a Jira admin look like this:

Radio buttons, just like checkboxes offer the advantage to display the full list of options vertically, so all options are instantly visible to the user. They work perfectly for “Yes / No” questions, or any other use-case where you have a limited number of mutually exclusive choices.
However, if the list of options users can select from is longer than three, you should consider alternatives to a radio button, as otherwise it would clutter your issues screens.
Checkbox
Checkboxes are the counterparts of radio buttons, they’re perfect when you want users to be able to select multiple values from a small list of options (ideally three at most, but it is commonly accepted to go up to five).

They offer the advantage of making all the options visible at a glance, thus making it easy for users to quickly compare and pick options.
Single choice custom select list
Single choice custom select lists are drop down lists that allow users to select one single option to complete the field.

A common use-cases for single choice select list is to create two select lists for managing risks associated to the ticket (one for impact, one for probability).
While they’re more compact than radio buttons, they tend to have a higher drop out risk as they take longer to browse and edit: it takes two clicks to select an option with a drop down list, while it takes only one with a radio button. One could be tempted to mark such field as required, but we recommend not to abuse the required attribute.
Another known limitation of the native custom select lists is that they do not offer any autocomplete feature (while system fields such as Fix Version do). This tends to make it hard for users to browse lists with many options.
Custom select list with multiple choice
Custom select lists with multiple choice allow to select multiple options from a list.

Their UX isn’t really user-friendly: one needs to scroll in the select list zone to see past the fifth option available, and to use Ctrl + Click (or Command + Click for mac users) to select multiple options. Moreover, there’s no autocomplete so it’s really hard to browse options if you have many to select from. That’s why we don’t recommend using them too much.
Cascading select list
Cascading select lists allow users to narrow down their options by branching a parent list with a child list. Users first need to make a selection in the parent list, and then the child list will display the set of options corresponding to the parent value selected. They’re limited to two levels only (so no grand-children! ) and displayed side by side.

If you have a large number of values that you can group into different categories, then cascading select lists will help users make their selection and spend less time browsing the options.
At the moment a Cascading Select Custom Field that is marked as required, will pass if only one field is selected.
A general limitation of native custom select list
There are a number of best practices when it comes to managing Jira custom fields wisely. One is to avoid creating option fields that have to be manually updated frequently, as the burden of updating the list of options can only be carried by a Jira admin. Not only is it a pesky task that puts you in a position where you’re the bottleneck, but it can also lead to users selecting outdated options, leading to inaccurate data in the system.
A smart way to bypass this limitation is to use an app such as Elements Connect, providing you have a place where the list values are maintained up to date (they can also be stored in Jira using a dedicated project). We’ll look at this possibility in the following sections of this article.
Doing more with apps: dynamic drop down lists with Elements Connect
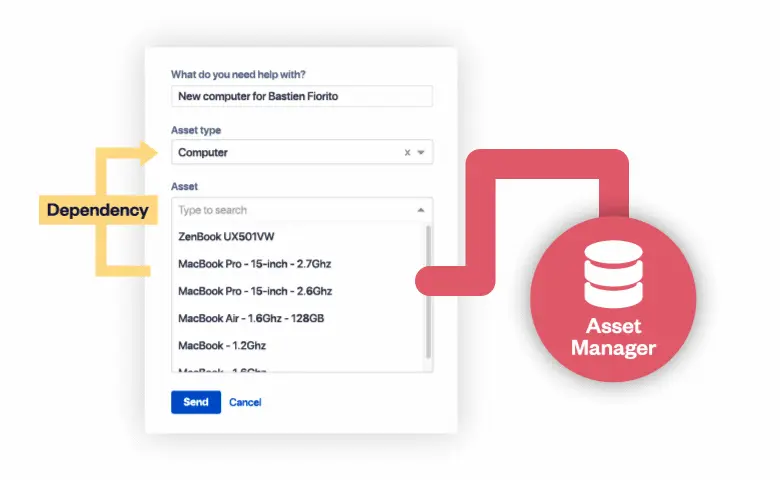
As presented in the previous section of this article, there are a number of limitations to the native select lists options provided by Jira. Using an app such as Elements Connect can help you enhance your Jira custom select lists and cover a broader range of use-cases. Elements Connect is an app for Jira that allows you to fetch data from your external datasources (CRM, CMDB, LDAP, homemade database…) and display it in Jira custom fields.
Here’s where Elements Connect can help leveling up your Jira custom fields game.
- Say goodbye to the manual maintenance of select lists options
Fetching your list values from an external source of truth allows you to ensure data consistency, without the recurring hassle of manually updating the list options in Jira. Data is pulled in real time directly from your external datasource.
- Use autocomplete in your dynamic drop down lists
Let users search the list of options with an autocomplete. This is particularly useful in case you have a long list of values to choose from.
- Present your select list options beautifully
If needed, you can customize the way your data is displayed using html to make it easier for users to browse options.
- Create cascading drop down lists on more than two levels
Create an infinite number of levels to cater to your most complex needs.
Unlike native Jira fields, you can change how the custom field is displayed and how users interact with it after it has been created.
No external data source containing the list options? Consider this hack
If you don’t have an external datasource where you store and update lists values (or can’t access it because of network restriction at your company) but still want to benefit from dynamic select lists, you can use Elements Connect to fetch data from Jira, by setting up your list of options in a dedicated project as Jira issues’s fields as show below.
It’s much simpler to set up and maintain than creating custom scripts, and you can order list options.
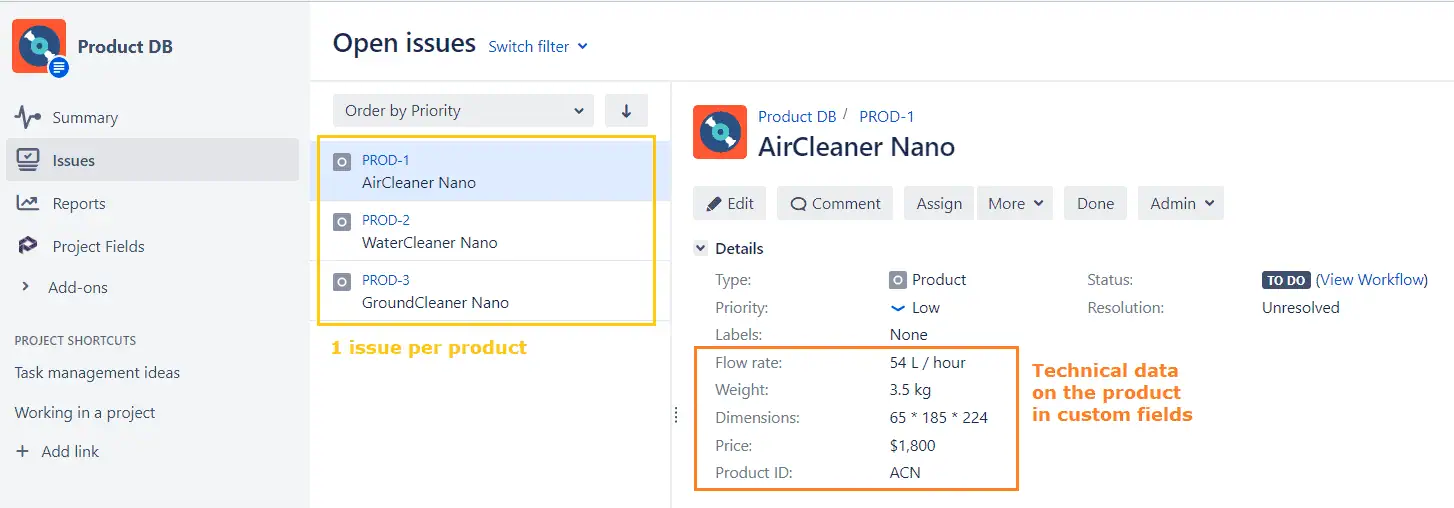
You can then grant a group of power users access to the project. This way, they can update the list of options by adding and removing the issues available in the project, without needing your help.
Choosing the type of Jira custom field best suited to your use-case
To determine the type of custom field that’s best for your “select list” use-case, you can follow the systemic approach proposed in the below decision tree.
First, you need to look at how you want to manage the options of your list, then decide how the information will be presented to the users.

User experience is key to adoption
There is no such thing as a one-size fits all solution. The guiding principle when it comes to custom fields in Jira is to reflect on the various needs you’re trying to reconcile: the need of the people who create the tickets, the needs of the ones who work on them, the need of those who need to aggregate data about them.
Simplifying these users’ experiences is key to the overall adoption of the solution. Sometimes it means saying no to a custom field request (for good reasons), sometimes it means going for the extra mile and setting up an integration between your external data sources and Jira so users can retrieve the information they need without the need to switch context or scroll down through a massive list of options.
At the end of the day, it is your call.