


How to sync Jira issues to streamline your project management processes
When managing projects in Jira, one of the most common pain points teams face is keeping issues synced across different boards, projects, or workflows. Often, teams working on complex projects struggle with consistency and data alignment, which can lead to confusion, missed deadlines, or duplicated work. Effective syncing of Jira issues ensures that team members remain informed and tasks stay organized, minimizing miscommunication. Whether you’re managing a small development team or coordinating cross-functional projects, learning how to sync Jira issues will improve collaboration, reduce friction, and streamline your project management process.
In this article, we’ll dive into why syncing Jira issues is crucial, common challenges teams face, and how to resolve them. We’ll also introduce you to Elements Copy & Sync which allows seamless syncing between issues.
Understanding the need to sync Jira issues
For many organizations, Jira is the backbone of their agile project management, serving teams across various departments like development, design, QA, and support. However, Jira’s flexibility can also be its drawback when it comes to syncing and managing related issues across different projects. Some common challenges include:
- Duplicate work: If issues aren’t synced, team members from different departments might work on the same task without realizing it, leading to wasted effort and duplicated work.
- Lack of visibility: When issues in one board aren’t updated or synced properly with related tasks in another board, it can lead to misalignment on priorities and project status, potentially resulting in missed deadlines.
- Cross-functional collaboration: Teams that work in silos with their individual Jira boards may face challenges in collaboration, particularly if the progress in one project affects another, yet there is no clear way to sync updates between them.
- Manual updates: Without proper sync tools, team members often have to manually update issues in multiple projects, leading to inconsistent information and human error.
Why sync jira issues is important?
Syncing issues across different Jira instances is essential for various reasons:
- Collaboration: When issues are linked or synchronized, multiple teams can track dependencies, understand blockers, and collaborate more effectively.
- Transparency: Syncing ensures that all stakeholders have real-time access to updated information, keeping the team aligned on progress.
- Efficiency: Syncing minimizes manual updates, reducing the risk of human error and saving valuable time.
Syncing also helps maintain a single source of truth, which is important for reporting and tracking KPIs across large or multi-project environments.
Methods to set Jira issue synchronization
- Manual syncing using links and dependencies
Jira provides basic tools to link issues across projects and instances. You can manually set dependencies between issues or link issues that are related. However, while this method provides a simple way to connect issues, it requires manual updates and doesn’t automate the process of keeping all issues in sync. - Automation using Jira Automation rules
One of Jira’s built-in features is the ability to create automation rules that trigger actions when certain conditions are met. For example, you can automate syncing by configuring a rule that, whenever a parent issue is updated, it automatically updates the linked issues in other projects. This reduces manual work and ensures real-time consistency across issues.
Discover how to master basics and overcome limitations of Jira Automation
- Using Jira’s built-in features (clone, move, link)
Jira’s default functionality allows you to clone, move, or link issues between boards or projects. While this can be effective for small-scale projects or when syncing a few issues, it quickly becomes time-consuming and error-prone as the number of issues increases. It also doesn’t provide true syncing, as updates in one cloned issue won’t automatically reflect in the original.
Automate and streamline Jira issue synchronization
At Elements we have developed Elements Copy & Sync to fully automate and streamline issue syncing within Jira. Our app is allowing automatic syncing of issues between different projects and instances.
Elements Copy & Sync for Jira:
This app offers advanced capabilities, allowing teams to define which fields, comments, and attachments to copy or sync between issues in different projects or even across multiple instances of Jira. Here are the standout features:
- Custom field syncing: You can specify exactly which fields should be synchronized, ensuring that critical information is consistently updated.
- Automatic updates: Whenever an issue is updated, the linked or cloned issue is automatically updated as well. This feature eliminates the need for manual syncs, reducing the risk of inconsistencies and human error.
- Cross-project sync: For teams managing multiple projects with interconnected tasks, Elements Copy & Sync allows for seamless cross-project syncing. When one task is updated, all linked tasks in other projects are updated automatically, ensuring all teams stay aligned.
- Customizable workflows: Different teams may use different workflows in Jira, but with Elements Copy & Sync, you can sync Jira issues regardless of workflow structure, making it highly adaptable for cross-functional teams.
How to set up syncing between Jira issues
- Identify your syncing needs
The first step in setting up a sync is to define your specific needs. Determine which fields you need to sync (e.g., issues, fields…), and decide if you need one-way or two-way synchronization. - Install and configure Elements Copy & Sync
Installing Elements Copy & Sync is a straightforward process via the Atlassian Marketplace. Once installed, you can start by creating a sync template to define which issues, fields, and projects should be kept in sync. - Test your sync rules
Before rolling out the sync across your entire project, it’s important to test it on a smaller set of issues. This ensures that all fields are syncing as expected and that no critical information is being left out.
Sync Jira issues with Ease
Syncing issues in Jira is a powerful way to ensure collaboration, visibility, and efficiency across your teams. While manual linking and Jira’s native automation rules offer some solutions, they can quickly become cumbersome in complex environments. That’s where apps like Elements Copy & Sync come in, offering a seamless solution to synchronize issues across boards and projects.
With the right approach, syncing can transform your Jira environment, making it more responsive and aligned. By leveraging automation and the right tools, you’ll eliminate the pain points of inconsistent information, duplicated efforts, and poor collaboration—paving the way for smoother project management and improved results.
Start syncing today and ensure your team’s work stays aligned and up-to-date!
As businesses shift from traditional SLA (Service Level Agreement) models to Experience Level Agreements (XLA), the focus on customer experience has never been greater. While the XLA approach offers immense potential for aligning IT services with user experience, many organizations still struggle with common pitfalls. Here’s how you can avoid the top XLA mistakes and truly harness the power of experience-driven IT management.
1. Focusing solely on metrics rather than experiences
The mistake: One of the most significant errors companies make when implementing Experience Level Agreement is continuing to prioritize metrics over the actual user experience. It’s tempting to keep tracking availability and uptime as primary indicators of success, but these don’t reflect how users truly feel about a service.
How to avoid It: Shift your focus towards qualitative feedback. While quantitative metrics still play a role, the real insight lies in understanding the user’s emotional journey and satisfaction. Implement user surveys, monitor feedback tools, and track emotional responses alongside technical metrics. For example, employ tools like CSAT (Customer Satisfaction Score) or NPS (Net Promoter Score) to gauge user satisfaction directly.
2. Treating XLAs as a “one-size-fits-all” solution
The mistake: Many organizations fail to customize their Experience Level Agreements to the unique needs of different user groups. A generic XLA might capture broad service performance but miss the nuanced needs of specific teams or departments.
How to avoid it: Tailor your XLAs fit your customers or employees within your organization. IT services will impact various teams differently. A finance team might prioritize seamless access to critical applications, while a marketing team could be more focused on collaboration tools. Create separate Experience Level Agreements that reflect the needs of different departments or user personas to ensure relevant and actionable insights.
3. Overlooking continuous improvement and feedback loops
The mistake: Another common mistake is treating Experience Level Agreements as a static measure. Many organizations set up their XLA metrics once and leave them untouched for years, failing to adapt as the business and its user needs evolve.
How to avoid it: Adopt a mindset of continuous improvement. XLAs should be revisited regularly to ensure they remain aligned with the evolving expectations of users. Establish regular feedback loops, use agile methodologies, and iterate on your Experience Level Agreement goals. By regularly reviewing user experience data, you can spot trends early and make proactive adjustments.
4. Failing to integrate XLAs with broader business goals
The mistake: IT departments often view XLAs as an isolated framework, not aligning them with broader organizational objectives. This disconnection can lead to misaligned priorities and the perception that Experience Level Agreements are just another IT-driven initiative, rather than a business-enabling tool.
How to avoid it: Link your XLAs to the company’s key business outcomes. Understand the strategic goals of your organization and ensure your XLA metrics are contributing to these objectives. For example, if your company’s goal is to improve customer retention, your Experience Level Agreement should measure how IT services are impacting the user journey and customer satisfaction. This alignment ensures that XLAs are seen as a critical component in achieving business success.
5. Neglecting communication and cross-functional collaboration
The mistake: Experience Level Agreements often fail when communication between IT and other business units is weak. Many organizations continue to operate in silos, where IT departments focus solely on technical performance metrics, and business units are concerned only with outcomes. This lack of communication leads to a disconnect between what IT delivers and what users actually need for an optimal experience.
How to avoid it: Foster a culture of collaboration by encouraging regular cross-functional meetings. IT teams should work closely with business units to understand their specific needs and how services impact their day-to-day operations. This collaboration ensures that XLAs are shaped not just by IT performance metrics but by user-driven outcomes that truly enhance the customer experience. Leveraging service management apps like Elements PULSE can help integrate these collaborative efforts by providing dashboards that both technical and business teams can easily understand.
6. Failing to leverage the right technology
The mistake: Many companies attempt to implement XLAs without the proper technological infrastructure, leading to fragmented data, poor insights, and a lack of actionable outcomes. Trying to manually track user feedback and correlate it with performance metrics can lead to delays in identifying and addressing user issues.
How to avoid it: Invest in advanced XLA tools that automate data collection, analysis, and reporting. Apps like Elements PULSE enable real-time experience tracking, integrating seamlessly with your existing ITSM platforms. By automating feedback collection and analysis, your team can make quicker decisions, respond proactively to user needs, and continuously improve the user experience.
7. Not investing in employee training and mindset shifts
The mistake: While technology plays a significant role in driving XLA success, human factors are equally crucial. A common pitfall is overlooking the importance of training IT staff and changing their mindset to align with experience-driven service delivery. Teams may still focus on ticking off tasks based on SLAs without truly considering how these actions impact the end user’s experience.
How to avoid it: Regularly train your IT staff not only in new apps and technologies but also in soft skills, such as empathy and customer service. Encourage a user-first mindset, where employees view service delivery through the lens of the end user’s experience, not just technical functionality. Role-based training programs can help personalize this approach, ensuring that every team member understands how their role contributes to the overall user experience.
8. Ignoring XLA results
The mistake: A common issue is when IT managers collect valuable data from XLA metrics but fail to implement actions based on the results. This lack of follow-through can lead to poor prioritization of internal tasks, overlooked areas for improvement, and ultimately, a decline in customer satisfaction.
How to avoid it: Ensure that XLA data drives actionable insights. Regularly review results and create a structured plan to address any issues or opportunities that arise. By turning insights into action, you can better prioritize tasks, address user needs more effectively, and boost overall satisfaction.
By avoiding these common pitfalls, you can fully leverage the potential of Experience Level Agreements, transforming your IT services into a user-centric powerhouse. Correcting these XLA mistakes, your organization can shift from a purely SLA-driven model to one that truly values and enhances the user experience. Remember, XLAs are not just about measuring service performance—they’re about enhancing the entire experience for users, from the ground up.
By embracing this approach, you’ll not only see improved user satisfaction but also stronger alignment between IT services and broader business objectives. The result will be a more engaged, satisfied customer base and an IT service model that seamlessly supports both performance goals and user experience, ultimately driving overall business success.
Take XLA monitoring to the next level with Elements PULSE
If you’re ready to elevate your XLA strategy and gain real-time insights into the customer experience, Elements PULSE is the perfect solution. Our app integrates seamlessly with your IT service management platforms, giving you instant visibility into key experience metrics and helping you drive continuous improvement.
Elements PULSE empowers your team to move beyond traditional SLAs by offering dynamic XLA tracking, actionable insights, and customizable dashboards.
Start delivering exceptional user experiences today— click here to learn more and try Elements PULSE.
We’re excited to announce our collaboration with Alex Ortiz! In his latest video, which you can find at the end of this article, Alex shares expert tips on how to enhance your Jira Service Management with Elements Pulse, driving improvements that elevate the overall service experience.
Now, let’s dive into how Elements Pulse ensures a seamless and satisfying support experience.
Customer satisfaction in Jira: Elevate your service with Elements Pulse
In today’s competitive world, customer satisfaction is a crucial metric for businesses to monitor and improve. Jira Service Management (JSM) offers basic tools like Customer Satisfaction (CSAT) surveys and Service Level Agreements (SLAs) to track how customers perceive your service. But are these tools enough to give you a complete picture of your customer experience?
Enter Elements Pulse, a powerful add-on designed to take your Jira Service Management to the next level by introducing Experience Level Agreements (XLAs). XLAs go beyond the primitive metrics of CSAT surveys and SLAs to provide a comprehensive view of how well your team is delivering exceptional service.
In this article, we’ll explore how Elements Pulse can drastically improve your customer satisfaction in Jira and give you actionable insights to help your team perform better.
Why customer satisfaction matters
Every business knows that keeping customers happy is the key to long-term success. But in an environment where customer options are endless, customer loyalty depends on seamless experiences. Jira Service Management offers tools like SLAs to measure performance metrics like response and resolution times, but these alone can fall short of providing a complete understanding of customer satisfaction.
Elements Pulse changes the game by introducing Experience Level Agreements (XLAs), which focus on the overall experience rather than isolated data points. This shift in focus helps businesses better understand how their customers feel when interacting with the service team. Whether it’s ticket response time, communication quality, or issue resolution, Elements Pulse delivers deep insights to help you improve across the board.
How Elements Pulse improves customer satisfaction in Jira
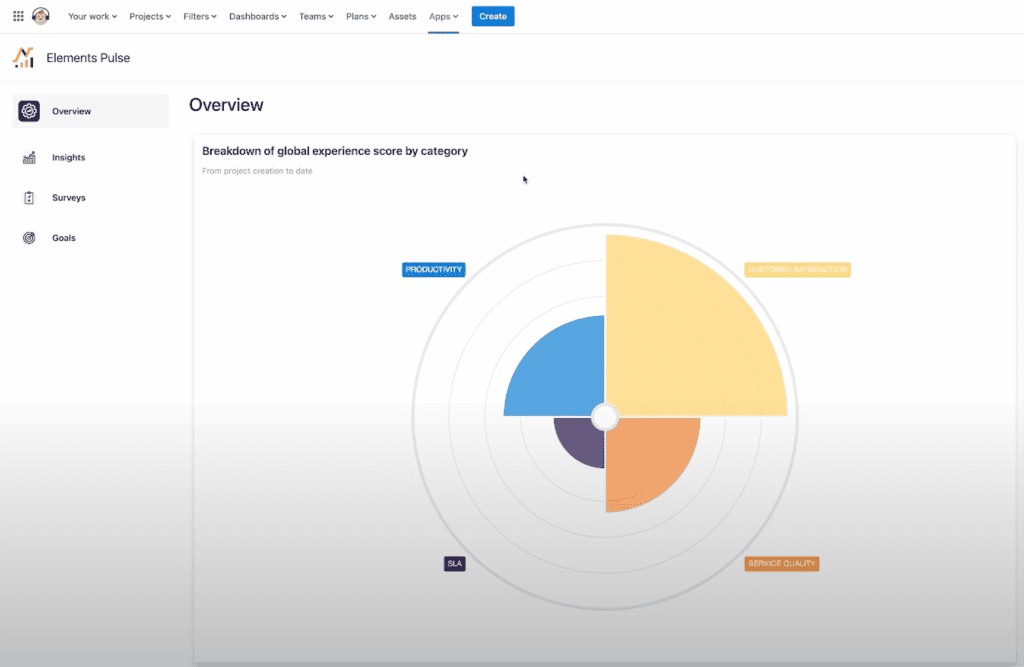
Intuitive dashboard with real-time data
Once installed, Elements Pulse provides a dynamic and easy-to-use dashboard that gives you a real-time snapshot of all customer satisfaction-related metrics. The dashboard is highly customizable, allowing you to view data relevant to your specific JSM projects. You can analyze tickets by productivity, customer satisfaction, service quality, and SLA performance.
One of the most powerful features of the Pulse dashboard is its ability to track trends over time. You can see how your team’s customer satisfaction metrics have evolved, helping you to make more informed decisions and implement strategic changes when needed.
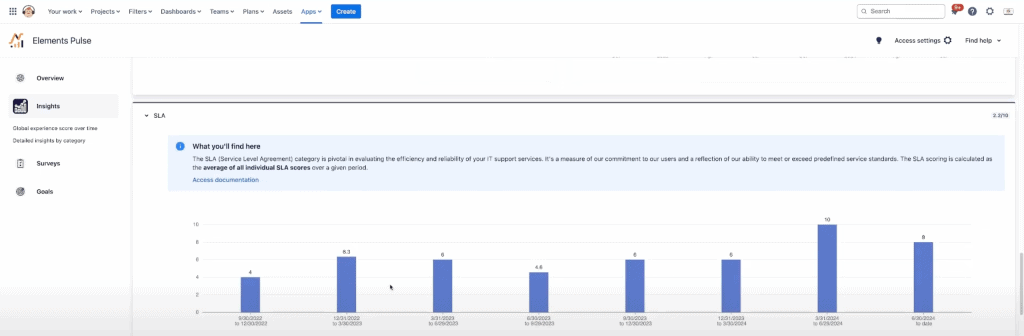
Experience level agreements (XLAs)
While traditional SLAs track operational performance like time to first response or resolution, XLAs focus on customer experience. They provide a broader view of how well your team is performing by factoring in elements like customer communication, issue resolution, and overall satisfaction.
Using XLAs, Elements Pulse allows you to move beyond simple metrics and get a more complete picture of your customer’s journey from the moment they submit a ticket until the issue is fully resolved.
This level of insight is crucial for improving customer satisfaction in Jira, as it helps you pinpoint exactly where your team can improve to provide a better experience.
Detailed insights and trends
Elements Pulse offers a wide range of insights, breaking down your performance into key categories like productivity, customer satisfaction, service quality, and SLA adherence. For example, you can see how many tickets were resolved within SLA times, whether customer satisfaction scores are improving, and which areas are slowing down your team’s efficiency.
With Elements Pulse, you can also monitor trends, making it easy to spot issues early and address them before they affect customer relationships. Elements Pulse helps you identify what’s working, what needs improvement, and how to adjust your processes for maximum impact.

Customizable SLAs for a better customer experience
While traditional SLAs are essential for maintaining service quality, Elements Pulse allows you to get creative with your SLA configurations. You can set SLAs that challenge your agents to go above and beyond, incentivizing them to focus on delivering an outstanding customer experience.
By crafting more meaningful SLAs and closely monitoring their performance, you’ll not only ensure timely responses but also create a more satisfying experience for your customers. This is the key to boosting customer satisfaction in Jira.
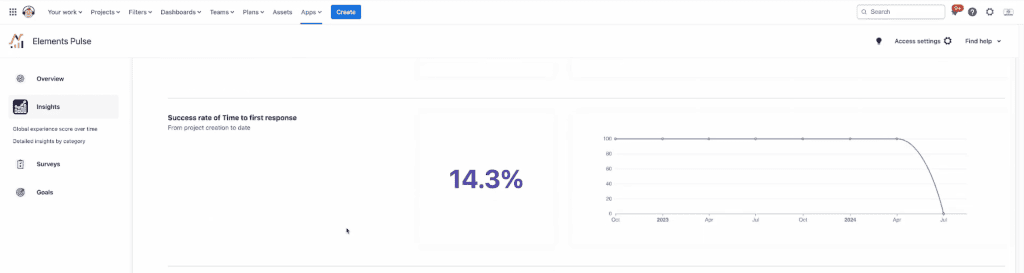
Productivity and operational efficiency
Improving customer satisfaction in Jira isn’t just about speed. It’s about resolving issues effectively with minimal back-and-forth between your team and the customer. Elements Pulse tracks operational efficiency metrics like average time to resolution, time to first response, and recategorization rates, giving you a complete picture of how well your team is performing.
By focusing on operational efficiency, Elements Pulse helps you identify bottlenecks and areas for improvement, ensuring that your team is delivering fast and effective solutions while maintaining a positive customer experience.
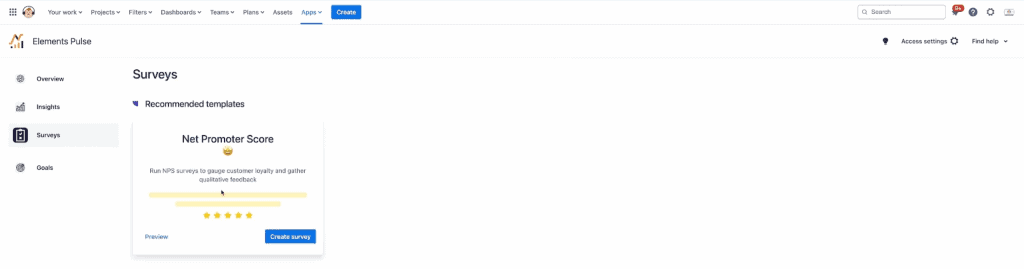
Surveys and feedback collection
To understand the customer’s perspective even better, Pulse offers customizable surveys that allow you to gather direct feedback through Net Promoter Scores (NPS) and Customer Satisfaction (CSAT) scores. These surveys help you collect real-time feedback, allowing you to take proactive steps toward improving your service.
With this feedback integrated into your Elements Pulse dashboard, you’ll have a clear view of how customers feel about their interactions with your service team, which is essential for making informed decisions that drive customer satisfaction in Jira.
Why you need Elements Pulse to improve customer satisfaction in Jira
In today’s competitive market, businesses can’t afford to ignore customer satisfaction. Elements Pulse provides you with the tools and insights you need to understand the full customer experience, allowing you to make data-driven decisions that directly impact customer satisfaction.
From comprehensive dashboards and Experience Level Agreements to customizable surveys and productivity metrics, Elements Pulse ensures that you stay on top of your team’s performance and continuously improve the customer experience.
If you’re ready to take your Jira Service Management to the next level, it’s time to explore Elements Pulse. With real-time insights, customizable SLAs, and a focus on the overall customer experience, Elements Pulse will help you transform how you manage and improve customer satisfaction in Jira.
Start your 30-day free trial today and unlock the power of Elements Pulse for your JSM.
By leveraging these insights, you’ll be able to keep your customers happy, increase your team’s performance, and drive higher profits for your business. Don’t miss out on the chance to revolutionize your customer satisfaction in Jira—Watch Alex Ortiz’s video!
Overcoming common challenges for Project Managers using Jira
Jira, a powerful project management tool developed by Atlassian, has become a go-to solution for software development teams worldwide. It offers a wide range of functionalities, from bug tracking to agile project management. However, despite its extensive capabilities, project managers often face several challenges when using Jira. Understanding these challenges and learning how to overcome them can help teams better leverage Jira’s strengths and mitigate its weaknesses.
1. Complex configuration and customization
One of Jira’s greatest strengths is its flexibility. However, this flexibility can also be a significant challenge. The tool offers numerous customization options for workflows, issue types, screens, and fields. While this allows teams to tailor Jira to their specific needs, it also means that setting up and maintaining the system can be complex and time-consuming.
Solutions:
- Initial setup investment: Allocate sufficient time and resources for the initial configuration. Engage with Jira experts or consultants if necessary.
- Regular review and cleanup: Periodically review and streamline configurations to ensure they remain relevant and efficient.
- Standardized templates: Create templates for common workflows and issues to reduce complexity and ensure consistency across projects.
Discover the power of project templating with Elements Copy and Sync. Streamline your workflows and maintain consistency across all your projects. Learn more about how this app can enhance your Jira experience.
2. Difficult learning curve
Jira is feature-rich, which can make it daunting for new users. Project managers often find that onboarding team members and getting them up to speed with Jira can take considerable time and effort.
Solutions:
- Comprehensive training: Organize detailed training sessions for new users and provide ongoing learning opportunities. For those looking for certified expertise, leverage Atlassian University to offer structured, in-depth training sessions led by professionals.
- User documentation: Develop clear, accessible documentation tailored to your team’s specific processes and use cases. You can use Confluence to document all your processes.
- Utilize resources: Take advantage of Atlassian’s online resources, including tutorials, webinars, and community forums.
3. Performance issues with large data sets
As projects grow and the number of issues in Jira increases, performance can degrade. This is especially true for teams handling large, complex projects with thousands of issues.
Solutions:
- Archiving: Regularly archive old issues and projects that are no longer active to keep the system running smoothly.
- Maintenance tasks: Perform routine maintenance tasks such as re-indexing and upgrading Jira to the latest version.
4. Integration complexities
While Jira integrates well with many tools, managing these integrations can be complex. Ensuring that data flows correctly between Jira and other systems (like CI/CD pipelines, customer support tools, or business intelligence platforms) can be challenging.
Solutions:
- Marketplace apps: Use apps from the Atlassian Marketplace to streamline integrations.
- Clear documentation: Maintain detailed documentation for all integrated systems and their interaction points.
- Integration specialists: Consider hiring or consulting with integration specialists to manage complex setups.
5. Managing permissions and security
Jira’s detailed permission settings are essential for managing access and security, but they can be intricate and difficult to manage. Project managers must balance ease of access with security and compliance requirements. You can ask your IT manager to handle it.
Solutions:
- Regular audits: Conduct regular audits of permissions to ensure they are up-to-date and aligned with current roles and responsibilities.
- Role-based access: Use role-based access control (RBAC) to simplify permission management and enhance security.
- Best practices: Implement and adhere to best practices for user management and security protocols.
6. Reporting and dashboards
While Jira offers robust reporting features, creating meaningful and actionable reports can be complex. Project managers often struggle to configure dashboards that provide clear insights into project progress and team performance.
Solutions:
- Training on reporting tools: Provide training on how to use Jira’s reporting tools effectively.
- Customized dashboards: Customize dashboards to highlight key performance indicators relevant to your team.
Enhance your IT service performance and boost employee satisfaction with Elements Pulse.
- Add-ons for enhanced reporting: Utilize plugins and add-ons from the Atlassian Marketplace to enhance reporting capabilities.
7. Maintaining agile practices
For teams using agile methodologies, maintaining agile practices within Jira can be challenging. Ensuring that all team members adhere to agile principles and use Jira’s agile boards (like Scrum and Kanban boards) correctly is really important.
Solutions:
- Agile training: Conduct regular agile training sessions and workshops to reinforce agile principles.
- Proper setup: Ensure that sprints, backlog grooming sessions, and Kanban boards are properly set up and used effectively.
- Continuous feedback: Encourage continuous feedback and iteration on processes to improve agile practices.
8. User adoption and change management
Introducing Jira to a team that is used to another tool or process can be met with resistance. User adoption is often a significant hurdle for project managers.
Solutions:
- Clear communication: Communicate the benefits of using Jira clearly to the team, highlighting improvements and efficiencies.
- Continuous support: Provide continuous support and address any concerns or issues promptly.
- Iterative improvements: Encourage feedback and make iterative improvements based on user suggestions to enhance the user experience.
While Jira is a powerful tool for project management, it is not without its challenges. By recognizing these challenges and implementing effective strategies to address them, project managers can ensure that their teams utilize Jira to its full potential. Regular training, proper setup, maintenance, and leveraging Jira’s extensive customization and integration capabilities are key to overcoming these hurdles and achieving project success.
For additional resources and support, consider exploring Atlassian’s community forums and documentation, as well as engaging with Jira consultants when necessary.
In the world of IT service management, understanding and improving user feedback is vital for long-term success. For teams using Jira, tracking and enhancing user sentiment becomes even more critical as it directly impacts the effectiveness of service delivery and project outcomes. By integrating performance metrics like Net Promoter Score (NPS) and Customer Satisfaction Score (CSAT), teams can gain valuable insights into their customers’ experiences and make data-driven decisions to improve their services. Thanks to Elements Pulse, an app available on the Atlassian Marketplace, the process is simplified, allowing you to evaluate and manage client perceptions in Jira seamlessly.
Understanding customer satisfaction in Jira
Client satisfaction is a crucial component of Experience Level Agreements (XLAs), which are becoming increasingly important in IT service management. While traditional Service Level Agreements (SLAs) focus on the technical aspects of service delivery—such as uptime, response times, and resolution times—XLAs shift the focus to the overall experience of the end-user. This shift recognizes that technical performance alone does not guarantee a positive customer experience. Instead, how clients feel about the service they receive, including their satisfaction with the support, communication, and outcomes, plays a significant role in their overall experience.
Customer satisfaction as part of XLAs
Experience Level Agreements (XLAs) take into account not only the service metrics traditionally covered by SLAs but also the subjective aspects of the user experience, such as client feedback. In the context of XLAs, it’s a key performance indicator (KPI) that reflects how well the IT services align with user expectations and contribute to a positive experience.
By measuring satisfaction through metrics like NPS and CSAT, organizations can gain insights into how customers perceive the value and effectiveness of IT services. These metrics provide a direct line of feedback from the users, indicating whether the services are meeting, exceeding, or falling short of expectations. High feedback scores suggest that the service is not only technically sound but also well-received by the users, contributing to a positive overall experience as defined by the XLA.
Why are XLAs important
- Holistic view of service quality: XLAs provide a more comprehensive view of service quality by combining both objective metrics (like those found in SLAs) and subjective experiences (such as customer satisfaction). This holistic approach ensures that IT services are evaluated not just on their technical merits but also on how they contribute to the user’s overall experience.
- Aligning IT services with business goals: XLAs help bridge the gap between IT services and business outcomes by focusing on user experience, which is directly tied to business success. When IT services contribute positively to customer satisfaction, they are more likely to support broader business goals, such as customer retention, loyalty, and brand reputation.
- Improving user experience: By emphasizing customer satisfaction as a part of XLAs, organizations can identify areas where the user experience can be enhanced. For example, even if a service meets all its technical SLAs, poor communication or a lack of empathy during support interactions can still lead to dissatisfaction. XLAs encourage IT teams to focus on these softer aspects of service delivery that significantly impact the user experience.
- Driving continuous improvement: XLAs promote a culture of continuous improvement. Regularly measuring and analyzing customer satisfaction helps organizations identify trends, uncover pain points, and implement changes that improve the overall experience. This ongoing feedback loop ensures that IT services evolve in line with user needs and expectations.
- Differentiating from competitors: In a competitive market, a strong focus on customer satisfaction through XLAs can be a key differentiator. Organizations that consistently deliver positive customer experiences are more likely to retain customers and attract new ones, giving them a competitive edge.
Why measure customer satisfaction in Jira with NPS and CSAT?
To effectively gauge user sentiment, two key metrics are commonly used: NPS and CSAT. Each provides a different perspective on customer sentiment and helps you understand how well your team is meeting customer needs.
- Net Promoter Score (NPS): NPS is a measure of customer loyalty and is calculated based on the question: “On a scale of 0 to 10, how likely are you to recommend our company/product/service to a friend or colleague?” Responses are categorized into Promoters (9-10), Passives (7-8), and Detractors (0-6). Your NPS is then calculated by subtracting the percentage of Detractors from the percentage of Promoters. In Jira, tracking NPS helps you understand the overall sentiment and loyalty of your customers related to specific projects or service interactions.
- Customer Satisfaction Score (CSAT): CSAT measures how satisfied customers are with a specific interaction or aspect of your service. Typically, clients rate their satisfaction on a scale, such as 1 to 5 or 1 to 10. The CSAT score is the average of these ratings. Unlike NPS, which gives a broader view of customer loyalty, CSAT provides a more detailed look at satisfaction with specific Jira issues, tasks, or services.
Measuring both NPS and CSAT allows you to gain a comprehensive understanding of customer satisfaction, helping you improve both overall loyalty and satisfaction with specific aspects of your service delivery.
If you’re looking for actionable strategies to implement NPS and CSAT effectively, check out this insightful video by Alex Ortiz. He shares expert tips on measuring and improving customer satisfaction, specifically designed for teams working with Jira. Watch the video now.
How to measure customer satisfaction in Jira with Elements Pulse
Elements Pulse is designed to integrate seamlessly with Jira. Here’s how you can set up and track NPS and CSAT in using Elements Pulse.
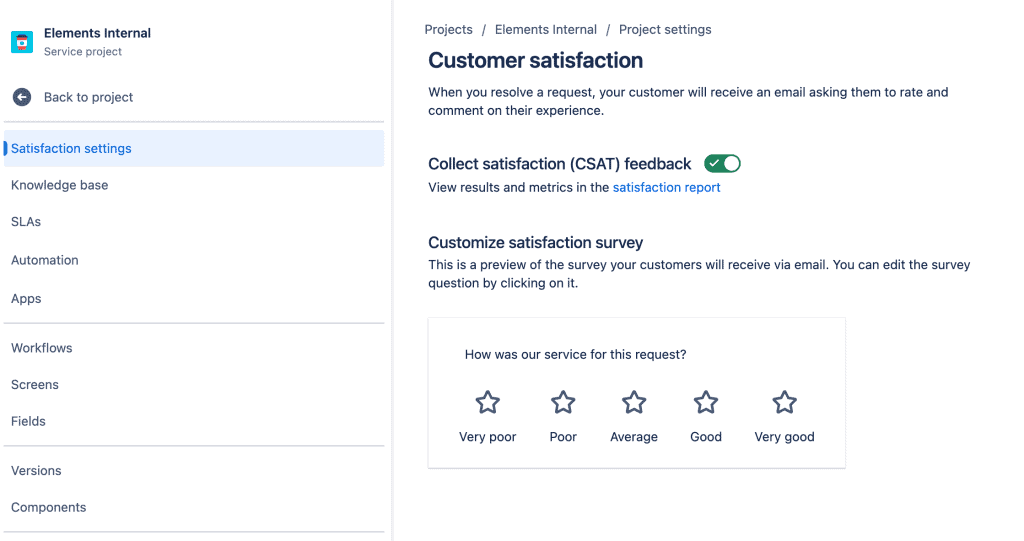
- Configure surveys in Jira: To begin with you have 2 options: you can activate native Jira CSAT survey or create a NPS survey directly from Elements Pulse. You can tailor these surveys to specific Jira projects, issues, or workflows, ensuring that the feedback you collect is relevant and actionable. For example, you might set up an NPS survey to be sent automatically after the closure of a Jira ticket, or a CSAT survey following the completion of a project milestone.
- Automate survey distribution: With Elements Pulse, you can automate the distribution of feedback surveys in Jira. Automation ensures that surveys are sent at the right times, such as after a ticket resolution or project delivery, without manual intervention. This helps you gather timely feedback consistently, allowing you to monitor user sentiment continuously.
- Collect and analyze feedback in Jira: Once your surveys are distributed, Elements Pulse collects the feedback and provides you with powerful analytics tools. You can view NPS and CSAT scores in real-time through customizable dashboards, making it easy to track sentiment trends and identify areas for improvement. This integration allows you to link user feedback directly to specific Jira issues or projects, providing context for the data and making it easier to act on.
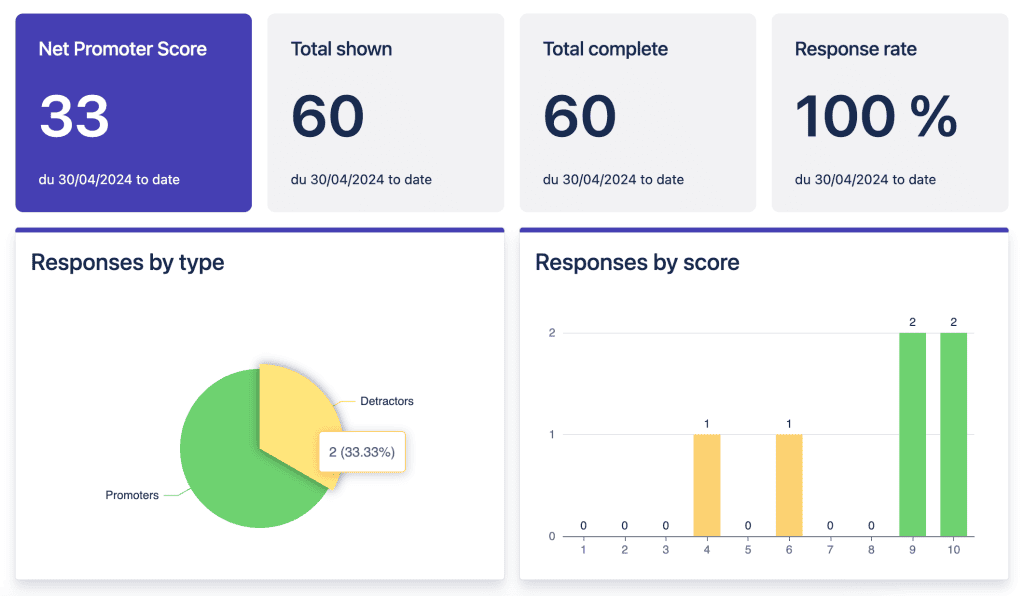
- Interpret NPS and CSAT results: Elements Pulse provides detailed insights into your NPS and CSAT results within Jira. The app categorizes responses, allowing you to see how many of your customers are Promoters, Passives, or Detractors for NPS, and provides average satisfaction scores for CSAT. These insights help you understand the overall sentiment of your customers and identify specific issues or projects that may be affecting satisfaction.
- Take action based on feedback: Measuring sentiment in Jira is only the first step; the real value comes from using the data to drive improvements. Elements Pulse enables you to create workflows within Jira that trigger actions based on survey results. For example, you can automatically generate an issue for your support team if a customer leaves a low CSAT score, ensuring that the feedback is addressed promptly.
- Monitor trends and improve over time: Elements Pulse allows you to track sentiment trends over time in Jira. By regularly reviewing NPS and CSAT scores, you can monitor the impact of changes and improvements on overall user satisfaction. This ongoing analysis helps you continuously refine your service delivery processes.
Conclusion
Measuring customer satisfaction in Jira is essential for ensuring that your IT services and projects meet customer expectations and drive business success. By using NPS and CSAT, you can gain valuable insights into customer loyalty and satisfaction with specific aspects of your service delivery.
Elements Pulse provides a powerful solution for integrating client feedback measurement into Jira, offering tools to configure surveys, automate feedback collection, analyze results, and take action based on the data. By leveraging these features, you can ensure that your team is consistently focused on improving the client experience, leading to higher loyalty, better retention, and more successful project outcomes.
Investing in customer satisfaction in Jira is not just about collecting feedback; it’s about building a stronger, more customer-centric organization. With Elements Pulse, you have the tools you need to measure, understand, and improve client sentiment, driving your business toward long-term success.
SLA vs XLA: Boost customer experience with Elements Pulse in JSM.
In the modern service delivery landscape, businesses strive to meet and exceed customer expectations. Key metrics like Service Level Agreements (SLA) have been the standard for measuring service performance. However, with the growing emphasis on customer experience, Experience Level Agreements (XLA) are emerging as a complementary, if not superior, metric. This article delves into the differences between SLAs and XLAs, exploring how they can be used together to enhance service delivery, particularly through the innovative Elements Pulse app.
SLAs: The traditional metric
Service Level Agreements (SLAs) are formal commitments between service providers and customers, defining the expected level of service. These agreements typically include specific metrics such as:
- Response time: The time taken to acknowledge a customer’s issue.
- Resolution time: The time taken to resolve a customer’s issue.
- Uptime/downtime: The availability of the service over a specified period.
SLAs focus on quantifiable metrics that are relatively easy to measure and report. They are designed to ensure that service providers meet basic contractual obligations, providing a foundation of trust between the provider and the customer.
Advantages of SLAs
- Clarity and accountability: SLAs provide clear expectations and accountability for service providers, ensuring they meet minimum performance standards.
- Performance measurement: They offer a straightforward way to measure service performance through objective metrics.
- Contractual protection: SLAs protect both parties by clearly defining service expectations and consequences for non-compliance.
Despite their benefits, SLAs have limitations. They primarily measure technical and operational aspects of service delivery, often neglecting the end-user experience.
XLAs: The modern approach
Experience Level Agreements (XLAs) shift the focus from operational metrics to customer experience. XLAs measure how customers perceive the service and the overall experience they receive. Key components of XLAs include:
- Customer satisfaction (CSAT): A measure of how satisfied customers are with the service.
- Net promoter score (NPS): An index that measures the willingness of customers to recommend a company’s services to others.
XLAs prioritize the customer’s perspective, aiming to enhance the overall service experience rather than just meeting technical specifications.
Advantages of XLA
- Customer-centric focus: XLA prioritize customer satisfaction and experience, leading to higher customer loyalty and retention.
- Holistic measurement: They provide a comprehensive view of service performance, incorporating both technical and experiential aspects.
- Proactive improvement: By focusing on experience, service providers can proactively identify and address issues that impact customer satisfaction.
Comparing SLAs and XLAs
| Aspect | SLA | XLA |
|---|---|---|
| Focus | Operational Performance | Customer Experience |
| Metrics | Response Time, Resolution Time, Uptime | CSAT, NPS |
| Measurement Approach | Objective and Quantifiable | Subjective and Perception-Based |
| Primary Goal | Meeting Contractual Obligations | Enhancing Customer Satisfaction |
| Outcome | Technical Compliance | Improved Customer Loyalty |
SLA and XLA are not mutually exclusive. Instead, they complement each other, providing a balanced approach to service management that ensures both operational efficiency and exceptional customer experience.

Why using experience metrics (XLA) on top of SLAs?
Using Experience Metrics (XLAs) on top of Service Level Agreements (SLAs) is beneficial for several reasons:
To enhance user satisfaction
SLAs focus on the operational aspects of a service, such as uptime, response times, and technical performance. However, they do not always capture the actual experience of the end-users. XLAs, on the other hand, measure the quality of the user experience, ensuring that services are not only operational but also meet the expectations and needs of the users. By incorporating XLA, organizations can gain insights into how users perceive the service, identify pain points, and take proactive steps to improve overall satisfaction.
To improve service quality
While SLAs provide a framework for maintaining a certain level of service quality, they can sometimes lead to a check-box approach where the goal is merely to meet the minimum required standards. XLAs encourage a more holistic view by emphasizing the end-user experience. This shift from a purely technical focus to one that prioritizes user outcomes can lead to higher quality services that better align with user expectations and requirements.
To drive operational excellence
Operational excellence involves going beyond basic service delivery to create value and optimize performance continuously. XLAs contribute to this by providing a more comprehensive understanding of service performance from the user’s perspective. By analyzing experience data, organizations can uncover trends, anticipate issues, and implement improvements that enhance both operational processes and user experience. This continuous feedback loop fosters a culture of excellence where services are consistently refined to deliver superior results.
In summary, integrating XLAs with SLAs helps organizations to ensure they are not just meeting contractual obligations but are also delivering a positive, valuable experience to users, which is crucial for long-term success and customer loyalty.
Introducing Elements Pulse
At Elements, our goal is to enable teams to connect with their customers, whether internal or external, in ways that exceed expectations and deliver exceptional value. To support IT departments in becoming more customer-centric, we developed Elements Pulse. This app serves as the central hub for monitoring and enhancing customer satisfaction within Jira Service Management.
The app features a visual dashboard that provides a clear and immediate overview of your IT performance. It analyzes your Jira data to offer valuable insights into various metric categories, includes an integrated survey tool for collecting direct user feedback, and has a module for setting and monitoring experience goals using XLAs.
Within minutes, you are equipped to deeply understand both the quantitative and qualitative aspects of your service delivery.
Elements Pulse is an innovative app designed to bridge the gap between SLAs and XLAs, offering a comprehensive solution for measuring and improving both service performance and customer experience.
Key features of Elements Pulse
- Unified dashboard: Elements Pulse provides a single platform where both SLA and XLA metrics can be monitored and managed.
- Real-time analytics: The product offers insights into service performance and customer experience, enabling proactive management.
- Integrations: The product seamlessly retrieves Jira Service Management (JSM) request history, enabling a comprehensive view of support team health and evolution over time. Additionally, it incorporates surveys to gather valuable feedback, enhancing the overall support experience and driving continuous improvement.
Key benefits of using Elements Pulse

- Align IT services with user needs
Elements Pulse enables you to align your IT services with the specific needs and expectations of your users. By providing a comprehensive overview of service performance, it helps you identify areas for improvement and prioritize actions that enhance user satisfaction. - Deliver deep insights into customer experience
The app delves into your Jira data to deliver profound insights into the customer experience. It goes beyond surface-level metrics to uncover the underlying factors affecting user satisfaction, allowing you to make informed decisions and take targeted actions to improve service quality. - Seamlessly integrate with Jira SLAs
Elements Pulse integrates seamlessly with Jira Service Level Agreements (SLAs), ensuring that your performance metrics are consistent and comprehensive. This integration allows you to monitor both operational performance and user experience in one unified platform, facilitating a holistic approach to service management.
For a deeper dive into how to balance SLAs and XLAs and boost customer satisfaction in Jira, read the article and watch this insightful video by Alex Ortiz. In the video, Alex breaks down practical steps and strategies to align service performance with customer experience using Jira and Elements Pulse. Read the article and Watch the video now.
In today’s competitive business environment, focusing solely on SLAs is no longer sufficient. While SLAs ensure that service providers meet basic performance standards, XLAs take a customer-centric approach, measuring the actual experience and satisfaction of customers. By leveraging both SLAs and XLAs, businesses can ensure operational efficiency and exceptional customer experiences.
Elements Pulse stands out as a powerful app that integrates these metrics, offering businesses the insights needed to excel in both areas. With its real-time analytics, customizable reports, Elements Pulse is the ideal solution for businesses aiming to enhance their service delivery and build lasting customer relationships.
By adopting a balanced approach that incorporates both SLAs and XLAs, and utilizing advanced apps like Elements Pulse, businesses can not only meet but exceed customer expectations, driving long-term success and growth.
What is data residency?
In today’s world, where data security and privacy are top priorities, it’s essential to know where your data is stored. Data residency refers to the practice of keeping data within a specific geographic location to meet local regulations and company policies. This means that your data is not just floating around in cyberspace; it is housed in a physical location that you can specify based on your needs and compliance requirements.
Data residency is particularly important for businesses that handle sensitive information or operate in industries with strict data protection regulations. By ensuring that your data is stored within certain geographical boundaries, you can better manage compliance with local laws and enhance your data protection measures.
Why is data residency important?
At Elements, we understand that your data’s safety and compliance are critical. With data residency, you can ensure that your data is stored in a location that meets your organization’s requirements and local laws. This means greater peace of mind and better control over your information.
One of the primary benefits of data residency is compliance with legal and regulatory requirements. Different countries and regions have varying laws concerning data storage and protection. For example, the European Union’s General Data Protection Regulation (GDPR) requires that personal data of EU citizens be stored and processed within the EU or in countries with equivalent data protection standards. By choosing where your data is stored, you can ensure compliance with such regulations and avoid potential legal issues.
Another significant advantage of data residency is enhanced security. Data stored in specific regions can be subject to local security measures and protocols, which can provide an additional layer of protection against cyber threats. This can be particularly important for businesses that handle sensitive or confidential information, such as financial institutions, healthcare providers, and government agencies.
At Elements, we are excited to announce that our apps Elements Copy and Sync and Elements Publish now support data residency, allowing you to choose the storage location of your information in full compliance with local regulations.
Where does Copy and Sync and Publish store your data?
Currently, they support data storage in the following regions:
- USA
- Germany (Frankfurt)
If you need your data stored in another region, don’t hesitate to reach out to our support team. We are here to help you meet your specific needs.
Storing data in these regions ensures that your information is subject to the respective local laws and regulations, providing you with the assurance that your data management practices are compliant and secure. Additionally, by having multiple storage options, you can choose the location that best aligns with your operational needs and customer base.
What data is covered?
With our data residency feature, several types of data are covered, ensuring comprehensive protection and compliance:
- Configuration settings: These include the various settings and preferences you configure within the app. Ensuring these are stored in a compliant region helps maintain the integrity and security of your application setup.
- Issue associations: This covers all data related to issue tracking, including links between different issues, ensuring that your tracking and management processes are compliant.
- Comments and user information: User-generated content and personal information are also covered under data residency, providing an additional layer of protection for sensitive data.
This broad coverage ensures that all critical aspects of your data are secure and compliant with your chosen region’s regulations.
How to get started with data residency in Copy and Sync and Publish?
Setting up data residency is simple and straightforward. Here’s how you can get started:
- For new users: When you install Copy and Sync, your data will automatically be stored in the Jira instance’s region, if supported. This automatic configuration makes it easy for new users to get started without worrying about manual setup.
- For existing users: If you are migrating your data, follow our straightforward process to move your data to your preferred region. The migration process is designed to be smooth and hassle-free, ensuring minimal disruption to your operations.
To request a data residency move, follow these steps:
- Go to admin.atlassian.com.
- Select your organization.
- Navigate to Security > Data residency.
- Select View details in the data residency table.
- Choose the Eligible tab and select Move apps.
- Follow the steps to review and submit your data residency move request.
It’s important to note that data residency moves must be requested at least three days in advance and can result in up to 24 hours of downtime. During this time, please notify your users and partners that the product will be temporarily out of service. This ensures a smooth transition and allows you to plan accordingly to minimize any impact on your operations.
If you need any assistance during this process, our support team is just a click away. We are committed to helping you ensure that your data is stored in the right place to meet your needs.
By choosing Copy and Sync or Publish with data residency, you are taking a significant step towards better data security and compliance. At Elements, we are committed to ensuring your data is protected and stored in the right place to meet your needs. Data residency not only helps you comply with local regulations but also provides peace of mind knowing that your data is secure.
In addition to these benefits, data residency can also enhance your customer trust. By being transparent about where and how their data is stored, you can build stronger relationships with your customers, showing them that you prioritize their data protection and privacy.
Ready to enhance your data security? Learn more about our apps and start today!
Efficiently managing and migrating data within Jira can significantly improve productivity and project management. Bulk cloning epics to populate a new project is one such task that, when done correctly, ensures consistency across projects. This article will explore the advantages of bulk cloning in Jira, how to do it using Jira automation, the limitations of Jira’s native capabilities, and how Elements Copy & Sync addresses these limitations.
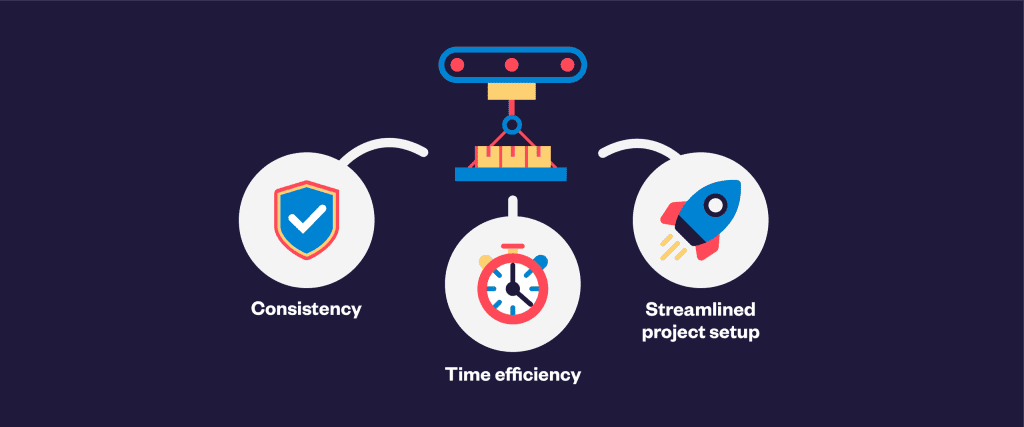
Advantages of bulk cloning in Jira
Time efficiency: Bulk cloning allows you to duplicate multiple epics and their associated issues in one go, significantly reducing the effort compared to manual cloning. This can be especially beneficial for large-scale operations where setting up new workflows can be prone to errors if done manually. By automating this process, teams can focus on more critical tasks rather than repetitive administrative work.
Consistency: Ensuring that all necessary epics and issues are copied accurately maintains the integrity of data. Consistency is important for maintaining the quality of tracking and reporting. Inconsistent data can lead to misunderstandings, missed deadlines, and ultimately, failure.
Streamlined project templating: Quickly setting up new workspaces with pre-existing epics and tasks allows teams to hit the ground running, focusing on execution rather than setup. Project templating ensures that all teams start with the same structure, making it easier to manage and track progress.
How to bulk clone epics using Jira automation
Jira’s automation capabilities allow for cloning issues and epics, though with some limitations. Here’s a step-by-step guide:
- Create an automation rule:
- Navigate to your settings and select “automation”.
- Click on “create rule”.
- Set the trigger:
- Choose a trigger that suits your needs, such as “issue created” or “scheduled”.
- Add a condition:
- Add a condition to ensure the rule applies only to epics. For example, use a JQL condition like
issuetype = epic.
- Add a condition to ensure the rule applies only to epics. For example, use a JQL condition like
- Clone the epic:
- Add the action “clone issue”.
- Configure the clone action to specify the target workspace and any fields that need to be copied.
- Clone related issues:
- Add additional actions to clone issues related to the epic. Unfortunately, Jira automation requires a separate rule for each issue type if you need to maintain the hierarchy.
- Run the rule:
- Save and enable your rule.
- Run the rule to see the epics and issues copied to the new workspace.
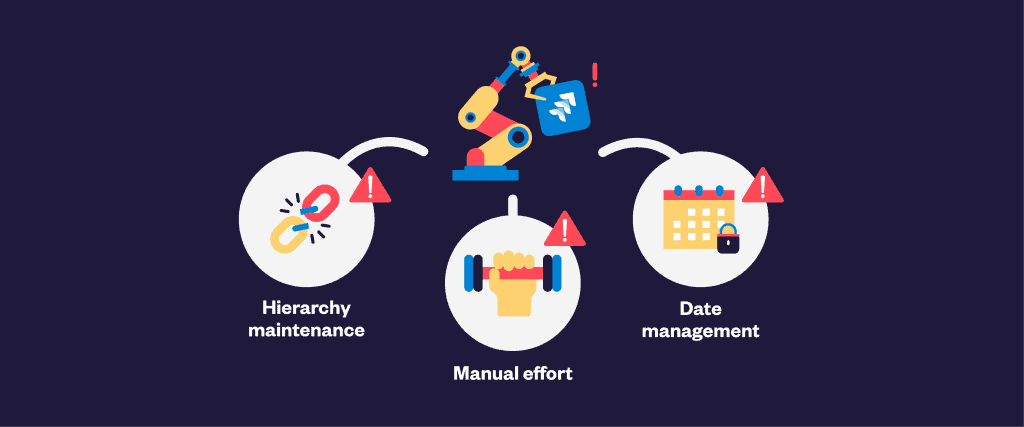
Limitations of Jira automation
While Jira automation is powerful, it has limitations:
- Hierarchy maintenance: Jira’s native automation cannot bulk clone an entire epic hierarchy in one go. You have to create separate rules for each level of the hierarchy, making the process cumbersome.
- Manual effort: Setting up multiple rules and conditions can be time-consuming and prone to errors. This manual setup can become tedious, especially for large-scale operations with complex structures.
- Date management: Jira does not allow bulk editing of dates during cloning, which can be crucial for timelines. Proper date management is essential for ensuring that schedules remain accurate and tasks are completed on time.
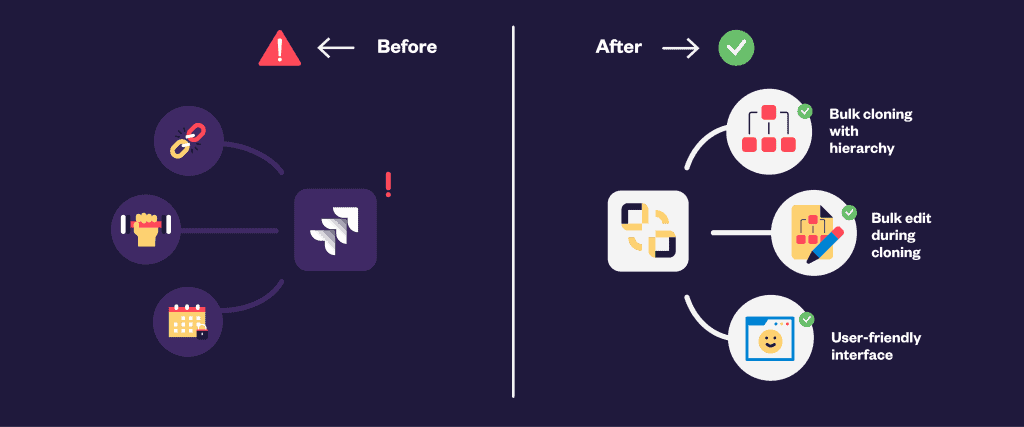
Overcoming limitations with Elements Copy & Sync
Elements Copy & Sync is a Jira cloud app designed to address the limitations of Jira’s native automation. Here’s how it can help:
- Bulk cloning with hierarchy: Elements Copy & Sync allows you to clone an entire epic hierarchy in one go. This ensures that all dependencies and relationships are preserved, maintaining the structure and flow of your workflows.
- Bulk cloning all the elements of an issue: The app allows you to clone all the elements of the issue, including the description, labels, attachments, comments, and other relevant details. This comprehensive cloning ensures that no critical information is left behind.
- User-friendly interface: The intuitive interface simplifies the process of setting up bulk clones, reducing the chances of errors and making the process more efficient. A user-friendly interface can save time and reduce the learning curve for new users.
With Elements Copy & Sync, you can also sync cloned issues to keep teams aligned and updated and improve support and development collaboration with efficient comment sync.
Implementing bulk cloning for different scenarios
When implementing bulk cloning, it’s essential to consider the specific requirements and scenarios of your operations. Here are a few common scenarios and how to address them:
- Creating templates:
- Use Elements Copy & Sync to clone and sync your templates with predefined epics and issues.
- Ensure that all necessary fields and dependencies are included in the template.
- Migrating workspaces:
- When migrating from one Jira instance to another, bulk cloning can help maintain the structure and data integrity.
- Elements Copy & Sync can clone the entire workspace, including all epics, issues, and their relationships.
- Setting up parallel workspaces:
- For organizations running parallel workspaces, bulk cloning can help replicate the setup quickly.
- This ensures that all teams follow the same structure and standards, making it easier to manage and track them.
Best practices for bulk cloning in Jira
To ensure the best results when bulk cloning in Jira, follow these best practices:
Monitor and review: After cloning, monitor to ensure everything was copied correctly. Review the setup and make any necessary adjustments to align with the project’s requirements.
Plan ahead: Before starting the cloning process, plan the structure and requirements of the new project. Identify the epics and issues that need to be cloned and any specific configurations required.
Test before cloning: If using Jira automation or a tierce app such as Elements Copy & Sync, test the rules on a smaller set of data to ensure they work as expected. This can help identify any issues before applying the rules to the entire project.
Regularly update templates: Keep your project templates updated with the latest best practices and standards. This ensures that new ones are set up with the most current information and configurations.
Bulk cloning epics in Jira is a powerful method for enhancing management efficiency. By leveraging tools like Elements Copy & Sync, organizations can overcome the limitations of Jira’s native capabilities and ensure consistent, accurate setups. Implementing bulk cloning can save effort, reduce manual work, and improve overall productivity, making it an essential practice for modern management.
Effective pre-sales management is crucial for closing deals and maintaining customer satisfaction. Integrating your CRM system with Jira Service Management (JSM) can significantly streamline your processes, improve data accuracy, and enhance collaboration among team members.
The challenge: streamlining RFP management
Pre-sales engineer often juggle multiple tasks, from managing Requests for Proposals (RFPs) to ensuring all necessary information is captured accurately. This process becomes cumbersome without a seamless integration between the CRM and JSM. Manually transferring data between systems can lead to errors, missed details, and inefficiencies that delay the RFP process.
The solution: Integrating your CRM with JSM
Integrating your CRM system with JSM can revolutionize your pre-sales process by ensuring that all critical information is centralized and easily accessible.
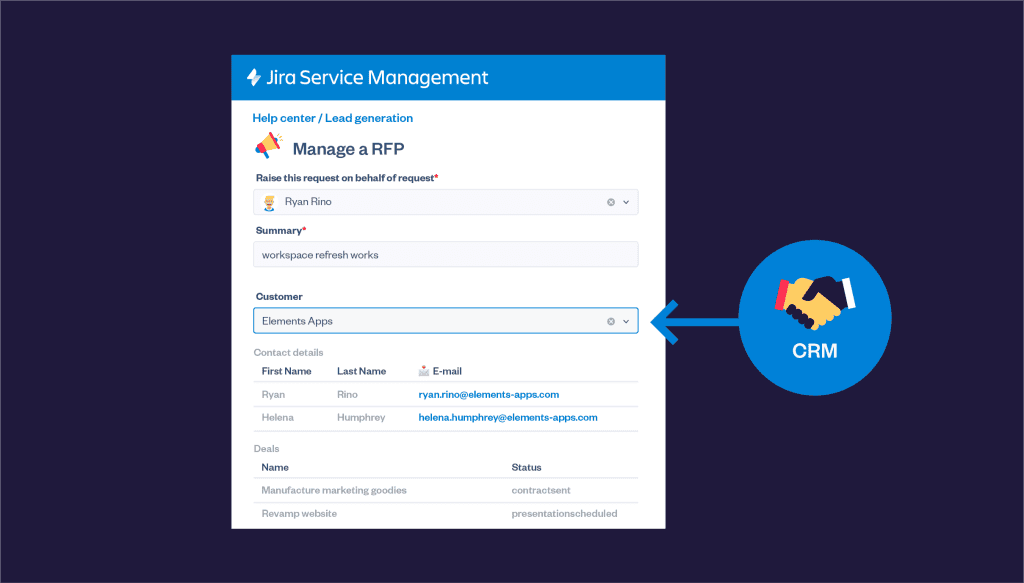
Benefits of integrating your CRM to Jira Service Management:
- Automated data syncing: Automatically synchronize data from your CRM to JSM. This ensures that all relevant customer information, such as contact details and communication history, is readily available in JSM without manual input.
- Enhanced collaboration: Facilitate better collaboration among team members by providing a unified view of customer interactions and RFP statuses. This can lead to more informed decision-making and a more cohesive approach to proposal management.
- Improved accuracy: Reduce the risk of errors by eliminating manual data entry. Automated data syncing ensures that the information in JSM is always up-to-date and accurate, which is crucial for creating effective and timely proposals.
- Time efficiency: Save valuable time that would otherwise be spent on manually transferring data. This allows pre-sales representatives to focus on more strategic tasks, such as crafting compelling proposals and engaging with potential customers.
Unlock seamless CRM integration with Elements Connect!
Streamline your pre-sales operations by integrating your CRM data directly into Jira Service Management withElements Connect.
Save time, reduce errors, and ensure all critical information is centralized and accessible. Empower your pre-sales team to focus on crafting winning proposals rather than searching for data. Learn more and optimize your workflow!
Integrating your CRM with Jira Service Management can transform your pre-sales management process. By automating data synchronization, enhancing collaboration, and improving data accuracy, this integration enables your team to work more efficiently and effectively. Invest in a seamless CRM-JSM integration to elevate your pre-sales operations and drive business success.