


At Elements, growth has always meant staying close to our customers while pushing to do more for them. Today, we’re excited to share the next step in that journey: Elements has entered an exclusive agreement to join Elevatic, the Platinum Atlassian Marketplace Partner formerly known as Communardo Products.
Why this, why now
Our ecosystem keeps raising the bar on scale, on compliance, on the depth enterprises expect from the tools they run their operations on. Elevatic shares our conviction that enterprise customers need Atlassian Marketplace vendors who go deep on the verticals they serve and can deliver at scale. Joining forces lets us accelerate an ambition we’ve held for years: making Elements’ portfolio the leading enterprise data connectivity and service management layer on Atlassian.
“Joining forces with Elevatic is the right next step for Elements in an ecosystem that demands scale and deep vertical expertise. The culture fit is strong, the portfolios complementarity is genuine, and together we can cover more of the customer journey, at greater scale.”
— Julie d’Antin, Co-CEO, Elements
What stays the same
Our products, and the high bar we put on delivering quality for our customers, don’t change. What changes is the scale of investment we can now put behind them.
“Clients and partners will continue to deal with the same people, the same roadmap commitments, and the same level of service they know today, backed by significantly greater resources to accelerate delivery.”
— Christophe Promé, Co-CEO, Elements
That means the same teams you’ve worked with, the same commitment to our roadmap, and the same quality of support that have shaped Elements for over a decade.
What this means for our partners and for Atlassian
For our Solution Partners, this is more firepower behind the co-build and co-sell work we already do together, and a stronger platform to support your Cloud migration, enterprise engagements and solution design.
For Atlassian and the broader Marketplace community, this is the emergence of a new kind of partner: a pan-European Marketplace leader with deep, specialized expertise across knowledge work, software development and ITSM. Combining Elements’ enterprise ITSM and data connectivity focus with Elevatic’s broader portfolio gives Atlassian a vendor that can go deep across the categories that matter most to its largest customers, at a scale few in the ecosystem can match.
“With Elements, we are adding a third pillar to our portfolio. Their strength in Service Management and Data Connectivity is the ideal complement to what we have built in Knowledge & Work Management and Developer Experience. Customers can now cover knowledge work, software delivery, and service operations with a single trusted Atlassian partner.”
— Feico Mol, CEO, Elevatic
A message to our ecosystem
We’re proud of what Elements has built: a specialized vendor trusted by 4700+ organizations worldwide, recognised for its ITSM leadership as Partner of the Year in 2025, and run by a team that’s stayed close to its customers every step of the way. Joining Elevatic doesn’t change that foundation; it gives us more room to build on it.
Thank you, as always, for the trust you’ve placed in us. We’re looking forward to writing the next chapter together.
About Elevatic
Elevatic is a Platinum Marketplace Partner, dedicated to enhancing collaboration, knowledge sharing, and software development efficiency. Building on more than 15 years of experience, Elevatic delivers reliable, high-quality solutions trusted by teams worldwide. The company with its 70 employees throughout Europe includes the former Communardo Products, bitvoodoo and Mibex brands. Elevatic enables over 10,000 clients in 105 countries to connect their data, platforms, and employees.
Elevatic Software – Connecting dots since 2009
TL;DR
- Manual rebuilding is the #1 sign: if your team recreates the same work item structure every recurring project or release by hand, that’s the clearest sign you need to clone Jira issues.
- Native Jira clone has real limits: Jira’s built-in Clone button works one work item at a time and doesn’t keep the original and the copy synced.
- Bulk need outgrows manual clicking fast: once you’re duplicating five, ten, or fifty work items at a time, that’s a sign you need Jira bulk clone tooling, not repeated manual clicks.
- Cross-project and cross-instance cloning exposes the gap fastest: teams copying work items between spaces, or between separate Jira instances, hit native feature limits first.
- A dedicated app adds what’s missing: bulk cloning, full hierarchy cloning (epic with child work items), and ongoing synchronization aren’t part of Jira’s native clone function.
If your team keeps recreating the same set of work items by hand for every sprint, release, or client onboarding, that’s usually the clearest sign you need to clone Jira issues. The other four signs covered below: copying fields manually across projects, rebuilding epics with the same child work items for every new initiative, configuration mistakes that creep in after manual copies, and a project templating need that has outgrown Jira’s native Clone button. Jira’s built-in clone feature works on one work item at a time, doesn’t keep the original and the copy in sync, and offers no granularity over what gets cloned, you can’t choose which fields, attachments, or comments to include. That’s where most teams start running into friction.
What are the most common signs your team needs to clone Jira issues?
Here’s the short version before we go through each one in detail:
- You manually recreate the same work item structure every sprint or release.
- You copy fields by hand across multiple projects.
- You rebuild epics with the same child work items for every new initiative.
- Configuration mistakes show up after work items are copied manually.
- Your bulk cloning need has outgrown the native Clone button.
Sign 1: Do you manually recreate the same work item structure every sprint?
If every new recurring project, new sprint, release cycle, or client onboarding starts with someone manually rebuilding a checklist of work items that’s nearly identical to the last one, that’s a template problem disguised as routine work.
A common example: a QA team that recreates the same 12 test-case work items at the start of every release, copying summaries, descriptions, and custom field values by hand each time. The work itself isn’t hard, but it’s repetitive, and repetitive manual work is exactly where errors and inconsistency creep in over time.
Sign 2: Are you copying fields by hand across multiple projects?
When teams need to clone Jira issues across project boundaries, manually re-entering field values quickly becomes unsustainable, especially if the source and target projects don’t share the same custom fields or schema.
This is a known limitation: when cloning between a team-managed and a company-managed project in Jira Cloud, some custom fields won’t carry over automatically because team-managed projects don’t share fields with other projects. Teams hit this exact wall when escalating a support ticket from a service project into a development project and discovering that half the relevant fields didn’t make the trip.
Sign 3: Do you rebuild epics with the same child work items for every new initiative?
Cloning a single work item is one thing; recreating an entire epic with its child stories, tasks, and subtasks is a different scale of problem. If your PMOs or scrum masters spend hours at the start of each project rebuilding a near-identical hierarchy of work items, that’s a strong sign you need something closer to “clone epic with child issues” functionality rather than one-by-one duplication.
A common use case: a project template with an epic, ten stories, and matching subtasks that gets recreated from scratch for every new client engagement. You can follow our guide to clone an issue’s full hierarchy at once if this is the bottleneck you’re hitting.
Sign 4: Do configuration mistakes show up after work items are copied manually?
Manual copying introduces a predictable failure pattern: missing custom fields, broken issue links, attachments that didn’t transfer, or a work item landing in the wrong project with the wrong workflow. These aren’t edge cases, they’re the expected result of asking people to manually replicate dozens of fields and settings, sprint after sprint. If your team has a habit of double-checking “did everything copy correctly” after every clone, that double-checking is itself a sign the current process isn’t reliable enough.
Sign 5: Has your bulk cloning need outgrown the native Clone button?
Jira doesn’t offer bulk clone natively. The Bulk Change menu covers actions like edit, transition, move, and delete, but not clone. Even where teams work around this with Jira Automation rules, that approach typically lacks field-level control, hierarchy support, and the ability to keep the copies updated afterward.
You can learn more about Elements Copy & Sync to see how this gap gets handled. A team rolling out the same set of 50 onboarding work items to a new department, for example, usually ends up clicking Clone 50 times. This is the point where “jira bulk clone” stops being a nice-to-have and becomes the actual bottleneck.
How does native Jira clone compare to a dedicated cloning app?
| Capability | Native Jira clone | Elements Copy & Sync |
| Clone a single work item | Yes | Yes |
| Bulk clone in Jira (multiple work items at once) | No | Yes |
| Clone an epic with all child work items in one action | No | Yes, in a single recipe |
| Clone across projects with different schemas | Limited, some custom fields may not map | Yes, with field mapping |
| Clone across separate Jira instances | No | Yes, when the app is installed on both instances (when using a remote recipe) |
| Keep the clone synced with the original afterward | No | Yes, one-way or two-way sync |
| Copy comments along with the clone | Not by default in most versions. Verify on your instance | Yes, configurable |
Note: native Jira behavior for comments and attachments during clone has varied across versions and editions; confirm current behavior on your specific instance before relying on this table for a configuration decision.
How do you know if you need bulk cloning instead of one-by-one cloning?
Here are a few practical thresholds that show when you’ve outgrown occasional cloning and need real bulk clone in Jira tooling:
- You’re cloning the same structure more than once per sprint or release cycle.
- You regularly duplicate more than five to ten work items in a single batch.
- The work items you’re duplicating include a hierarchy (epic plus children), not just standalone tickets.
- The clone needs to land in a different project, or a different Jira instance, rather than the same project.
- You need the clone to stay updated when the original changes, not just exist as a one-time snapshot.
If two or more of these apply to your team, manual cloning is likely costing more time than it looks like on paper.
Frequently asked questions about cloning Jira issues
What happens when you clone an issue in Jira?
Cloning a Jira issue creates a new work item that duplicates the summary, description, and most fields from the original, along with a link back to it. It’s a one-time copy, once created, the clone does not automatically update if the original changes.
What’s the difference between cloning and duplicating a Jira issue?
Cloning creates an actual new work item, an exact copy of the original, automatically linked back to it through a “Clones” link. Duplicating is different: it’s a link type (“duplicates” / “is duplicated by”) used to connect two existing work items that describe the same problem, without creating anything new. If two people report the same bug, you’d mark one as a duplicate of the other rather than cloning either one.
Can you clone a Jira issue together with its subtasks?
Apps like Elements Copy & Sync are built to handle subtasks and full hierarchies as a standard part of the cloning process, not as something you have to redo by hand.
Can you clone a Jira issue into a different project or a different Jira instance?
Native Jira clone keeps the copy within the same project by default; moving it to another project afterward is a separate, manual step. Cloning into a completely different Jira instance isn’t supported natively at all. That requires either an export/import workaround or an app like Elements Copy & Sync to clone a Jira issue into a different project or instance.
What should you do next if these signs sound familiar?
If your team is recreating the same work item structures by hand, hitting field mismatches across projects, or clicking Clone dozens of times to handle a bulk rollout, those are reliable signs that native Jira cloning has reached its limit for your use case. The next step isn’t necessarily a new process. It’s usually a tool that handles bulk cloning, full hierarchy cloning, and cross-project or cross-instance copying as standard features rather than workarounds.
You can install Elements Copy & Sync on the Atlassian Marketplace to test this against your own workflow, watch how to bulk clone in Jira, or start by checking which of these signs applies most directly to your team:
- See our walkthrough of how to leverage bulk cloning in Jira if Sign 5 was the one that hit closest to home.
- Or, if your bottleneck is closer to whole-project duplication rather than individual work items, see how to clone a project in Jira.
TL;DR
- SLAs measure speed, not quality: A ticket closed in 30 minutes can still represent a poor customer experience if the user was kept in the dark.
- Fragmented ecosystems are the main enemy: Multiple Jira instances, external data sources, and siloed teams create invisible friction for end users.
- Elements Connect surfaces external data directly in Jira: Support agents and users see the right information at the right time and right place without switching tools.
- Elements Copy & Sync bridges separate Jira instances in one click: Escalations are synchronized automatically, work item fields, statuses, comments, and attachments included.
- User-centric design reduces both mean time to resolve and frustration: When every stakeholder works from the same data, support becomes seamless and scalable.
SLAs tell you whether a ticket was closed on time. They don’t tell you whether the customer got a useful answer, understood what was happening, or had to repeat themselves three times across different teams. Customer satisfaction in Jira starts where SLAs stop, and it requires rethinking how data, teams and Jira instances connect.
Why are SLAs not enough to measure customer satisfaction in Jira?
Service Level Agreements are a contractual baseline. They measure a single dimension, response or resolution time, and declare success the moment a timer stops. But user expectations have shifted. People expect support to feel like Amazon tracking: transparent, proactive, and frictionless. An SLA met with a vague first reply, and three follow-up pings is not a good experience.
What does customer satisfaction mean in a Jira ITSM context?
Customer satisfaction in Jira ITSM means the end user received accurate, timely information throughout the ticket lifecycle, not just a response within a defined time window. It involves transparency (the user knows where their issue stands), relevance (the agent had the right data to act), and seamlessness (the user never felt transferred between disconnected systems).
Beyond the user side, SLAs can also hide internal dysfunction. Because teams work in silos, IT, HR, Engineering, and external vendors, information gets lost between handoffs. A ticket may be resolved “on time” from a process standpoint while three agents manually copy-paste data across tools in the background. That hidden friction compounds over time into agent burnout and inconsistent service quality.
| Metric | What it measures | What it misses |
|---|---|---|
| SLA compliance rate | Whether a response was sent within a time box | Quality, accuracy, and usefulness of that response |
| First response time | Speed of initial acknowledgement | Whether the agent had context to actually help |
| Resolution time | How fast was the ticket closed | Whether the root cause was addressed or just acknowledged |
| CSAT score (user survey) | Perceived quality of the interaction | Structural reasons behind low scores (data gaps, silos) |
| Escalation rate | Frequency of tier-2 involvement | Smoothness of the escalation from the user’s perspective |
What causes fragmented customer experience in Jira environments?
Most Jira environments that struggle with customer satisfaction share the same structural problem: the information a support agent needs to help a user is scattered across systems that don’t naturally communicate with each other.
- External data sources (asset databases, CMDBs, fleet registries, HR systems) that live outside Jira
- Multiple Jira instances, often created after mergers, acquisitions, or departmental splits
- Mixed toolsets: Jira Service Management for support, Jira Software for engineering
- Manual escalation processes that require copy-pasting between systems
- No shared visibility between the requester and the teams working on the ticket
What is the biggest ITSM challenge when using multiple Jira instances?
When two teams operate in separate Jira instances, for example, after a merger, escalating a request between them requires manual duplication of data. Without synchronization, comments, attachments, and status updates stay isolated. The user sees one ticket; the backend may involve two or three disconnected records that no one manages consistently.
How Elements Connect improves customer experience in Jira
Elements Connect is an app for Jira that pulls data from external sources, databases, REST APIs, LDAP directories, and CMDBs into Jira.
The result: support agents see asset details, component specifications, or customer records directly on the request, without leaving Jira. Portal users get filtered, context-aware forms that guide them to fill in the right information.
How does Elements Connect help support agents?
When a user submits a request, Elements Connect can auto-populate fields based on their selections. For example, choosing “Battery” as a component category dynamically filters the exact sub-components available for that asset. The ticket arrives at the agent with rich context already attached, no back-and-forth to gather basic information.
| Without Elements Connect | With Elements Connect |
|---|---|
| The agent asks the user for asset reference manually | Asset data auto-populated from an external source on ticket creation |
| User fills in a generic form, may omit critical fields | Portal form dynamically filters options based on the user’s context |
| Routing is manual or based on simple Jira rules | Ticket routed to the right queue based on external field values |
| The agent switches between tools to get technical details | All external data is visible inline on the Jira ticket |
Can Elements Connect improve the self-service portal experience?
Yes. The portal is often the first and most frustrating touchpoint for end users. Elements Connect lets admins build dynamic forms where each selection narrows the next field. A truck driver selecting a vehicle type sees only the components relevant to that vehicle. Read-only fields confirm what the system already knows, so users feel guided rather than interrogated. This reduces incomplete submissions and accelerates triage on the agent side.
How Elements Copy & Sync enables seamless cross-instance escalation
Elements Copy & Sync solves a specific and common problem: when a ticket needs to move either to another Jira instance, another project, or another team, the agent should not have to do it manually. The app creates a synchronized clone with a single click. From that moment, any update on either ticket (field, status change, comment, attachment) is mirrored in real time across both instances.
How does Elements Copy & Sync work across two Jira instances?
When an agent identifies that a ticket needs to be escalated to a separate Jira instance, they move the ticket to the status that automatically triggers the clone with one click. Elements Copy & Sync creates a Jira linked issue in the target instance, pre-populated with all relevant fields, attachments, and comment history. Any subsequent update, status transition, or new comment is automatically synced back to the original ticket in real time. The end user sees a single, continuously updated ticket on their end.
| Escalation scenario | Manual process | With Elements Copy & Sync |
|---|---|---|
| Ticket needs to go to a second Jira instance | Agent manually creates ticket, copies fields and description | One-click clone with all fields and attachments pre-filled |
| Status update in instance B | Agent manually updates instance A, or it never gets updated | Automatic sync between both tickets reflects the same status |
| Engineer adds a resolution comment in instance B | Agent must check the other instance manually, no notification, no sync | Comment appears automatically in instance A |
| End user checks the portal | May see stale status, no visibility on escalation progress | Portal reflects the real-time state, transparent to the user |
A real-world example: ITSM at scale in the automotive industry
An automotive company managing a large fleet of commercial trucks faced a compounded support challenge: their IT environment included two separate Jira instances (from a merger), an external database of component and battery data, and a need to route issues between Jira Service Management and Jira engineering teams. Users, truck drivers reporting field failures, needed fast, transparent support without understanding any of this complexity.
Step 1: User submits request via the JSM portal
- Clara, a truck driver, reports a battery failure via the Jira portal
- Elements Connect pulls the vehicle data from the Jira external database into connected custom fields available in the Jira forms
- She selects the component category (“Battery”), which dynamically filters available sub-components
- She selects the sub-components, which automatically populate read-only fields
- The ticket is auto-routed to the “Critical” queue based on the component type
Step 2: Support agent triages and escalates
- Suzie sees the ticket with full external data already visible, no manual lookups needed
- She identifies the manufacturer as Company B (the acquired company, in a separate Jira instance)
- One click with Elements Copy & Sync creates a synchronized clone in Company B’s Jira
- Clara receives an update, her ticket is active and in the right hands
Step 3: The engineer resolves, and the user sees the result
- Carlos (Company B engineer) receives the ticket pre-loaded with the same external data, same source, both instances
- He resolves the issue and marks it “Done” with a resolution comment
- In Company A’s Jira, the original ticket automatically transitions to “Done” and the comment appears
- Clara checks her portal and sees the issue resolved. She never knew multiple systems were involved
What results does this approach produce?
The gains from this setup operate at three levels simultaneously. For end users: transparency and speed, with no perception of being transferred between systems. For support agents: less manual work and fewer errors, since data flows automatically. For the organization: better collaboration across instances and a reduced risk of SLA breaches caused by escalation delays.
How can organizations measure the impact of this approach on customer satisfaction?
Beyond SLA compliance, teams should track: CSAT scores collected after ticket resolution, the number of user-facing status updates per ticket (more updates = more transparency), escalation cycle time (how long between the original ticket and the first update from the escalated team), and ticket re-open rate (a proxy for resolution quality). These metrics collectively give a more complete picture of experience quality than time-based SLAs alone.
How to implement customer experience management in Jira: a practical checklist
Moving from SLA-centric to experience-centric support in Jira requires changes at three levels: data integration, process automation, and visibility design.
| Layer | Action | Tool |
|---|---|---|
| Data integration | Connect external data sources to Jira fields (CMDBs, asset DBs, customer records) | Elements Connect |
| Portal design | Build dynamic request forms that filter fields based on user context | JSM Portal (admin) + Elements Connect |
| Routing automation | Auto-assign tickets to the right queue based on component or priority field values | Elements Connect + Jira |
| Cross-instance escalation | Set up synchronized cloning rules between Jira instances or projects | Elements Copy & Sync |
| End-user visibility | Configure the portal to reflect real-time status updates from all involved instances | JSM portal + Elements Copy & Sync |
| Satisfaction measurement | Track experience data alongside SLA | Jira Service Management + Elements Pulse |
Conclusion: Customer satisfaction in Jira is a design decision
SLAs will always have a role in ITSM governance, but they measure process compliance, not human experience. True customer satisfaction in Jira comes from designing support workflows around how users actually feel: informed, not guessed at; guided, not interrogated; updated proactively, not left in the dark.
The combination of Elements Connect (for dynamic external data in Jira forms and requests) and Elements Copy & Sync (for cross-instance work item synchronization) turns a fragmented Jira environment into a coherent experience for every stakeholder in the chain, from the end user submitting a request to the engineer resolving it two instances away.
The starting point is not a tool selection; it is a question: “What would a seamless experience look like for the person submitting this ticket?” Every process and integration decision should work backwards from that answer.
Is your data trapped in silos across disconnected tools?
See how the lack of integration between your apps is killing your team’s productivity, and discover the exact strategy to orchestrate a frictionless IT ecosystem.
TL;DR
| The core problem: By default, Jira tickets show what someone is requesting but not who they are in your system; agents must leave Jira to look up that context manually. Elements Connect bridges that gap: the app pulls real-time data from any REST API, database, or external system directly into custom Jira fields, visible in the ticket without any tab-switching. 38% reduction: Nebrija’s average ticket resolution time dropped by 38% after agents gained instant access to live student context directly inside each JSM request. No custom development required: the setup uses a configuration UI and FreeMarker dynamic query logic; no coding from scratch needed for Jira admins. The pattern works beyond education: any organisation where agents need customer, employee, or asset data before they can act on a ticket can apply the same approach. |
How Nebrija Surfaces External Data in Jira | 38% Faster
Serving 15,000+ students and Alumni across 6 countries is complex enough. Managing the support operations behind that scale, without giving agents the context they need to act, makes it harder than it has to be. For Nebrija University, the turning point came when live student data started appearing directly inside Jira Service Management tickets, eliminating the manual lookups that were slowing every single interaction down.
The implementation was led by Sngular, a long-standing Atlassian Solution Partner with deep expertise in JSM deployments. Elements Connect was the app that made external data visible inside JSM, without any custom development, bringing the average ticket resolution time down by 38%.
Who is Nebrija University and why did support need to scale?
Nebrija University is not a single campus. It is a conglomerate that includes a university, college, vocational training programs, student residences, and international institutes, with a presence in 6 countries, more than 15,000 students per year, and over 50,000 alumni. The support demands are closer to those of a large enterprise than a traditional academic institution.
Before moving to Jira Service Management, Nebrija’s support operations ran on a home-grown PHP platform. The service catalog was scattered, forms were basic and similar for each request type, and there was no unified experience across departments and entities.


When Sngular came in to lead the migration to Jira Service Management, the ambition was clear: build a modern, scalable service operation, one where agents could focus on resolving issues, not on hunting for information.
Why were JSM agents working without requester context?
In a standard JSM setup, a ticket tells you what someone is requesting. It does not tell you who they are in your systems.
For Nebrija’s support team, this gap had a real operational cost. A student submitting a request about a certificate, a software access issue, or a campus administrative problem expects a fast, informed response. But before an agent could act, they needed to answer basic questions: Is this person currently enrolled? In which faculty? On which programme? Are they administratively blocked? Have they completed the required credits?
None of that information was visible in Jira. Agents had to log into the university’s student information system separately, search manually, then return to Jira to start working on the request.
This context-switching was adding days to average first time to response and resolution time, across every ticket, every day.
“The goal was to give agents a 360° view of the requester, pulling real-time data from across the university’s ecosystem, right inside Jira.” – Sngular project team
How does Elements Connect display external data in Jira?
Elements Connect is an app that connects Jira work items to external data sources, REST APIs, SQL databases, LDAP directories, and displays the returned data as native Jira fields, directly on the issue view; No tab switching; No manual lookup; No duplication.
Sngular configured Elements Connect to query Nebrija’s internal student information system automatically every time a ticket is opened. Using the reporter’s email address as the dynamic identifier, the app called the university’s REST API and populated a dedicated panel, Datos alumno (student data), in the ticket, visible to agents immediately.
What data appears on each Jira ticket?
| Field | Examples of what it shows |
| Student ID (NIA) | Unique university identifier |
| Full name | From the university system |
| Faculty | e.g. Facultad de Derecho y Relaciones Internacionales |
| Programme | e.g. M164 Master en Prevención de Riesgos Laborales |
| Enrolment year | e.g. 2024 |
| Last enrolment | e.g. 2025 |
| Credits completed | e.g. 60 |
| Administratively blocked | Yes / No |
| Enrolment cancelled | Yes / No |
| University and personal email | From the university system |
This data loads at ticket open and requires zero action from the agent.
How does the dynamic query pull the right record?
The query path uses FreeMarker templating to identify the requester and retrieve the correct record. If the requester is not a student (staff, contractors, or internal users with different email domains), the field stops gracefully rather than returning an error. The same configuration principle applies to any organisation integrating employee, customer, or asset data into Jira.
How do JSM, Elements Connect, and Refined work together?
Elements Connect solved the agent context problem. But the Nebrija transformation also addressed the experience on the requester side.
Sngular used Refined, the experience layer for Jira Service Management, to create a branded, audience-aware service portal aligned with Nebrija’s visual identity. Rather than exposing students and staff to the default JSM experience, Refined delivered a structured service front door with clear navigation across service areas such as student support.
The two apps work at different layers of the same service experience:
| Layer | App | What it solves |
| Requester experience | Refined | Students and staff find and route requests correctly |
| Service operations | Jira Service Management | Ticket management, SLAs, routing, workflows |
| Agent context | Elements Connect | Dynamic external data is visible on every ticket at triage |
| Architecture and rollout | Sngular | Configuration, change management, phased implementation |
What results did Nebrija get from Elements Connect?
After deploying Elements Connect, Nebrija’s average ticket resolution time dropped by 38%. Agents stopped switching between systems at every triage step; the student context they needed was already on the ticket when they opened it.
The improvement is directly tied to eliminating manual context lookup. Before the implementation, an agent opening a ticket about a student request had to: leave Jira, log into the student information system, search for the requester, read the relevant data, and then return to Jira to act. That sequence added time to every single interaction. With Elements Connect, that sequence no longer exists.
Note: Nebrija’s broader JSM transformation, led by Sngular and also involving Refined for portal experience, delivered additional service improvements at scale. The 38% resolution time reduction is specifically attributed to the Elements Connect deployment and the contextual data it surfaces on each work item.

Why does surfacing external data in Jira matter?
This is a practical example of what becomes possible when external data is treated as a first-class part of the service workflow, not an afterthought.
Nebrija’s agents did not get faster by working harder. They got faster because the information they needed was already there when they needed it. The system did the lookup for them.
The same pattern applies far beyond higher education. Any team managing support in Jira, where agents routinely need customer records, employee data, asset history, or account status before they can act, can follow the same approach with Elements Connect.
Whether you’re handling IT requests, HR onboarding, customer support, or field service operations, connecting your external data sources to Jira is one of the highest-leverage changes you can make to your service operation.
What’s next for Nebrija’s Jira rollout?
With the data foundation in place, Nebrija and Sngular are now looking at how to extend the value of Elements Connect across the organisation. The immediate priority is Step 1 of that roadmap: connecting to more data sources within Nebrija’s ERP to bring additional teams onto Jira Service Management.
Two concrete initiatives are underway:
- Connecting to more ERP data sources: as more departments join JSM, Elements Connect will be configured to query additional endpoints within Nebrija’s ERP, giving each new team the same contextual data their agents need at triage, without duplicating data or building new integrations from scratch.
- Converting static fields to Live Fields: the next configuration step is moving from cached data to true live fields, so that the information displayed on a ticket reflects the exact state of the source system at the moment the agent reads it. For a university environment where enrolment status, payment records, or administrative flags can change between the moment a ticket is submitted and the moment it is triaged, accurate real-time data is not a nice-to-have; it directly affects the quality of the response.
This maturity curve is worth noting for any organisation planning a similar implementation. Start with the highest-friction data lookup your agents face today. Get that into JSM. Then expand to additional sources and refine the freshness of the data as usage scales.
FAQ
Q: What is the difference between a Jira integration and displaying external data in Jira?
A Jira integration typically connects two tools so that actions in one trigger actions in the other, for example, creating a GitHub issue from a Jira ticket. Displaying external data in Jira is different: it means reading data from an external system and showing it as context inside the Jira interface, without necessarily creating or modifying anything in either system. The goal is to give agents information at the right moment, not to synchronise workflows.
Q: Does Elements Connect require coding skills to configure?
No. The core configuration, defining data sources, setting query paths, and mapping response fields to Jira custom fields, is done through the Elements Connect UI. FreeMarker templating is used for dynamic query logic, which requires some familiarity with template syntax but is not full programming. Most Jira admins comfortable with Jira automation rules can configure Elements Connect without developer support.
Q: Can Elements Connect work with any REST API, or only specific systems?
Elements Connect works with any REST API that returns JSON or XML, as well as SQL databases and LDAP directories. It is not tied to specific vendors or platforms. As long as the data source is accessible from the Jira Cloud instance, Elements Connect can query it. This makes it applicable to student information systems, HR platforms, ERP systems, CRMs, and any other system of record an organisation maintains.
Q: What specifically caused Nebrija’s response time to drop by 38%?
The reduction came from eliminating the manual context-lookup step that preceded every triage decision. Before Elements Connect, agents had to leave Jira, log into the student information system, find the requester’s record, and return to Jira before they could act. Elements Connect removed that sequence entirely by surfacing live student data, enrolment status, faculty, programme, administrative flags, directly on the ticket at load time.
Q: Is this approach applicable outside higher education?
Yes. The underlying pattern applies anywhere agents regularly need information from outside Jira before they can act on a request: IT and HR teams needing employee records, customer support teams needing order history or CRM data, field service teams needing asset and maintenance history, and financial services teams needing account status or compliance flags. The configuration approach is the same in each case.
Try Elements Connect today
TL;DR
Jira’s internal database should never be modified directly. When teams need external data inside tickets (customer info, asset inventories, billing records), four approaches exist: API-based sync, middleware platforms, direct database interaction (strongly discouraged), or a dedicated Jira app. Elements Connect is the most maintainable option; it retrieves data dynamically without duplicating records or breaking the core architecture.
Jira stores all its data (issues, workflows, permissions, and custom fields) in a relational database (PostgreSQL, MySQL, SQL Server, or Oracle). This internal database should never be modified directly. When teams need external data inside Jira tickets, such as customer subscriptions, asset inventories, or billing records, the recommended approaches are API-based sync, middleware platforms, or a dedicated Jira app like Elements Connect, which retrieves data dynamically without altering the core database structure.
This article explains how the Jira database works, how external data can interact with it, and what limitations to consider before connecting external sources.
Understanding the Jira database
Every Jira instance relies on a relational database to store its internal data. This backend layer contains all the information required for the application to operate.
The database stores elements such as:
- work items and comments
- space configuration
- workflows and statuses
- permissions and user accounts
- custom fields and metadata
Depending on the environment, Jira typically runs on one of the following database engines:
- PostgreSQL
- MySQL
- Microsoft SQL Server
- Oracle
This database forms the foundation of the platform. If it becomes corrupted or misconfigured, the entire Jira instance can be affected.
For this reason, Atlassian strongly advises administrators not to modify the Jira database directly. Changes should always be performed through supported APIs or applications.
While Jira manages its own internal data structure, organizations usually maintain many other systems storing operational information.
Examples include:
- customer subscriptions
- asset inventories
- licensing records
- product usage metrics
- configuration values
Teams frequently need access to this information while working on issues.
Without a connection between systems, users must search for data manually across different tools.
Why external data is needed into Jira
Requests to display external information into Jira usually come from real operational needs.
Support teams may want to see a customer’s subscription status directly within a ticket.
Developers might require configuration values stored in an internal SQL server.
Operations teams often manage infrastructure inventories in dedicated asset databases.
Finance departments may track billing references linked to projects.
When this information is not accessible from Jira, users rely on inefficient workarounds.
Typical examples include:
- manually copying values into custom fields
- exporting spreadsheets from external systems
- switching between dashboards
- updating issue fields manually
These processes create several problems.
Information inside issues can quickly become outdated. Manual updates increase the risk of human error. Teams lose confidence in the accuracy of stored values. Users also waste time navigating between tools.
Providing controlled access to external data within Jira helps eliminate these inefficiencies.
Approaches for accessing external data into Jira
Several technical strategies exist for connecting external data sources into Jira. Each approach offers different advantages and constraints.
Understanding these options helps administrators design a sustainable architecture.
API-based synchronization
One common approach is to retrieve information from another system and push it into Jira through the REST API.
The process typically works as follows:
- A script queries the external data source
- The returned data is transformed or filtered
- The script updates Jira custom fields using API calls
This method offers flexibility because developers control the transformation logic.
However, it also introduces maintenance overhead. Scripts must be monitored, updated, and adapted whenever systems change.
If the synchronization process fails, Jira fields may stop updating.
In many cases, updates run on a scheduled basis rather than in real time.
Middleware and integration platforms
Another approach involves using middleware or an integration platform.
These tools sit between Jira and other systems, managing data flows and transformations.
They can automate synchronization tasks and orchestrate workflows across applications.
However, they also increase architectural complexity. Additional infrastructure must be configured, monitored, and maintained.
For teams without dedicated integration specialists, this approach can become difficult to manage over time.
Direct interaction with the Jira database
Some administrators consider interacting directly with the Jira database to manipulate stored information.
This approach is strongly discouraged.
The internal database structure is tightly coupled with the application logic. Direct changes may corrupt data, break upgrades, or invalidate Atlassian support.
Any integration strategy should therefore avoid modifying the internal storage layer directly.
Jira apps designed for external data
A more structured solution is to use a Jira app designed to retrieve external data dynamically.
These applications allow administrators to configure connections to external systems and display results directly in Jira.
Typical capabilities include:
- secure connections to SQL servers
- configurable queries
- dynamic custom fields
- controlled access based on permissions
- display of external records inside issues
This approach allows administrators to enrich Jira with external information without altering the core database structure.
Limitations to consider
While connecting external data sources into Jira can provide significant value, administrators must carefully consider several technical constraints.
Ignoring these factors often leads to unstable or inefficient implementations.
Data freshness
Some integrations rely on scheduled synchronization processes.
For example, a script may update Jira fields every hour using information retrieved from another system.
In this scenario, the values visible inside issues may already be outdated.
For operational use cases such as subscription validation or infrastructure monitoring, delays can cause confusion.
Dynamic queries can improve accuracy but must be carefully optimized to avoid performance issues.
Security and access control
Any architecture involving external data requires strong security measures.
Administrators must manage authentication credentials, encrypted connections, and network access rules.
Permissions also need to be carefully configured. Not every user should be able to see sensitive information such as financial records or customer details.
A secure configuration ensures that only authorized users can access specific data.
Performance considerations
Querying external systems during issue loading can affect the responsiveness of the Jira interface.
Performance issues may occur when:
- queries are poorly optimized
- large datasets are requested
- the external system responds slowly
- too many dynamic fields are displayed at once
If response times increase significantly, users may perceive the entire Jira instance as slow.
Proper query design and caching strategies are therefore essential.
Data consistency
Another common challenge appears when information from external systems is copied into Jira instead of being retrieved dynamically.
For example, a subscription status may change in the source system while the value stored in a Jira field remains outdated.
Automation rules or workflows may then rely on incorrect information.
Referencing live data instead of duplicating it helps maintain consistency across systems.
When connecting external data makes sense
Not every Jira environment requires deep integration with other systems.
However, accessing external data directly from issues becomes valuable in several situations.
Examples include:
- when information changes frequently
- when workflows depend on external values
- when multiple teams rely on the same dataset
- when manual updates create operational risks
- when support teams need immediate context
In these scenarios, providing access to external data inside Jira can significantly improve efficiency.
Questions administrators should consider
Before implementing a connection to external data sources, administrators should clarify several important points.
Is the access read-only, or should Jira update external systems?
Should information be retrieved dynamically or synchronized periodically?
Which projects or user groups require access?
How should the system behave if the external source becomes unavailable?
Who will maintain queries and connections over time?
Addressing these questions early helps avoid architectural problems later.
Common mistakes
Many integration initiatives fail because they are implemented too quickly without long-term planning.
Frequent mistakes include:
- building custom scripts without documentation
- ignoring SQL query optimization
- exposing unnecessary information in issues
- duplicating records unnecessarily
- underestimating maintenance effort
A sustainable implementation should remain simple, secure, and maintainable.
If administrators must constantly monitor the system, the architecture is probably too fragile.
A practical approach for accessing external data
For most organizations, the goal is not to turn Jira into a full data management platform.
Instead, administrators want to provide users with the information they need directly within issues.
An effective solution should allow teams to:
- connect external SQL servers securely
- configure queries without complex development
- display results in custom fields
- control permissions and visibility
- maintain strong performance
Rather than synchronizing large datasets, a modern architecture focuses on retrieving only the information required for each issue.
Bringing external data into Jira with Elements Connect
Elements Connect connects external data sources into Jira work items through dynamic custom fields, without modifying the internal database or requiring custom scripts. Instead of storing duplicated values, the app retrieves information from the source system when needed. Queries can be configured securely, permissions are respected, and administrators maintain full control over the data displayed.
Frequently asked questions
What database does Jira use?
Jira supports several relational database engines depending on the deployment: PostgreSQL, MySQL, Microsoft SQL Server, and Oracle. The database stores all internal data including issues, workflows, permissions, and custom fields.
Can I modify the Jira database directly?
No. Atlassian strongly advises against direct database modifications. The internal schema is tightly coupled with application logic; direct changes can corrupt data, break upgrades, and void Atlassian support. All changes should go through supported APIs or apps.
How can I display external data inside Jira issues?
There are several approaches: API-based synchronization scripts, middleware integration platforms, or dedicated Jira apps. The most maintainable option is a Jira app designed for external data access, such as Elements Connect, which queries external sources dynamically and displays results in custom fields without duplicating or storing data inside Jira.
What are the risks of syncing external data into Jira?
The main risks are data freshness (synced values can become outdated), performance issues (slow external queries can affect Jira’s responsiveness), security exposure (credentials and access rules must be carefully managed), and data inconsistency (when values are copied rather than retrieved live).
What is Elements Connect?
Elements Connect is a Jira app built by Elements Apps that allows administrators to connect external SQL databases and other data sources directly to Jira. It displays live data inside issues through dynamic custom fields, without modifying Jira’s internal database or requiring custom development.
Final thoughts
Jira plays a central role in managing work across teams, but the information required to resolve issues often lives in multiple systems.
Understanding how the Jira database works and how external data can be accessed is essential for administrators designing integrations.
With the right architecture, teams can access critical information directly within issues while preserving performance, security, and maintainability.
When implemented correctly, connecting external data sources transforms Jira from a simple issue tracker into a powerful operational workspace.
| TL;DR Toolstation, one of the UK’s fastest-growing trade suppliers, needed a reliable Jira and Confluence integration to automate IT reporting. Teams were manually copying Jira work items into Confluence docs, field by field. With Elements Publish, they now automatically create Confluence pages from Jira issues, synchronize data in real time, and maintain a live knowledge base eliminating manual effort and scaling across departments. Industry: Retail / Trade Supply • App: Elements Publish • Platform: Jira Service Management + Confluence Key outcome: 100% elimination of manual reporting, standardized Confluence pages from Jira, live knowledge base, expanding to 4+ teams |
What are Jira and Confluence, and why do teams use them together?
Jira and Confluence are two of Atlassian’s most powerful apps. Jira captures and manages work items, from bugs and tasks to service requests and incidents. Confluence is a live doc and knowledge base platform where teams create, organise, and share content. Together, they support efficient project and knowledge management across the organisation.
But making Jira and Confluence truly work together, automatically creating Confluence pages from Jira issues, synchronizing data in real time, is where most teams hit a wall. The native link between the two platforms doesn’t automate content creation. Teams end up copying data manually, which doesn’t scale.
Toolstation, one of the UK’s fastest-growing trade suppliers, faced exactly this challenge. Their IT teams relied on Jira Service Management for work items management and on Confluence as their central knowledge base. Linking Jira to Confluence for efficient project and knowledge management was the missing piece.
The challenge: manually bridging Jira and Confluence at scale
Without an automated way to create Confluence pages from Jira issues, Toolstation’s teams were doing everything by hand. Every resolved incident, every new store, every project wrap-up required someone to manually select Jira work items and copy the data into Confluence, field by field, doc by doc.
This manual process consumed significant colleague time, created formatting inconsistencies in Confluence knowledge base content, and couldn’t scale as reporting needs grew.
“Jira is great for capturing the info, and Confluence is great for displaying it, but getting the two talking together never really worked, so we saw a significant and growing impact on colleague time as reporting needs expanded.”
Cam Burridge, Incident & Problem Lead, Toolstation
The work items in Jira were structured and complete. The Confluence templates were ready. What was missing was the automated integration that would create Confluence pages from Jira issues automatically and keep them synchronized.
The solution: automatically create Confluence pages from Jira with Elements Publish
Toolstation selected Elements Publish, the Elements app designed to create Confluence pages from Jira issues and synchronize data across both tools. Elements Publish gave Toolstation the Jira and Confluence integration they needed, without any custom development.
Thanks to Elements Publish, the team defined exactly how:
- Each Jira work item should be mapped and displayed in Confluence
- Confluence pages are now created automatically, with fields, labels, and attachments from the Jira work item, whenever the defined conditions are met
- Data synchronization ensures Confluence stays up to date as Jira work items evolve

Key use cases: creating Confluence pages from Jira
- Major Incident Reports (MIRs): Jira Service Management work items are automatically published into a strict Confluence template, standardized, consistent, and created with a single click.
- Store configuration pages: Each new store generates a dedicated Confluence knowledge base page, pulling all support information directly from Jira project data.
- Lessons learned reports: Failed changes, incidents, and problems in Jira are automatically turned into structured Confluence pages, capturing lessons learned without manual content creation
The impact: a live Confluence knowledge base, fed automatically by Jira
Since adopting Elements Publish to create Confluence pages from Jira and synchronize data, Toolstation has completely transformed their reporting. Manual work items management is gone. The Confluence knowledge base is live, structured, and automatically updated.
- MIRs are now standardized Confluence pages, created automatically from JSM work items
- All stakeholders receive consistent, up-to-date content, no delays, no formatting inconsistencies
- Confluence evolved from a passive documentation repository into a dynamic reporting hub, automatically fed by Jira data
- IT Ops and Infrastructure are already live. HR, Retail, Facilities, and Procurement are next
- Reporting scope has expanded significantly: use cases previously too time-consuming to document are now automated
“Since we started using Elements Publish, we’ve managed to completely eliminate the manual headaches, streamline our processes, and expand the scope of how we use Confluence and JSM.”
Cam Burridge, Incident & Problem Lead, Toolstation
The support experience: fast, flexible, and knowledgeable
“Elements have been great to work with thanks to their prompt and flexible communication, and make it easy to discuss feedback, improvements, and requesting support to help us set things up quickly.”
Cam Burridge, Incident & Problem Lead, Toolstation
Toolstation hasn’t encountered any issues with the app, a strong signal for a team managing a complex Jira and Confluence integration across multiple departments. Expert support is available via the Elements support portal whenever needed.
FAQ
What is Elements Publish?
Elements Publish is a Cloud Fortified app that lets you automatically create Confluence pages from Jira issues and synchronize data across both tools. This app allows a Jira Confluence integration for efficient project and knowledge management, without any scripting or custom development.
Key features include: creating Confluence pages from Jira issues (Jira and JSM), real-time data synchronization from Jira to Confluence, support for Confluence templates or custom page layouts, compatibility with Jira post-functions and Automation rules, and a Publish Macro to display a dynamic list of Jira issues in any Confluence template.
How do I create Confluence pages from Jira issues?
With Elements Publish, creating Confluence pages from Jira is straightforward: (1) install Elements Publish from the Atlassian Marketplace, (2) design your Confluence template or use an existing one, (3) start the configuration of the recipe to create a confluence page to Jira issue that maps Jira issue fields, including labels and attachments, to the right Confluence template sections, (4) set your trigger: a post-function, an automation rule, or a manual one-click action. Confluence pages are then created automatically from your Jira issues, with full data synchronization to keep them up to date.
What is the Jira and Confluence integration?
The Jira and Confluence integration connects Atlassian’s two core tools to allow teams to automatically create Confluence pages from Jira issues and synchronize data between them. Elements Publish extends the native Jira and Confluence link to enable full automation: pages are created from Jira work items, populated with issue fields, labels, and attachments, and kept in sync as the issue evolves, linking Jira to Confluence for efficient project and knowledge management.
What are the most common use cases for creating Confluence pages from Jira?
The most popular use cases include: Major Incident Reports and post-mortems (automatically created from Jira Service Management issues), project management documentation (sprint summaries, project templates), knowledge management (knowledge base articles from resolved Jira issues), employee onboarding (Confluence pages triggered by Jira onboarding requests), bug analysis reports, store or site configuration pages, and lessons learned documentation from Jira change and problem management.
Does Elements Publish work with Jira Service Management?
Yes. Elements Publish is fully compatible with Jira Service Management (JSM) and is one of the most effective ways to link Jira Service Management to Confluence for efficient knowledge management. Work items from JSM, incidents, service requests, changes, and problems are automatically published into Confluence templates, with data synchronization to keep pages current. It’s the go-to Jira and Confluence integration for ITSM teams.
Can I synchronize Jira and Confluence data automatically?
Yes. Elements Publish includes powerful real-time synchronization between Jira issues and Confluence pages. You define which Jira fields should be synchronized and how they map to your Confluence template. When a Jira work item is updated, the corresponding Confluence page is automatically updated, keeping stakeholders on the same information level and ensuring your knowledge base stays current without manual intervention.
Is Elements Publish secure?
Yes. Elements Publish is Cloud Fortified, Atlassian’s highest trust designation for Marketplace apps. It is SOC2 Type II and ISO 27001 certified, with data residency options in the USA and Germany. Full details are available at http://trust.elements-apps.com .
Why it matters: the case for creating Confluence pages from Jira automatically
Toolstation’s story is a clear example of what becomes possible when you create Confluence pages from Jira and synchronize data automatically. Elements Publish closes the gap that no native Jira and Confluence integration could, turning every resolved incident, every new project, every lesson learned into a structured Confluence knowledge base page, automatically.
When Jira and Confluence are properly linked for efficient project and knowledge management, teams stop spending time on documentation and start focusing on the work that matters. The knowledge base stays current. Stakeholders stay informed. And as reporting needs grow, the integration scales without adding manual effort.
“Publish has been a game-changer for us by seamlessly automating all of our reports through an effortless click.”
Cam Burridge, Incident & Problem Lead, Toolstation
Create Confluence pages from Jira and synchronize data link Jira to Confluence for efficient project and knowledge management.
Try Elements Publish for free today
When managing a project in Jira, keeping work structured and visible is key. Jira subtask play a crucial role in that effort, they allow teams to break complex work into smaller units, distribute responsibilities, and track progress at a more detailed level.
In this article, we explain the fundamentals of Jira subtasks, what they are, how they relate to parent issues, how they differ from standard Jira issues, and when to use them across projects. You will also learn best practices to manage subtasks efficiently without adding unnecessary complexity.
Whether you are new to Jira or looking to improve how your team structures work, this guide will help you understand how subtasks fit into your project management strategy.
What is a Jira subtask?
In Jira, a subtask is a smaller unit of work that belongs to a parent issue, usually a story, task, or bug. Subtasks inherit key attributes from their parent while remaining manageable on their own.
Each subtask exists at a lower level of the issue hierarchy. It can be assigned to a team member, moved through a workflow, tracked, and resolved independently, while still contributing to the completion of the parent issue.
Think of a subtask as a concrete action required to complete a larger task. For example:
- Parent task: Implement login functionality
- Subtask: Design login UI
- Subtask: Build authentication API
- Subtask: Test login flow
Each subtask represents a specific piece of work, often handled by different people within the same team.
Why use subtasks in Jira?
Subtasks help teams work more clearly and efficiently by breaking work down to the right level of detail. Used correctly, they improve visibility and execution across a project.
Better work breakdown
Large tasks can feel overwhelming and difficult to estimate. Subtasks make work more manageable by splitting it into logical steps that are easier to plan and complete.
Improved delegation
Subtasks allow teams to assign different parts of a parent issue to different team members. This supports better workload distribution and avoids bottlenecks.
More precise tracking
Each subtask has its own status and workflow. This gives teams better insight into progress at a granular level, especially during development or testing phases.
Clear accountability
Assigning subtasks to individuals makes ownership explicit. Everyone knows which part of the work they are responsible for, even when working under the same parent issue.
Increased transparency across projects
Subtasks nested under a parent issue make it easier for stakeholders to understand the real scope of work involved in delivering a feature or completing a task.
When should you use Jira subtasks?
Subtasks are powerful, but they are not always the right choice. The key is knowing when work should live at the subtask level and when it should exist as a standalone issue.
Use subtasks when:
- A parent issue contains multiple clearly defined steps
- Different parts of the work can be assigned to different team members
- The work is closely tied to a single parent issue
- The subtask does not need independent tracking across projects
Avoid subtasks when:
- The work requires its own reporting, visibility, or prioritization
- The issue is large enough to stand alone as a task or story
- The work spans multiple projects or teams
- You need more than one hierarchy level
In those cases, creating a standard Jira issue is usually a better option.
Subtasks vs standard issues in Jira
Understanding the difference between subtasks and standard issues helps teams choose the right structure.
- Subtasks always have a parent issue
- Standard issues can exist independently
- Subtasks cannot have their own subtasks
- Both support assignees, workflows, and due dates
Subtasks are tightly linked to their parent. If the parent issue is deleted, all its subtasks are deleted as well. This dependency makes subtasks ideal for execution-level work, but less suitable for tracking work that must survive independently.
Common use cases for Jira subtasks
Teams across different disciplines use subtasks in consistent ways.
QA and testing
Testing work is often broken down into subtasks such as test case design, execution, and regression verification, all grouped under a single parent issue.
Software development
Development teams commonly split work into frontend, backend, and integration subtasks. Each subtask represents a different technical responsibility at the same hierarchy level.
Onboarding workflows
HR and IT teams often create onboarding projects where each new employee has a parent issue with standard subtasks for access, equipment, and training.
Recurring processes
For recurring projects such as releases, audits, or incident response, teams use templates and automation to create the same subtasks every time, ensuring consistency.
Limitations of Jira subtasks
Despite their usefulness, subtasks come with important constraints.
Same project limitation
A subtask must belong to the same project as its parent issue. You cannot create subtasks across different projects.
Single hierarchy level
Jira only supports one subtask level. You cannot create subtasks of subtasks, which limits how deeply you can break down work.
Reporting complexity
Subtasks may not appear in filters, dashboards, or boards unless explicitly included. This can make reporting more complex in large projects.
Permission inheritance
Access to subtasks depends on permissions set at the parent issue level. This can be restrictive in environments with complex permission schemes.
Best practices for managing Jira subtasks
To get real value from subtasks, teams should follow clear guidelines.
Define a subtask strategy
Agree as a team on when to use subtasks and when to create standard issues. Overusing subtasks can clutter projects and reduce clarity.
Write clear, actionable summaries
Each subtask summary should describe a concrete action so there is no ambiguity about what needs to be done.
Use consistent naming conventions
Consistent naming helps subtasks remain readable when viewed outside the context of the parent issue.
Assign owners deliberately
Every subtask should have a clear owner. Unassigned subtasks reduce accountability and slow progress.
Use automation where possible
Automation helps teams create and manage subtasks efficiently, especially in projects with recurring workflows.
Subtasks and automation at scale
If your team repeatedly creates the same subtasks, automation becomes essential to avoid manual errors and missed steps.
Elements Copy & Sync, enables teams to instantly create structured subtasks using reusable templates. Choose exactly which data should be inherited from the parent work item – such as description, priority, assignee, and other fields (including custom fields) – and optionally include comments and attachments. With Elements Copy & Sync, every task is created consistently and ready to work on from the start.
Subtask creation can be triggered through workflows or transitions, allowing teams to adapt automation rules to different issue types and use cases. Elements Copy & Sync also keeps comments, statuses, and selected fields aligned between parent issues and subtasks, so everyone stays in sync as work progresses.
This approach helps teams reduce manual effort, improve consistency, and scale recurring processes reliably across multiple Jira projects.
Learn how to define substask templates with Elements Copy & Sync
Jira subtasks in agile boards
Subtasks behave differently depending on board configuration.
In Scrum boards, subtasks usually do not contribute to story points unless additional configuration or apps are used.
In Kanban boards, too many visible subtasks can clutter the board and reduce readability. Filtering and swimlane configuration help maintain clarity.
Make sure your board setup matches how your team wants to visualize progress at both the issue and subtask level.
Final thoughts on Jira subtask
Jira subtasks help teams structure work, improve collaboration, and track execution at the right level of detail. When used intentionally, they bring clarity to a complex project.
Before creating a subtask, ask whether the work truly belongs under a parent issue or whether it should exist as a standalone task. Consistency across projects is key to long-term success.
Ready to create Jira subtasks faster, with consistency and control built in?
Explore how Elements Copy & Sync can help you streamline task management on the Atlassian Marketplace.
Service teams running a Jira Service Management project often need to have data that has been accurately collected upon receipt: customer IDs, asset tags, office locations, contracts, catalog items. Default Jira fields (Summary, Description) don’t enforce structure, so admins create a custom field for each requirement and hope requesters type the right thing.
In practice, free text leads to mismatches, clean-up work, and an issue history that’s hard to query. Elements Connect addresses this by letting you integrate external data in custom fields and place it directly on Jira Service Management request forms. A requester selects live values from your data while creating the ticket, and the created issue stores those selections, so agents see the same, reliable data.
Why Jira Service Management benefits from connected custom fields
Each project tends to have its own taxonomy (customers, offices, products) living outside Jira. If a field relies on a static list or manual entry, values drift. By contrast, a custom field retrieves options dynamically from the system that owns the data (REST API & database). That means one place to create and curate the list, and one place, the work item, to store the selected value. The result in Jira is simpler queues, accurate routing, and reports that reflect reality across projects and issues.
What’s new in JSM
Elements Connect’s connected custom fields have been available on Jira issues for a while. The change is that they’re now portal-ready in JSM projects. You can create a single-select & multi-select (with text search allowed), backed by an external source, and add that field to any request type. Options are retrieved when the form loads or as the user types, so the fields always mirror the current dataset, no nightly syncs and no duplicated tables inside Jira.
Cascading dependencies are supported as well. If aparent field (Offices) changes, thechild field (Printer) filters its options immediately, helping the requester create a correct, well-scoped issue.

For the complete matrix of supported variables and behaviors on the portal versus the agent view, see Using connected custom fields on JSM projects.
How to add your first connected custom field (step-by-step)
- Create a custom field in Elements Connect. Select the data source (REST API or database) and write the query that returns the column you want to display.
- Click Add field to portal. Choose the target JSM project and the request type that needs the field.
- Place the field in the form layout. Save and preview the portal to confirm the options load. Once you had your custom field on customer portal, then it will automatically be added to the agent’s view.
- (Optional) Create a child field and made it dependent to have his options according to the values selected on the parent field. Make sure both fields are present on the same form/screen.
- Submit a test request. Verify that the created issue stores the selected values in the mapped custom fields, and that agents can view or edit it on the issue screen.
From there, reuse the same field configuration across additional request types without duplicating setup. Because the field reads from your data, updates to the external list are reflected the next time someone creates a request.
You can try it for free here.
Supported today on the portal and agent views
- Portal forms and agent view. The same connected field appears for customers and agents.
- Dependencies between fields. Parent/child fields filter instantly when both are present on the form or screen.
- Dependencies with the requester. Element Connect’s connected custom fields can be configured to display only the external data linked to your requester.
- Field types. Single-select & multi-select (with text search allowed) are common choices for custom fields on a JSM project. But all fields like Read only and User can be add. You can even create one field on the request form with single select and read only information attached to it.
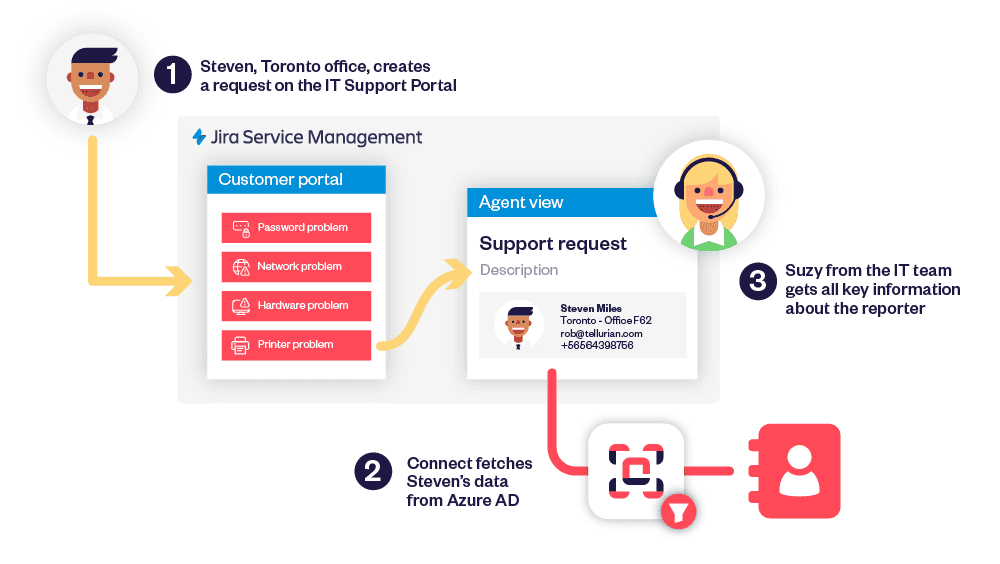
Practical example: from request to issue (select → store → report)
Imagine a hardware request for a printer problem. On JSM, the requester selects a portal from the relevant project to create his request. The Elements Connect’s connected custom field Office, in this portal, is already filled according to the requester informations (example: Toulouse because it’s his workplace). He can now fill the custom field Printer , which is filtered according to the location of Toulouse.
On the agents side, they see the same field values on their screens, can adjust if stock changes, and automation can route the issue to the right queue. Because the fields hold structured values, you can filter, report, and measure SLAs reliably across projects.
Tips for clean configuration in JSM projects
- Prefer searchable mode for large datasets; it’s faster than loading thousands of options and reduces scrolling.
- Name fields clearly (e.g., “Customer — from CRM”) and add concise help text to reduce questions.
- Limit column to what the form must show; keep sensitive attributes out of Jira.
- Test dependencies with real data. Place parent and child fields together to ensure the child field filters.
- Report on the stored values. Because selections land in custom fields on the issue, dashboards and queues can use them directly.
Short FAQ
Will the same custom field work across multiple request types and projects?
Yes. Add the field wherever it’s needed; configuration stays central and reusable.
Are values live or cached?
Connected data are retrieved cached and you can configure the cache duration for balance between freshness and performance.
Can agents see and edit the field on work items?
Yes. The Elements Connect’s connected custom fields is available in the work item view, matching what customers selected on the portal, but the agent can edit the field directly on the work item in case this is needed.
Can users select multiple values in one field?
Yes, use the multi-select picker field type. Users can select multiple values; each is saved in the custom field on the created issue and works with JQL, queues, and dashboards. Prefer searchable mode for long lists to keep performance high.
How do I migrate a free-text field to a connected custom field without breaking issues?
Create a new connected custom field, add it to the project screens, then copy data from the old text field with Jira automation (rule: when edited → set new field to old value). Keep the old field for history/labels, and report on the new field going forward.
Streamlined connected fields for JSM
Jira covers the basics for managing field configs, but Elements Connect bridges the external-data gap: you can create custom fields, surface live options on portal forms, and have each issue consistent across each project, without maintaining parallel lists or scripts.
Dive deeper in the guide: Connected custom fields on JSM projects.
Try it in your site via the Elements Connect listing on the Atlassian Marketplace, and watch quick walkthroughs onElements YouTube.
If you often roll out similar request types or onboard new teams, adopting a dedicated connected-fields setup pays off: you’ll standardize capture at create time, keep Jira issues reliable, and scale patterns cleanly across environments.
Jira is great at tracking tasks, but what if your team needs to follow things?
We’re talking about laptops, software licenses, ID badges, access cards, vendor contracts, the everyday items and moving parts that keep your organization running, but don’t fit neatly into a to-do list.
That’s where Assets, a feature of Jira Service Management, enters the picture.
If you’ve never heard of it, you’re not alone. Many departments that use Jira daily have no idea this module exists, or that it could solve a silent struggle they’ve simply learned to live with. In this guide, we’ll explain what Assets is, how it works, common ways companies use it, and where it shows its limits. At the end, we’ll also suggest an alternative for teams who need more flexibility with external data.
Get more info on Assets in JSM
What is Jira Assets?
Assets is a native feature in Jira Service Management (JSM) Premium and Enterprise editions that allows departments to follow and manage more than just issues. It introduces a structured way to work with data that isn’t task-based, like hardware, locations, contracts, vendors, and people.

The tool originally started as a Marketplace app called Insight, which Atlassian acquired and integrated into JSM to strengthen its IT service management (ITSM) offering. Today, Assets allows teams to visualize and connect “objects” (i.e., assets) to requests, incidents, and other records inside the platform.
With Assets, you can track practically anything:
- Workflows (like onboarding checklists)
- Licenses and renewals
- Vendor agreements
- Customer accounts
- Internal services
- Team members and roles
The module brings structure to otherwise scattered data, making it searchable, referenceable, and linkable to service desk tickets. It’s Jira’s way of saying, “This isn’t just a task tracker anymore.”
What is Assets used for? (with real-life examples)
While Assets was originally built for IT asset management, its flexible configuration options mean it can serve teams across many functions, from HR and facilities to procurement and finance.
Let’s walk through a few practical use cases.
1. IT teams
IT departments use Assets to track equipment, laptops, monitors, phones, access points, and more. When an employee raises a support request, agents can quickly view which device is involved and pull up its specs and history.
Example:
“Tom’s computer is having Wi-Fi issues.”
→ The agent checks the ticket, sees the device is a 2022 MacBook Pro issued last June, and realizes three other users with the same model reported similar problems.
This speeds up diagnostics, avoids back-and-forth, and helps standardize service.

2. HR teams
HR professionals use Assets to track people, roles, onboarding checklists, and even access credentials.
Example:
When a new employee is onboarded, the HR service request automatically links to objects like:
- Assigned laptop
- Available software licenses
- Employment contract templates
- Manager or team lead object
This centralized data view ensures everything needed for a smooth onboarding is visible and connected.
3. Facilities and operations
Facilities teams manage internal resources such as meeting rooms, parking spots, vehicles, or security equipment.
Example:
When an employee requests to book a meeting room, Assets can cross-reference availability and auto-assign an available room object to the request.
This helps reduce double-bookings and ensures better use of shared spaces.
4. Procurement and finance
Teams responsible for purchasing and vendor management use Assets to monitor contracts, renewals, and spending.
Example:
Finance might analyze:
- Software licenses and their expiration dates
- Vendor support agreements
- Purchase orders and status
- SLA compliance metrics
These are all organized as objects within the Assets schema, giving teams a single place to review and act on critical business information.
The keyword here is flexibility, Assets allows you to model almost any type of information, as long as you’re willing to invest time in setup.
Core features of Jira Assets
Assets is powerful, but it’s not plug-and-play.

Let’s take a closer look at its main features:
| Feature | What it means |
|---|---|
| Object schema | A custom database for the type of items you want to track (like “Laptops” or “Licenses”) |
| Object types & attributes | Define the properties of each asset, e.g. serial number, location, purchase date |
| Object relationships | Link items to other objects (e.g. employee owns laptop) or to Jira issues |
| Data import | Bring in data via CSV, JSON, REST API, or Discovery integrations |
| Automation rules | Trigger actions (like sending alerts) when asset fields change |
| Permissions & roles | Define who can view or edit each schema or field |
If that sounds technical, that’s because it is. Assets is essentially a no-code database layered onto Jira. It’s incredibly customizable, but that also means there’s a learning curve.
Limitations of Jira Assets
While Assets is packed with features, it’s not perfect. Based on feedback from users across IT, HR, and operations, here are some practical limitations to consider.
1. Steep learning curve for setup
Assets uses a schema-based structure that takes time to model and configure. It often requires Jira admin skills, especially when defining object relationships or designing automations.
If you’re not comfortable with abstract data models, setup can be overwhelming.
2. No real-time sync with external systems
Assets allows you to import data, but syncing external data sources in real time requires custom scripting or third-party tools.
Example:
Let’s say your asset inventory lives in a CMDB or SQL database. You can import that data into Assets, but it won’t automatically update unless you set up a sync via REST API or automation.
3. Performance can lag at scale
Managing thousands (or hundreds of thousands) of assets? You’ll need to monitor performance closely and optimize your schemas. For very large datasets, Assets can become sluggish.
4. Not designed for external, volatile, or live data
Need to display data from an external CRM, directory, or cloud system without storing it in Jira? That’s outside Assets’ native capabilities.
What if you need external, live data?
Here’s where Elements Connect comes in.
Many internal services discover that while Assets is helpful for internal asset tracking, it falls short when it comes to integrating live external information. That’s exactly the gap Elements Connect fills.
Elements Connect allows you to display real-time external data inside Jira issues, without importing it.

Whether your data lives in:
- SQL databases
- REST APIs
- LDAP directories
- CRMs like Salesforce or HubSpot
- CMDB tools
You can fetch and show it in context, directly on your issues.
No data duplication, no syncing hassles, and no storage limits. The information is pulled live from the source and shown exactly where your agents or users need it.
You can also combine Elements Connect with Assets. For example, store internal asset IDs in Assets, and use Elements Connect to fetch real-time availability or warranty details from your backend systems.
Is Jira Assets right for you?
Assets is a powerful addition to Jira Service Management, especially for ITSM departments needing to follow internal assets and connect them to service tickets.
Its flexible structure means you can model nearly any type of information, but that same flexibility comes with a price, complexity, limited availability, and challenges around syncing external data.
If your team works mainly with internal data and you’re already on JSM Premium, Assets might be a great fit.
But suppose you need to bring in live data from other tools, sync directories, or connect to multiple external systems. In that case, Elements Connect might just be the smarter solution, helping you extend Jira without overloading it.
Curious how Elements Connect brings your external data inside Jira Cloud?
👉 Learn more here