


Are you looking for a way to monitor the change requests made by your stakeholders with Jira? Automate setting the approver on the issue for a change request? Maybe both, but your manager/approver information is stored in an external database? Providing answers to all those questions is the goal of this article.
Get approval from the right stakeholders in change management
As defined by ITIL, change management is the process used to minimize the disruption in your IT processes, for example when completing upgrades or changes in your workflow or services. The change management process is designed to reduce incidents, dissolve silos, avoid bottlenecks and reduce risk.
To manage the process, we usually set a change advisory board (CAB) or we choose a specialist such as a manager to accept these changes. This point of contact will become the approver of your change management process within Jira. By adding an approval step into your workflow, you can monitor the changes and let your team leader know when there are problems, and take action to fix them. The mission of this approver is to review all the proposed changes, evaluate any risk for the change, and then decide how to proceed. By doing so, they help the company to reduce risk and avoid unnecessary changes.
Let’s look at the importance of adding approvals to your change management workflows in Jira and then how to set approvers automatically with the help of Elements Connect.
Set a Jira user as an approver automatically natively with Jira workflows
When creating a new Jira project, Atlassian provides preconfigured projects with workflows and pre-set fields for a change management approval process. In Jira Service Management you can find the change management workflow. Atlassian based this workflow on ITIL principles and it looks like this:

Of course, this workflow covers several types of change requests, and not all change requests should follow the same path. By creating rules with Jira Automation, requests can move through the workflow automatically depending to the importance of the change. Three different paths can be taken based on the impact of the change:
- Emergency: A rapid assessment and implementation of an emergency change is required
- Standard: This refers to your everyday, repeatable change
- Normal: Non-emergency but also non-repeatable changes that require some risk assessment
Change management approval can be configured automatically in Jira with the native option provided by Atlassian. You can easily add approvals to your workflow by editing the workflow and adding an approver to the step you choose:

Next, fill the field in the popup window and set the appropriate approver from within the Jira users database.
Use an LDAP to set the manager of the reporter as approver on Jira On-Premise
Let’s imagine you want to set the manager of the reporter (or the infrastructure manager of the asset in the request) as approver, and this information is stored in an AD or LDAP. This use case is possible with the help of Elements Connect.
4 steps to use an LDAP to set the approver
- Connect your Jira Server/Data Center instance to the LDAP datasource
- Create Elements Connect fields to retrieve information from LDAP: the reporter’s manager and his Jira username. Thanks to the LDAP connection, we can get those details to then assign the reporter as approver.
- Adapt the workflow transition to retrieve the previous data and populate Elements Connect fields automatically upon issue creation thanks to post-functions.
- Set the manager as approver, by adding the Elements Connect custom field “Reporter’s manager” as approval to our workflow for the “Waiting for Approval” status:

Follow the full tutorial on the Elements Connect On-Premise documentation.
Set a Jira user as an approver automatically based on external data on Jira Cloud
4 steps to set an approver based on external data on Jira Cloud
- Create and configure the datasource in Elements Connect
- Create and configure the Connected items in Elements Connect
- Associate the Connected items to a request type / issue type
- Configure a Jira Automation rule
- This rule will copy the value of the “Approver” mirror field in the “Approver” Jira user field every time the “Approver” mirror field is updated
Follow the full tutorial on the Elements Connect Cloud documentation.
Set your change management process up for success
Ticket approval is critical in change management: to resolve emergencies, mitigate risk when planning normal changes, or just make make life smooth for standard changes, you need approval from the right stakeholders. While you can set approvals natively with Jira, Elements Connect helps you go further by integrating external data from an LDAP or AD.
Importing your Excel files in Confluence can bring many benefits to your team:
- Centralizing information. No more searching in different drives or mailboxes to find the latest version of the file you want. No more wondering if someone worked on the document on their personal desktop and you are not informed. With a single Confluence sheet, the data you look at will always be up-to-date.
- Fostering team collaboration. You and your team can work on the same document, inside the collaborative environment of Confluence. Thus reducing the risk of errors and the time and effort necessary to maintain multiple file versions and send them internally.
- Contextualizing data. By embedding your spreadsheets in Confluence, you can surround the tables with descriptions and comments to help colleagues understand the data and what insights they can get from it.
As you can see the advantages are numerous, but when looking at how to take the leap and integrate Excel tables in your Confluence page there are plenty of options to choose from. Let’s explore the alternatives available and discuss which ones are best suited to collaborate on data in Confluence.
Pull data from Excel to Confluence: your 3 options
The recent versions of Confluence allow you to pull data from Excel to Confluence in various ways. To help you determine which one is right for you, we’ll briefly explore the different solutions to add spreadsheets in Confluence in the section below.
Using the Atlassian companion app
The plugin adds an edit button that allows you to open your files in Excel, then save the modifications directly on your Confluence page.

However, this method moves away from the collaborative spirit of Confluence as you open an external app. On top of that, the file rendered on the page is a miniature version of the table that lacks any form of display option.
Note: On Cloud, you won’t be able to edit files using the Companion app after 31 March 2022 as Atlassian will remove the app from its Cloud platform.
Choosing the Confluence Office connector
If you do not use the companion app, you have the option of using a browser depending on your office version (see Office connector documentation) to edit an Office document attached to a Confluence page.
Simply go into the page attachments list, and you should see an Edit in Office button beside the attachment you want to edit.
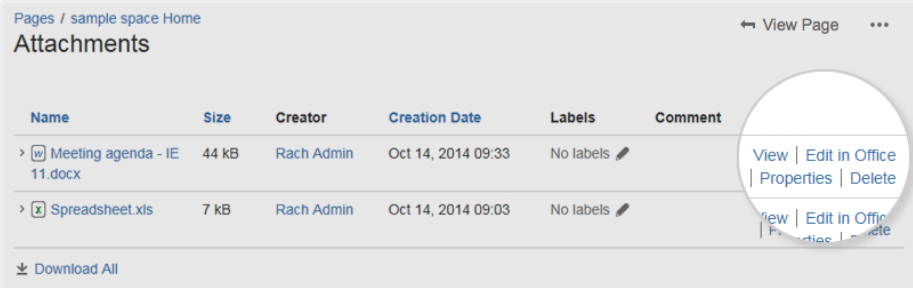
This is another simple option but again lacks any kind of collaborative spirit or display properties to make your table enjoyable to use and read by your team.
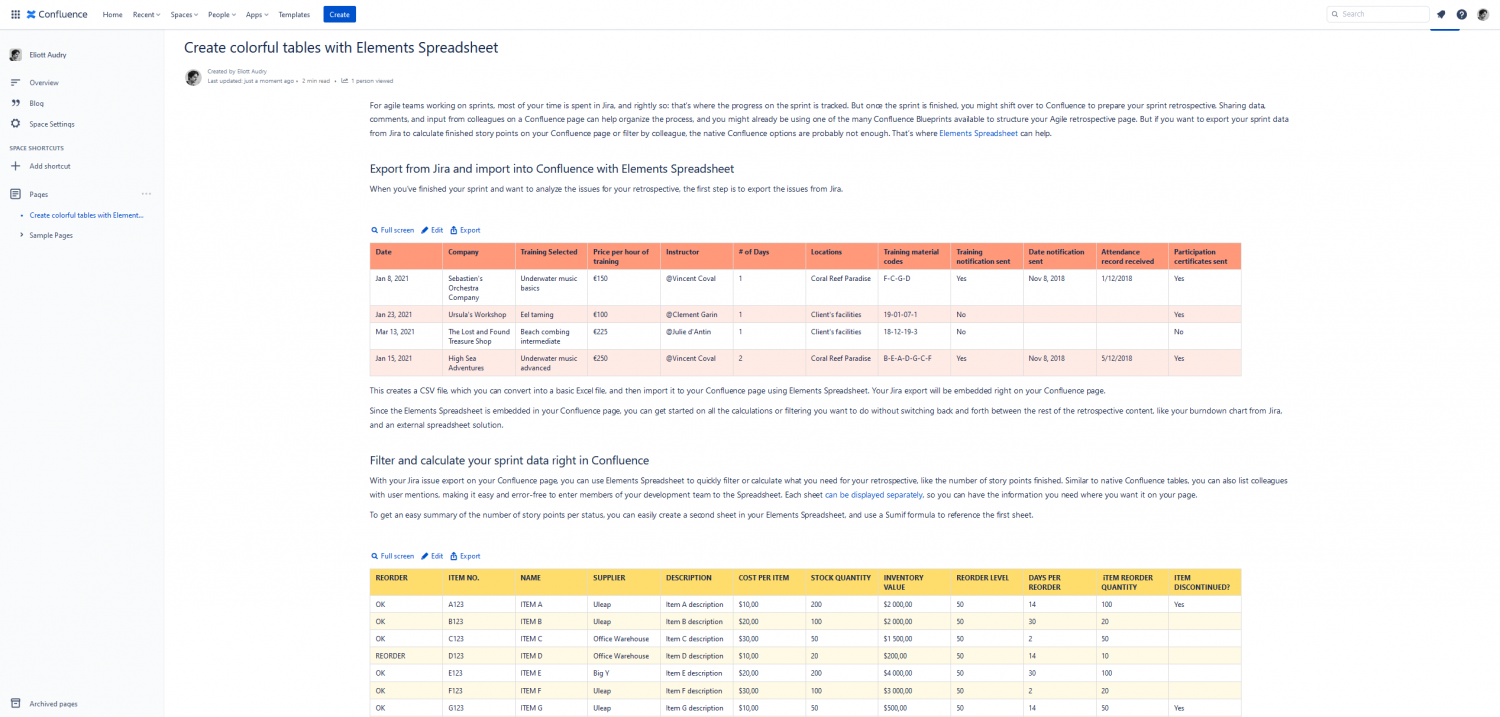
Using an external plugin like Elements Spreadsheet
At Elements, we found those options were too limited and curbed our productivity. That is why we created Elements Spreadsheet, a simple Confluence plugin that allows you to transfer your data from Excel to Confluence in a few clicks.
The plugin allows you to display dynamic tables seamlessly in Confluence. It uses native Confluence features like user mentions and dates, support formulas, data filtering, dropdown lists and is fully compatible with your Excel files.
To have a glance at how well the app can integrate with your team processes, you can check some of our detailed use-cases:
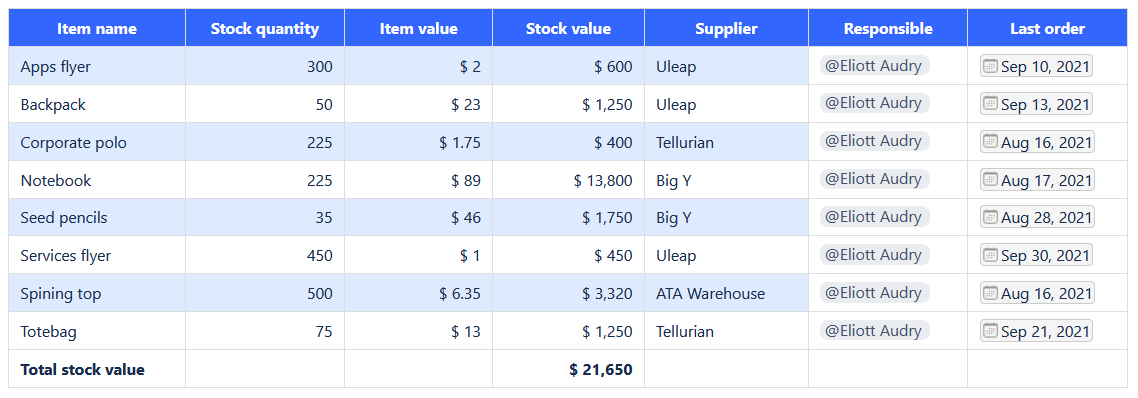
- Configure a pricing calculator for your sales proposal
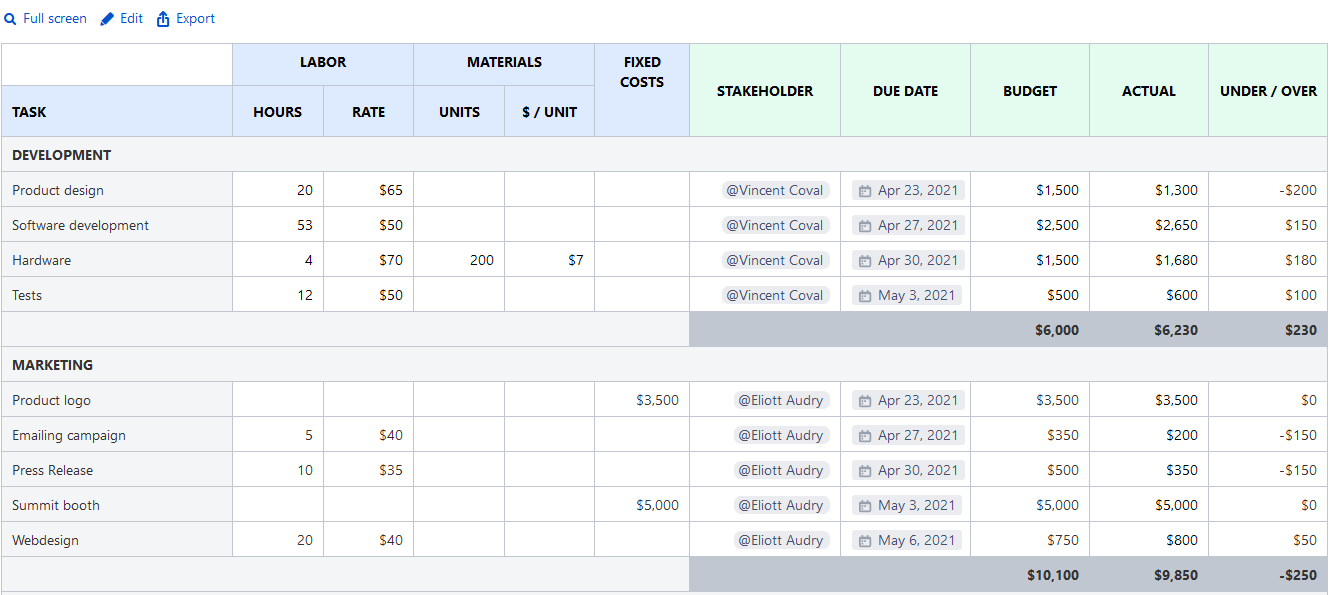
- Manage your events organization directly in Confluence
Import an Excel file into Confluence using Elements Spreadsheet
How your Excel sheets are rendered is often just as important as the content. Here are our top tips and best practices in order to make the import process smooth and ensure your data is presented in a clear way.
Best practices for preparing your Excel document before importing it into Confluence
These general guidelines will help ensure that your table will be as close to the original as possible when importing it to Elements Spreadsheet for Confluence.
- Apply the correct data format: For instance, be sure your date cells are in the date format. This way they will match the native Confluence dates aspect after the import.
- Format your data as a table in Excel if you want your rows to display alternating row colors. The app will detect it automatically and apply alternating row colors to the corresponding area.
- Make sure to not have an empty first row, and that the first row is your header row with names for the data in the corresponding column.
Importing your Excel spreadsheet into Confluence
Now that your data is prepared, let’s look at how to import it in a few simple steps using Elements Spreadsheet:
Go to your Confluence page where you want to import your Excel file and insert the Spreadsheet macro.
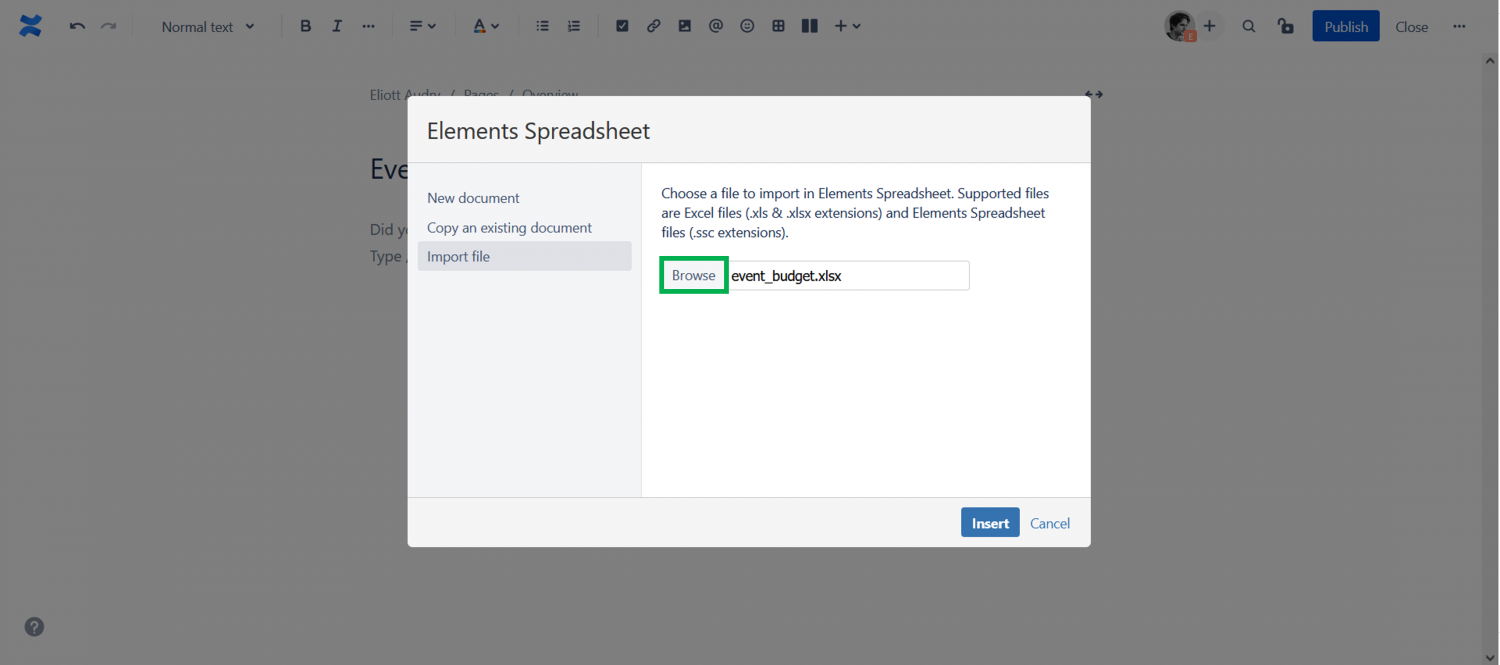
Select “Import file” and click on the “Browse” button to select your Excel document on your computer.
Once your file is selected. Simply click on the “Ok” button to import your document.
Note: To be available on your Confluence page, you have to save your imported document in the editor (even if you don’t edit it).
That’s it, you’ve pulled your Excel spreadsheet into Confluence. Let’s now see how to optimize the way it’s rendered.
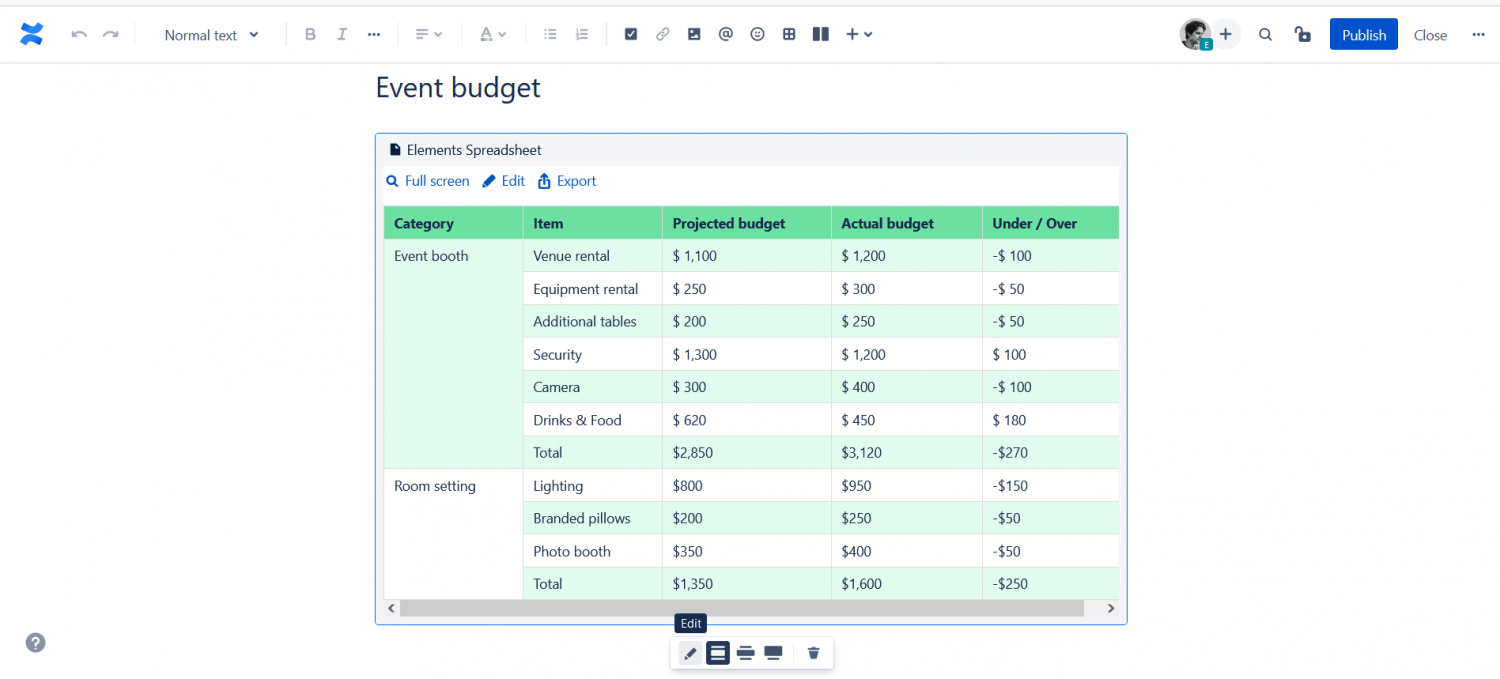
Display options for your Elements Spreadsheet documents
When the page is in edit mode, simply click on the Spreadsheet macro. You have 3 sets of buttons popping up at the bottom:
- Edit to configure the advanced rendering options.
- Shortcuts to adjust the width of your table in display mode: Centered, Wide, or Full Width.
- Delete to remove the table from the page.
If you click on Edit, a pop-up window will appear with multiple options to configure the sheet rendering mode.

First, your Spreadsheet can be rendered in your Confluence page as a Table, in that case, it will be rendered as a standard spreadsheet inside your Confluence page.
The alternative is to render it as an Icon, in which case only a Spreadsheet App icon is displayed with the document name. This can be useful in case you have very long or large tables that you don’t want to fill your page space with. It will only display a placeholder icon and clicking on it will open the document in full-screen.
If you chose the Table mode, you can now pick if you want to:
- Display the Full Screen / Edit / Export buttons when the Confluence page is in display mode.
- Have the table width match the edit mode width, or always fill all the section available space.
- View all the sheets and navigate between them by clicking on the different tabs, or displaying some selected tabs only. This allows you to hide tabs with less useful information relative to the context of the page and control what you want your team to get out of the table.
An embedded spreadsheet fully integrated into your Confluence page
Spreadsheets are an integral part of today’s project work and they shouldn’t be isolated from the wiki information. By pulling Excel data inside Confluence with Elements Spreadsheet, you’re able to offer a seamless experience with all the information centralized in Confluence.
If you want to see what else you can do with Elements Spreadsheet, be sure to check out our documentation.
Interested in trying the app?
In 2020 Atlassian announced they are sunsetting their Server products to sharpen their focus as a Cloud-first company. While this change won’t happen overnight, and they are leaving up to three years for their Server community to make the switch to either their Cloud or their Data Center offering, planning a migration requires careful thoughts to evaluate options, choose the one that’s right for you and implement it. Rest assured, Elements has a plan to support you through this transition, no matter where you stand and where you want to go.
In this blog, we’ll review the changes timeline and share with you our commitments to our Server customers and resources to help you navigate these changes. Our goal is to give you visibility with regards to the future of our Jira and Confluence apps, so you have all the information you need to design your migration plan.
Summary of Atlassian’s announcement
In order to focus on its Cloud offering, Atlassian stopped selling new Server products starting February 2nd 2021 and will fully stop maintaining the Server products in February 2024. New apps sales for existing Server licenses won’t be possible after February 2023. This leaves Server customers up to three years to plan and execute their migration.

One important thing to note is that as of February 15, 2022 you will no longer be able to upgrade or downgrade user tiers for your Server products or apps.
Atlassian has put in place several mechanisms that will help you switch platform:
- Loyalty discounts for their products to help transitioning to Cloud or Data Center (decreasing over time to incentivize you to switch at the earliest possible date)
- Extended free trials for Cloud
- Multi-year contracts
We advise you to reach out to Atlassian or your Solution Partner for more information about pricing and how to take advantages of these mechanisms.
Navigating these changes
With significant changes, comes significant questions. We’ve gathered resources that answer the most prominent ones we’ve received over the past few days in the sections below.
Our commitments to our Server customers
We know these changes have a significant impact on our Server customers, and we’re here to help you through this transition. Here’s a summary of our commitments to you:
- Server: we will continue to offer support for our Server apps until the end of Atlassian’s support period in 2024.
- Data Center: we do offer a Data Center version of all our apps. This version offers the same features as your Server version and is frequently tested against scalability and security issues. We will continue to support and ship new features to our apps on this platform.
- Cloud: Over the past year, we’ve been working a lot on taking our flagship products to Cloud. We’re proud to say all of our apps now have a Cloud version. We know there’s currently a gap in functionality between our Server products and our Cloud apps. In the coming months, we’ll work on making sure the value you can get from our Cloud apps exceeds the one you currently get with our Server apps. We will also invest in easing the migration from our Server products to our Cloud apps.
Resources for our apps
We have created some resources to keep you updated of the key differences between the Cloud / Server & Data Center versions of our apps. These pages will be continuously updated with our apps status regarding Cloud:
Atlassian’s migration resources
Atlassian has created a lot of content to help their customers on their journey to Cloud or Data Center. We’ve curated a list of the resources we think are most useful:
| Cloud resources | Data Center resources |
|---|---|
| Cloud migration hub Claim your free Cloud migration trial Cloud roadmap Data residency information Security and compliance information Pre-migration checklists Jira Confluence Server to Cloud migration FAQ | Timeline of changes Data Center migration hub Data Center roadmap Migration guide Jira Confluence Simplified Data Center deployment (non clustered) |
We’re on this journey together
Over the past decade, over 2200 customers have put their trust in our Server apps. We’re very grateful for that and want to thank you for your continued support.
The Elements team is fully committed to making your path to Cloud or Data Center as seamless as possible. Feel free to contact our support team for any concerns that you might have: you can count on us to answer your questions, provide guidance, and offer 1:1 support throughout your journey to cloud.
If you’ve been a Jira admin for long enough, you know that choosing a new app to complement Jira’s functionalities is no simple matter. Between gathering the requirements from the relevant stakeholders, assessing the various solutions available on the Atlassian Marketplace, testing the top contenders on your staging instance, getting budget approval, finally setting it up and on-boarding users, it’s sometimes a long journey!
If you’re searching for a solution to leverage your external data in Jira, and want to get it right, look no further.
This article will walk you through the key criteria to take into account when picking an app that populates Jira fields with data from your external sources. We’ve asked several experienced Jira admins and Atlassian consultants for their top tips to select apps to autofill Jira fields with external data that are beneficial to their company for the long run and boiled it down to the following list of questions to reflect on.
5 aspects you must check before choosing your connector
 |  |  |  |  |
#1 Matching your needs to features
“Does the app allow me to cover my current set of requirements? Will it allow us to go further tomorrow? “
Before you get stuck into the rabbit hole of flashy features and beautiful demos, you need to be really clear on your integration needs. For any project to be successful, you need to gather and prioritize pain points to solve, project objectives and requirements. Otherwise, you’ll have a hard time determining what makes a good solution to your company’s challenges.
Let’s review the criteria to take into account when looking at apps to connect to your external data sources.
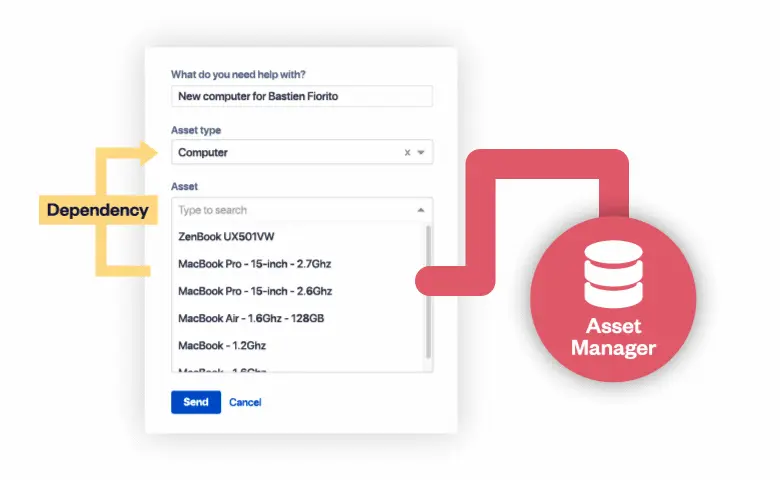
External data sources available
“Where is the data that you want to bring into Jira stored? “
The first and foremost criteria to take into account is the data sources you need to connect to. Are you looking to retrieve data about clients from Salesforce? or to get employee details from LDAP? Or to fetch asset data from your external CMDB?
[vc_row][vc_column][vc_column_text css=”.vc_custom_1622193388776{border-top-width: 2px !important;border-right-width: 2px !important;border-bottom-width: 2px !important;border-left-width: 2px !important;padding-top: 20px !important;padding-right: 40px !important;padding-bottom: 20px !important;padding-left: 40px !important;background-color: #f5f5f5 !important;border-left-color: #f5f5f5 !important;border-right-color: #f5f5f5 !important;border-top-color: #f5f5f5 !important;border-bottom-color: #f5f5f5 !important;}”]
Specialized VS Generalist Tool

Some apps are specialized in connecting Jira to just one datasource type, such SQL databases, or Salesforce. They will usually pop up first in your search. However bear in mind that that if some day you find yourself with the need to connect to another tool in your information system, you’ll need to call another app to the rescue.
Generalist apps that allow you to connect to several datasource types and set up as many custom fields as you want are a better option if you currently have the need to bring data into Jira from multiple sources, or if you anticipate additional external data requirements in the upcoming years. You can thus factor needs in one app, saving you extra costs and app maintenance.
Be sure to check you can actually access the needed datasources, and that your company’s policy allows you to set up integrations between your data repository and Jira. It would be a pity to do a complete study only to find out that you can’t set up the integration.
[/vc_column_text][/vc_column][/vc_row]
Use of the external data in Jira custom fields
“How will users interact with the data in Jira?”
Depending on your use-cases, you might just need to display information as read-only for users to make informed decisions based on these insights. Alternatively, you may want to create dynamic drop down lists fetching option values from an external data source, to guide users in their selection without the hassle of maintaining the list options manually in Jira yourself.
How you wish to customize the display of the fetched data is also a criteria to take into account when analysing a potential candidate. For instance, each app has different editor options, and some offer more possibilities than others. Keep Jira custom fields best practices in mind. It’s important to take readability and actionability into account when adding connected custom fields to Jira issues, as your end goal is not to clutter the screen or make forms less engaging but rather to empower users to work faster.
Last, consider whether the app offers Jira post functions or integrates with automation apps if you need the values of your custom fields to be set automatically as part of your process.
Reporting possibilities
“How would the data be used in reports?”
The data you’ll bring inside Jira using an app can be extremely valuable to provide more granular reporting to stakeholders. If your initial requirements gathering has surfaced some reporting needs, you’ll want to pay attention to how the raw data in your source can be transformed and formatted via the app to enable teams to use it for reporting on the metrics that matter to them.
What about bi-directional sync?
“Do we need to sync data from Jira with a third-party tool? “
A few specialised apps offer some bi-directional data syncing with other Cloud-based tools. We recommend to have a close look at the depth of the integration and what information can be synced, and how, before committing to a solution.
#2 Assessing the ease of initial set-up
“How much effort will the app configuration take? Do you have the required skills to do it on the team?”
Setting up your connector to match your needs is going to require some effort on your side. Make sure to check the admin interface, overall on-boarding experience and available resources (getting started guides, tutorials, examples…) during your evaluation process.
Pay attention to the skills needed to set up the app. Generally connectors fall into two different buckets:[/vc_column_text]
[vc_column_text css=”.vc_custom_1622193502738{border-top-width: 2px !important;border-right-width: 2px !important;border-bottom-width: 2px !important;border-left-width: 2px !important;padding-top: 20px !important;padding-right: 40px !important;padding-bottom: 20px !important;padding-left: 40px !important;background-color: #f5f5f5 !important;border-left-color: #f5f5f5 !important;border-right-color: #f5f5f5 !important;border-top-color: #f5f5f5 !important;border-bottom-color: #f5f5f5 !important;}”]
Home-Made Scripting VS Low-Code Connector
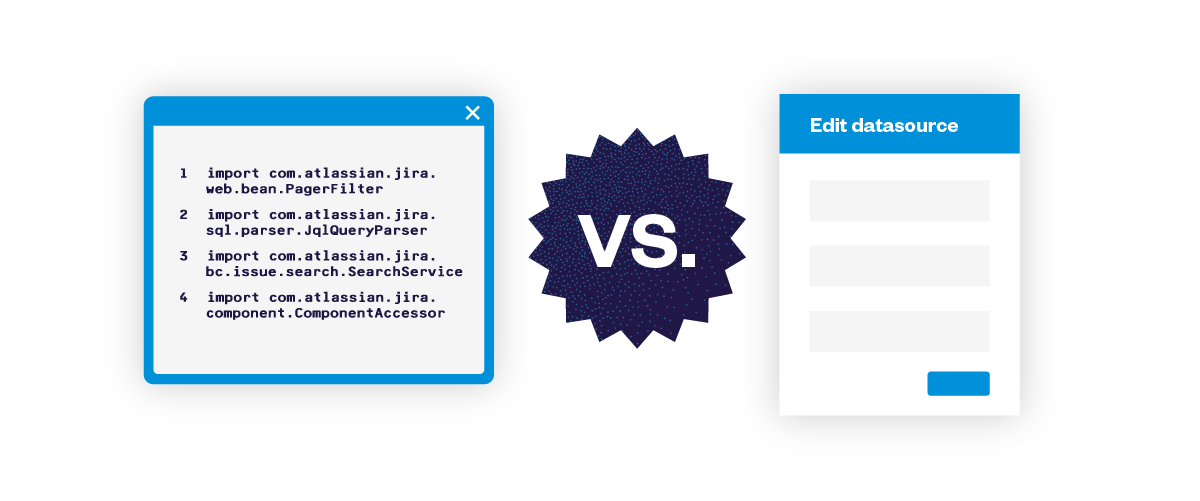
On the one side, you have home-made scripting apps. These apps can cater to a broad spectrum of needs, on top of connected fields, but require some advanced scripting skills. And the maintenance of your connected custom fields – especially after a few months, or if the person who did the implementation was a contractor or no longer works with your company – can be quite complex, and is often overlooked. Moreover, they have some limitations when it comes to connected custom fields.
On the other side, low-code connectors focus on one thing: enabling you to create connected Jira custom fields, and they do it very well. You’re guided all along the way from data source connection to custom fields creation and configuration. They require much less technical expertise and are a lot easier to maintain, while offering a lot of possibilities to configure your custom fields according to your specific needs.
For more information about the difference between these type of app, read our comparison of the two category leaders.
[/vc_column_text]
#3 Taking maintainability into account
“What if something in our configuration needs to change? How easy will it be to do it?”
As the saying goes, “change is the only constant”. There will always be new needs to cater to, changes in processes, new teams on-boarding in Jira. Maintainability isn’t an aspect to overlook, as once you choose a solution, you’ll be responsible for updating your custom field configurations every time they need to be.
It’s not only about how much time will it take you to update your app configuration if something changes in your processes. You’ll want to ensure the vendor’s capability to support you in the long run by checking the release frequency, whether the app is supported or not and if their website looks professional.
#4 Evaluating support & documentation quality
“How will the vendor help you get up to speed with his app?”
An app vendor that supports you can make all the difference. Before committing to an app, it’s always best to ask the support team a question and see how long it takes them to respond. Also, make sure to check out their app documentation to see if they have tutorials, examples or step by step guides to help you get started.
#5 Looking at the costs the right way
“How much will the app really cost us, including not only the license fees, but also the time spent on the implementation and maintenance of the solution?”
Don’t just get attracted to a lower price tag on the licensing: take into account the total cost of ownership of the solution, including the time you’ll need to spend setting it up and maintaining it. Do the same for each contender, and weigh that against the cost of continuing to work the same way, without bringing your external data inside Jira.
The solution with the best long term ROI isn’t always the one you think. It’s easy to be fooled by a “cheap” option that’s going to take you ages to set up properly. If you look at costs the right way, you should spare yourself troubles down the line.
The bottom line
Choosing an app is hard, but by being thorough in your analysis and reflecting on the right questions, you can be confident that the decision you’ll make will have a positive impact on employees’ productivity, while not generating too much overhead for you, now or later.
It’s all about being willing to take it one step at a time and ask good questions.
Teams all have their specific needs when it comes to capturing data in Jira custom fields. As a Jira admin, it is your job to ensure issue creation screens do not turn into endless forms nobody wants to fill in, while still collecting the information that matters. Select lists, which reduce the complexity of providing data by guiding the users with a limited number of predefined options they can choose from, can seem like a miracle solution to many of your custom fields needs.
But, they’re not a panacea and going beyond native Jira custom fields is sometimes necessary, notably if you want to create dynamic drop down lists.
In this article, we’ll review:
Custom select lists in Jira: the pros and cons of the native options
When you need to limit users to chose from a list of options in a custom field, you have several possibilities in Jira. We’ll discuss each one of them, their pros and cons, and the situations in which they best apply.
Radio button
Radio buttons allow users to select one option from a list. Custom radio buttons created by a Jira admin look like this:

Radio buttons, just like checkboxes offer the advantage to display the full list of options vertically, so all options are instantly visible to the user. They work perfectly for “Yes / No” questions, or any other use-case where you have a limited number of mutually exclusive choices.
However, if the list of options users can select from is longer than three, you should consider alternatives to a radio button, as otherwise it would clutter your issues screens.
Checkbox
Checkboxes are the counterparts of radio buttons, they’re perfect when you want users to be able to select multiple values from a small list of options (ideally three at most, but it is commonly accepted to go up to five).

They offer the advantage of making all the options visible at a glance, thus making it easy for users to quickly compare and pick options.
Single choice custom select list
Single choice custom select lists are drop down lists that allow users to select one single option to complete the field.

A common use-cases for single choice select list is to create two select lists for managing risks associated to the ticket (one for impact, one for probability).
While they’re more compact than radio buttons, they tend to have a higher drop out risk as they take longer to browse and edit: it takes two clicks to select an option with a drop down list, while it takes only one with a radio button. One could be tempted to mark such field as required, but we recommend not to abuse the required attribute.
Another known limitation of the native custom select lists is that they do not offer any autocomplete feature (while system fields such as Fix Version do). This tends to make it hard for users to browse lists with many options.
Custom select list with multiple choice
Custom select lists with multiple choice allow to select multiple options from a list.

Their UX isn’t really user-friendly: one needs to scroll in the select list zone to see past the fifth option available, and to use Ctrl + Click (or Command + Click for mac users) to select multiple options. Moreover, there’s no autocomplete so it’s really hard to browse options if you have many to select from. That’s why we don’t recommend using them too much.
Cascading select list
Cascading select lists allow users to narrow down their options by branching a parent list with a child list. Users first need to make a selection in the parent list, and then the child list will display the set of options corresponding to the parent value selected. They’re limited to two levels only (so no grand-children! ) and displayed side by side.

If you have a large number of values that you can group into different categories, then cascading select lists will help users make their selection and spend less time browsing the options.
At the moment a Cascading Select Custom Field that is marked as required, will pass if only one field is selected.
A general limitation of native custom select list
There are a number of best practices when it comes to managing Jira custom fields wisely. One is to avoid creating option fields that have to be manually updated frequently, as the burden of updating the list of options can only be carried by a Jira admin. Not only is it a pesky task that puts you in a position where you’re the bottleneck, but it can also lead to users selecting outdated options, leading to inaccurate data in the system.
A smart way to bypass this limitation is to use an app such as Elements Connect, providing you have a place where the list values are maintained up to date (they can also be stored in Jira using a dedicated project). We’ll look at this possibility in the following sections of this article.
Doing more with apps: dynamic drop down lists with Elements Connect
As presented in the previous section of this article, there are a number of limitations to the native select lists options provided by Jira. Using an app such as Elements Connect can help you enhance your Jira custom select lists and cover a broader range of use-cases. Elements Connect is an app for Jira that allows you to fetch data from your external datasources (CRM, CMDB, LDAP, homemade database…) and display it in Jira custom fields.
Here’s where Elements Connect can help leveling up your Jira custom fields game.
- Say goodbye to the manual maintenance of select lists options
Fetching your list values from an external source of truth allows you to ensure data consistency, without the recurring hassle of manually updating the list options in Jira. Data is pulled in real time directly from your external datasource.
- Use autocomplete in your dynamic drop down lists
Let users search the list of options with an autocomplete. This is particularly useful in case you have a long list of values to choose from.
- Present your select list options beautifully
If needed, you can customize the way your data is displayed using html to make it easier for users to browse options.
- Create cascading drop down lists on more than two levels
Create an infinite number of levels to cater to your most complex needs.
Unlike native Jira fields, you can change how the custom field is displayed and how users interact with it after it has been created.
No external data source containing the list options? Consider this hack
If you don’t have an external datasource where you store and update lists values (or can’t access it because of network restriction at your company) but still want to benefit from dynamic select lists, you can use Elements Connect to fetch data from Jira, by setting up your list of options in a dedicated project as Jira issues’s fields as show below.
It’s much simpler to set up and maintain than creating custom scripts, and you can order list options.
You can then grant a group of power users access to the project. This way, they can update the list of options by adding and removing the issues available in the project, without needing your help.
Choosing the type of Jira custom field best suited to your use-case
To determine the type of custom field that’s best for your “select list” use-case, you can follow the systemic approach proposed in the below decision tree.
First, you need to look at how you want to manage the options of your list, then decide how the information will be presented to the users.

User experience is key to adoption
There is no such thing as a one-size fits all solution. The guiding principle when it comes to custom fields in Jira is to reflect on the various needs you’re trying to reconcile: the need of the people who create the tickets, the needs of the ones who work on them, the need of those who need to aggregate data about them.
Simplifying these users’ experiences is key to the overall adoption of the solution. Sometimes it means saying no to a custom field request (for good reasons), sometimes it means going for the extra mile and setting up an integration between your external data sources and Jira so users can retrieve the information they need without the need to switch context or scroll down through a massive list of options.
At the end of the day, it is your call.
Jira comes equipped with many useful standard fields, designed to capture essential business data. However, it also lets you add custom fields in addition to the built-in fields to fit your business’s specific needs.
While this allows for a great deal of flexibility, it is essential to carefully manage your custom fields: it’ll make your administration easier as having too many custom fields may affect Jira’s performance but also your work as a Jira admin.
Below, you’ll find essential resources, how-tos, and expert advice to help you adjust the way you manage custom fields in Jira so you capture the right data for your business, while ensuring your configuration is sustainable in the long run.
Keep on reading to understand Jira custom fields, or jump ahead to the section that interests you most.
- Essentials things to know about custom fields in Jira
- Do’s and Don’ts for managing custom fields in Jira
- Optimizing Jira custom fields: a step by step process
- Governance: best practices to handle Jira custom fields requests
Essentials things to know about custom fields in Jira
What are Jira custom fields and how do they work?
Custom fields complement the built-in fields in Jira by allowing you to track information specific to your team’s needs inside Jira issues. You can create custom fields to capture virtually anything and choose to display any number of custom fields when creating, editing, viewing or transitioning Jira issues.
They also act as filters for Jira issues, when performing issue search, in reports or dashboard gadgets, so users can know better where their work stand at a glance.
The anatomy of a Jira custom field
When talking about custom fields, there’s more than meets the eye. Jira custom fields each have a number of attributes that will define what data they can contain, and how this data will be presented, and searched for instance. Here’s the list of attributes1 you’ll be manipulating when creating, editing or deleting custom fields.
- Name: the label that appears to the left of the custom field when it is displayed to a user on a screen.
- Description: the help text that appears next to the custom field on hover.
- Default value: the default value of the custom field when it is first prompted to a user.
- Context (also known as custom field configuration scheme): the combination of project(s) and issue type(s) for which a given default value and a set of options will apply.
As we’ll discuss later in this guide, you can and often should create multiple contexts for a given custom field, allowing you to associate different default values and options with particular projects or issue types. This can help limit the number of custom fields by reusing them in a different way across your Jira instance. - Screens: the screens on which the custom field will appear when an issue is created, edited or when it is transitioned through its workflow. A screen also allows you to split subsets of fields across multiple tabs.
- Search template: the mechanism for making a custom field searchable via Basic Search and Advanced Search, also responsible for the indexing of custom fields.
- Options: the values from which users can choose . These values can be manually entered by a Jira admin or live fetched from an external datasource using an app.
Options are only available for select lists, multi select lists, radio buttons, multi checkboxes and cascading select lists. - User filtering: the set of users which the end-user can pick from in a User Picker Field. These options can be limited to users in specific groups and/or project roles.
Additionally, when defining field behavior for certain project(s) and issue type(s) combinations using field configurations, you’ll be able to configure:
- Hide/Show: whether the field is visible on the view or hidden
- Required/Optional: whether the field must be filled or is optional
- Renderers: renderers defines how a field’s value is going to be displayed, they affect the view, not the data itself.
Jira custom fields and reporting
Custom fields are a great way to add rich data to your issues, and they’re extremely useful data points to get insights from in reports, search queries or on dashboards.
However, not every custom field type is built equal when it comes to reporting. Structured custom fields such as select and multi select lists are particularly effective, as the user has a limited number of options to choose from, and thus there’s a known fixed set of options to search from and display in your reports. On the other hand, text fields are less structured and can only be searched using the contain (~) operator, meaning they’re a lot less useful in reporting as people don’t always enter data correctly or as expected by the JQL query used in the report.
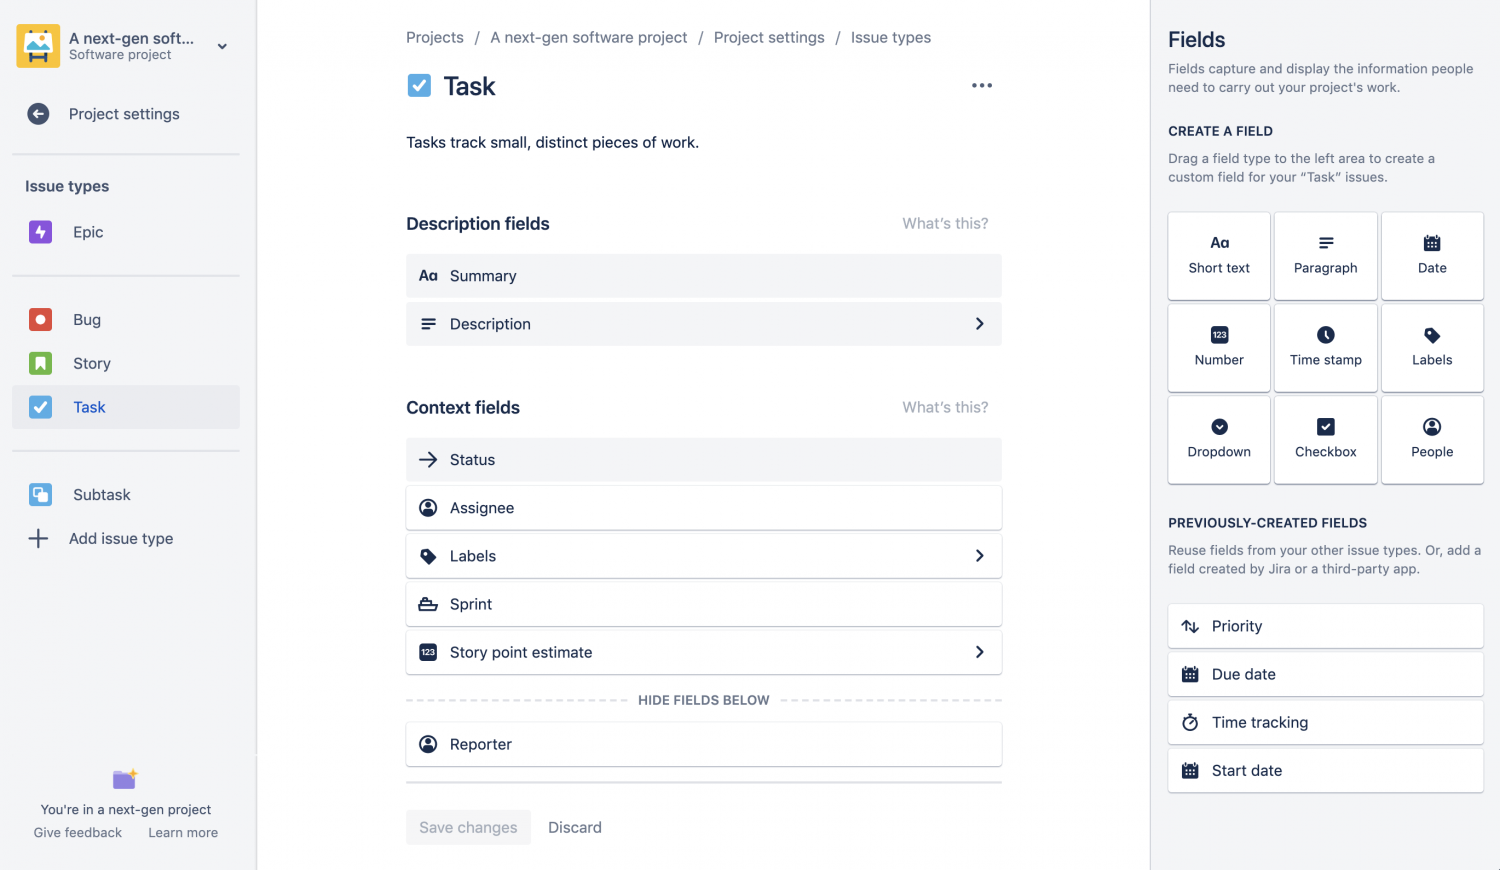
Cloud only: custom fields in Next-gen projects
If you’re using Jira on Cloud, you have the option to empower your users to create Next-gen projects. Next-gen project allow users to create and set-up their own issue types and custom fields, basically to configure their project to match their team’s specific needs without relying on a global Jira admin. These projects are self-contained, meaning fields created in next-gen projects can’t be used by other projects which should prevent them to affect performance globally. Similarly you can’t use a custom field created in a classic project on your next-gen project issues.
While this “DIY” approach offers some benefits in terms of flexibility, you should think twice about going down that road, especially if you need cross-project reporting that requires shared custom fields. Before teams create Next-gen projects, make sure they can clearly define the business value of having a self contained project with custom fields that can’t be shared with other projects as there is no easy turning back.
If you wish to explore this new paradigm to project management in Jira, consider starting with a small number of power users that you will train (by default, anyone can create a next-gen project, so make sure you set up the appropriate permissions). You can share this best practice guide about custom fields with them as a reference.
Apps and custom fields
Apps are additional bricks Jira admins can add to their instance, allowing them to customize the tool to their company’s specific needs and enhance it with further functionality. There are two ways apps can leverage custom fields: first to store additional data related to the app functionality in Jira, and second to reuse the data stored in the fields that are already available on the instance as an input. How custom fields are used depends on the app functionalities. For instance an app such as Tempo Planner will leverage data stored in fields to display a plan while an app such as Elements Connect will provide custom fields that fetch their values from external data sources.
While the custom fields types provided by Jira are already extensive, you might want to consider using an app to enhance its capabilities when in need of calculated fields (as Jira can’t natively provide with any kind of computation in custom fields) or when the information the field will capture already exist in one of your external referential and you’d rather fetch it from there.
One important thing to note is that when an app is deactivated or uninstalled, their custom fields remain in the Jira database even if they are removed from screens and the custom fields section of the Jira admin.
Do’s and Don’ts for managing custom fields in Jira
What are the considerations for creating custom fields in Jira? Here’s our curated list of do’s and don’ts for effectively managing your Jira custom fields, and avoiding custom fields bloat.
DO’s
- Be careful how many custom fields you define in Jira
Every custom field has a cost in terms of performance for the instance, but also in terms of time of complexity to fill in requests for users. Strive to challenge the necessity of each custom field early on, this will save you from having to run a custom fields audit because of poor performance later on. - Make custom fields names generic
Try to give custom fields non-specific names that allow you to reuse them in other places. Use context to define project / issue type specific options, if needed. For example, name your field “Rating” instead of “Support Rating” . - Translate custom fields names
If you have users using different language packs, make sure you translate your custom fields accordingly. This will ensure your custom fields are understood correctly. - Use custom fields contexts judiciously
Restrict the custom fields context where appropriate, and avoid using global context when it’s not necessary. This will help optimize your Jira instance performance. - Automatically fill in Jira fields when possible
As a Jira admin, your job is to strive for simplifying issue creation for users while maintaining a high-level of data accuracy and enough information in the Jira issue for it to be effectively handled. If you already have the information you’re requesting from users stored in an other system, consider using an app to retrieve data from external datasources, automatically fill fields or guide users with select lists that fetch their values from your external sources.
DON’Ts
- Don’t duplicate names
Do not create new custom fields that have the same name as other existing fields …or search in JQL will become a nightmare for users. This can also lead to administration mistakes and custom script errors. Always run a check to see no other field in the instance share the name of the field you’re about to create. - Don’t create option fields that have to be manually updated frequently
Avoid creating option fields if the options provided are likely to frequently become outdated and require a manual update as data is likely to become inaccurate. However, if the list of options you want to provide is being maintained in an other system (your CRM, an Asset Manager…), an app that can fetch this data and display it in Jira can spare you the maintenance of the list options in Jira and provide an efficient solution. - Don’t abuse the required attribute
While there’s a strong temptation to make fields required, you should use this option sparingly as it makes creating tickets more difficult. If a custom field must be required, always have a way for the user to say “I don’t know”, otherwise you might end up with erroneous data.
Optimizing Jira custom fields: a step by step process
When too many custom fields affect your Jira instance performance
Research has shown that having too many custom fields can have a dramatic impact on your Jira instance performance, as the response time of any action that involves custom fields is affected by the raw number of these objects available in Jira.
As show below, the difference in response time per action for an instance with 1400 custom fields and one with 2800 is affected the most for Search with JQL, and Create issue, two commonly performed actions.

If you’re experiencing slow load time on your Jira instance, optimizing custom fields can lead to significant improvement in the quality of service you deliver to your users. Here’s a high-level step-by-step process on how to approach this project.
1. Audit your Jira custom fields
First, you need to get a clear list of the fields that are currently implemented in your instance. There are a few way to identify them: you can do a manual examination, use an app from the Marketplace such as Cleaner for Jira or Custom Fields Usage for Jira (Server only) or Jira’s built-in Custom Fields Optimizer (Data Center only).
Once you’ve established the list of custom fields available in your instance, it’s time to classify them and assess whether they’re still needed or not.
Process step by step in your investigation: identify how they were created (by Jira, by an app, or by an admin). For the ones that were created by an admin, check for duplicates or fields that have too narrow names, determine the fields’ scope and current use in projects, screens, workflows and users’ JQL queries. Also question the business value of the custom fields.
Once you’re done reporting this information in your spreadsheet, you’ll be ready to move on to the next step: deciding on how to optimize your Jira custom fields.
2. Decide what to do with your custom fields
Now that you’ve assembled all the necessary information about your Jira custom fields, it’s time to decide what to do with them. For each custom field, you have six options:
- Keep it as is
- Rename it for the sake of clarity and re-usability
- Delete it purely and simply
⚠️ Bear in mind that this operation can’t be undone, and the values in the database will be deleted. - Hide it from the screens while preserving the data
- Limit its scope to specific projects context
- Merge it with other custom fields that are essentially the same

3. Prepare stakeholders for the changes
Loss aversion is a very common fear. When working on optimizing your custom fields list, always make sure to explain to users and project admins why you’re doing this, and that in doing so you will not take away the functionality from them but rather find a more elegant way to provide them with this functionality.
Make sure also to state that you’ll only delete fields that aren’t used anymore, and with the agreement of the project admins of projects previously using that field. Be prepared to share data that shows how the field isn’t valuable anymore.
4. Advice for the actual implementation
Always ensure that your changes are tested in a test environment before rolling them out to production, and allow enough time to these tests. This may seem like an overkill sometimes, but be careful so that no data that’s critical to a team is lost in the process.
Governance: best practices to handle custom fields request
As the saying goes, an ounce of prevention is worth a pound of cure. Whether you’ve had to go through an audit and field clean up, or are just getting started with custom fields, here are some tips around custom fields requests management that will help you keep your Jira instance clean and performing well.
Pieces of information to collect for each new field request
While you can provide your users with a request form for new fields directly in your Jira support project, you’ll want to spend some time with the project lead or user that brought you this request to interpret their requirements for the new field, understand the underlying business needs and determine how to translate these requirements in your Jira instance and whether a new field is indeed needed or not.
For each new field request, try to get the most context you can. By the end of your investigation, you should know:
- the desired field name
- the purpose of the field
- the type of data that will be collected ( text, number, date, checkbox, select list…)
Pay special attention to interpreting the user’s requirement around the field type correctly, as once a field is created with a certain type it can not be changed later. Asking the requester for examples of the data the field will contain can help prevent such errors. - how and when in the issue lifecycle the data will be collected (manually entered or synced from an external referential)
- the screens on which the field should be shown
- for select lists and checkboxes, the list of options the user can choose from
- the validation rules for the field
A checklist for evaluating requests for new custom fields
Just because you can, doesn’t mean you should. By carefully assessing the requests you get from users you’ll truly be in a position to make the best choices for your Jira instance.
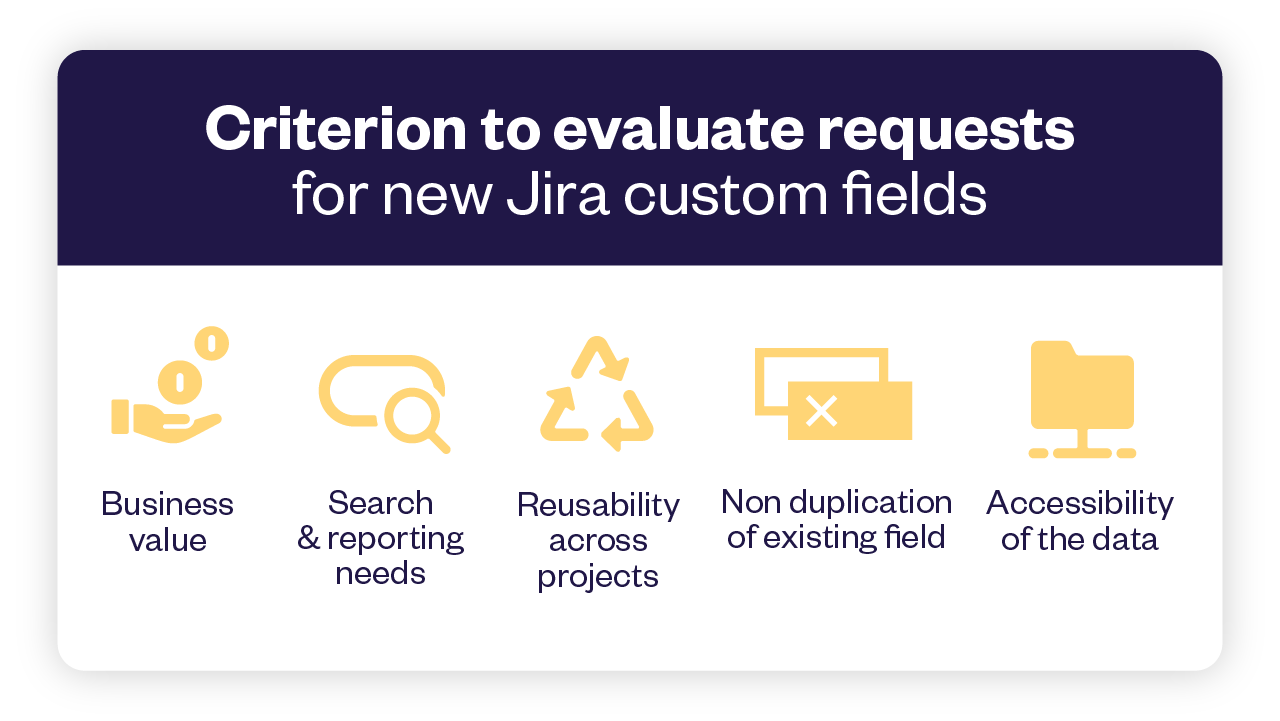
Take a moment to assess whether or not a new custom field is legitimately needed by reflecting on the following aspects:
- What would be the business value of the new field?
Always verify there’s a clear purpose for capturing a piece of information in a new field by asking the requester: how will knowing this information impact how you do your job? How is the data needed to perform your work or for reporting? It may sound obvious, but more often than you think you’ll find out the need isn’t clear. - Does the data need to be structured?
Ask the requester: will you search or filter issues based on this field’s value? will you need to run reports based on the values of this field?
If not, consider simply specifying what’s needed from the end user in the hint of the description field on the issue creation screen. - Will the new field be used by multiple teams across the organization?
Seeking for mutualization of custom fields across your Jira instance is a very effective way to fight custom field proliferation. Some companies even have a requirement that at least two teams benefit from the new field for it to be created. - Is there already a built-in Jira field or an other custom field that could fit this purpose?
Jira comes with a lot of built-in fields, and you probably have already added custom fields to fulfill previous requests on top of that. Before moving further with a new custom field creation consider reusing an existing field with a new context for instance. - How long will it take a user to reliably collect and submit the information?
For fields to be useful, they need to be filled correctly with accurate information. Remember that every field has a cost: no one likes to fill-in endless forms. Where possible consider automatically populating dropdown list options or read-only fields with data from your external databases or Cloud apps. This will save your end-users time while at the same time ensuring the accuracy of the data in Jira.
Once you’ve answered these questions, making the call for whether or not to create a custom field should be a straightforward decision.
Make managing custom fields requests a part of your Jira governance processes
Each company has its own way of governing its processes – yet there are some common best practices that can help you ensure your Jira instance keeps running smoothly and rules about its customization are well understood. Consider having a governance policy around custom fields and make it easy for users managers and executives to find. You’ll want the rules for how new objects such as custom fields, workflows, etc get added to Jira to be clear and unambiguous for everyone.
A Jira Advisory Board made up of different profiles (executive, project lead, end user…) is also a good way to make sure decisions are taken based on the collective insights of different stakeholders and with a global perspective, ultimately leading to more trust and efficiency in the way the solution is administered.
Maintain and Sustain
Ensuring the performance and optimal configuration of your Jira instance is not a one time job. We recommend you regularly audit your custom fields and make sure that you and other Jira administrators at your company are following the quality standards and procedures that you’ve put in place to ensure custom fields are managed the right way at your company.
Make your Jira instance sustainable for future generations to come. There will be a day when you will leave, and you should leave with pride that you have built a maintainable and sustainable environment that has helped your company grow the right way.
References
1. Configuring a custom field, Atlassian Documentation
2. Performance testing for custom fields, using the methodology detailed in their Performance and Scale testing report for Jira Data Center, Atlassian Documentation
At a glance
“Speed and performance in today’s world defines a brand.”
Apcela, an American pioneer in the development of high-performance cloud-optimized enterprise networks, lives by this motto.
This notion of speed and high-performance must be reflected in all their services, including the customer support. Having the right tools to deliver high-quality customer support is therefore crucial.
With the help of Elite IT Consulting Group, an expert in Atlassian solutions, Apcela built an efficient support portal using Jira Service Management (formerly Jira Service Desk) combined with the apps Elements Connect and EazyBI.
The main goal was to provide a fast & easily-monitored incident management of their customers’ services.
Elements Connect helped achieve this goal by connecting Jira to the external CMDB storing network data, and thus centralizing all the information needed in each incident ticket so the support team can solve them faster.
EazyBI was implemented in order to create reports, and the compatibility between Connect and EazyBI meant the JSM solution was key to efficiently monitoring the assets of all clients and deliver a high level of performance in incident management.
The challenge: provide a fast & easily-monitored incident management service
Speed is in the DNA of Apcela. That has to be reflected in the nature of their products— cloud optimized networks— but also by every service around them.
That’s why it is crucial for them to deliver the same speed and quality in their customer support management as their products offer.
They reached out to Elite IT Consulting Group, Atlassian Solution Partner, to help them in this task.
The goal was to implement a high-quality customer support environment to manage incidents on their customers’ assets easily and efficiently.
Apcela had the following requirements:
- Ease the life of support agents & customers when raising an incident. To do so, it was important to provide them with all the information they needed on the assets which were impacted (routers, networks, etc).
- Asset & customer data must be updated live, due to constant changes in assets & services ; new locations or new networks connections are made every minute.
- Easily monitor customer service and build activity reports based on the main criteria for them: the service-level agreements (time to first response & time to resolution). SLAs were especially crucial for them because an incident on one service can impact the work of hundreds of users. The sooner an incident is detected, the better.
The solution: automate data centralization in a high-velocity support portal
Elite consulting team helped find the best solution to match Apcela’s requirements.
To monitor customer service and build reports based on SLAs, Elite identified Jira Service Management to build a high-velocity support portal.
The final piece was added by centralizing data on customers’ assets inside this portal. As Apcela already stored this data in a CMDB (as a SQL database), Elite used the app Elements Connect to integrate the already existing data inside Jira.
Elements Connect serves as a connector between the CMDB and Jira: it retrieves information on the customers & assets impacted from the CMDB to integrate it inside Jira tickets. This way, support agents get all the information they need to handle incidents efficiently.
This connection can be configured to get real-time updates, providing always up-to-date information to agents.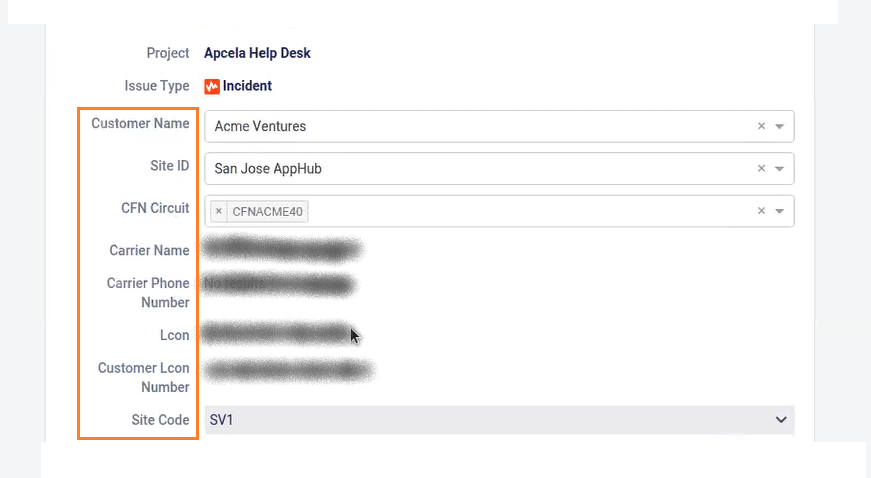
Cascading select-lists & read-only fields, filled automatically by Elements Connect based on the customer name
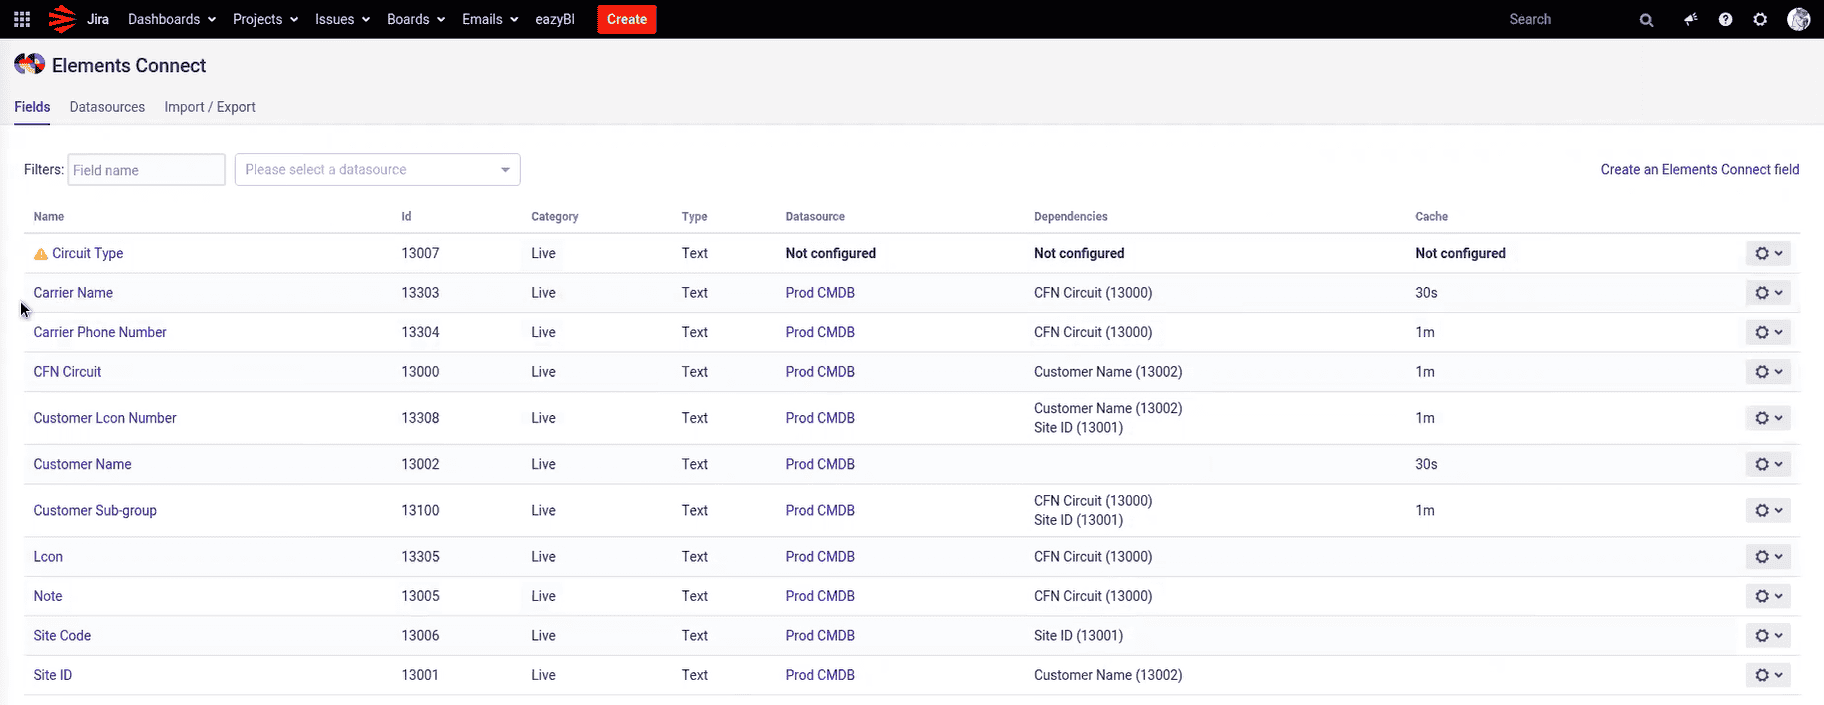
Elements Connect configuration
The final reason for the choice of Elements Connect: its native integration with the app EazyBI. As the Elements Connect custom field data gets stored in Jira, it is made possible to use eazyBI to build reports based on data coming from the CMDB. This integration was crucial to build comprehensive dashboards & have a global view of the support service performances.
With this personalized solution, using Jira Service Management combined with EazyBI and Elements Connect, they were able to automate as many actions as possible, saving a lot of time for agents, and providing a high-velocity incident management service.
Results: faster incident resolution by well-resourced support agents
The first benefit for Apcela was the centralization of all the information on their customers & networks in an unique environment for incident management.
Thanks to the external data integration made possible by Elements Connect, the support team was able to manage incidents more efficiently, accessing all key information directly inside the Jira tickets and saving a lot of time on manual actions.
As Apcela was now able to monitor everything, they could identify any incident on their networks ahead, centralize them in the portal, and therefore correct them as quickly as possible.
As proof, since this solution was implemented 3 years ago, they’ve achieved a huge improvement on SLAs: average pick up time has been divided by 20 on Apcela Help Desk.
Thanks to this implementation made by the Elite team, speed and performance continue to be the cornerstone of Apcela company.
About Elite IT Consulting Group
Elite IT Consulting Group is an Atlassian Solution Partner based in Argentina. Formed by a multidisciplinary engineering team, they developed an expertise of more than 8 years implementing, configuring, administering and automating Atlassian’s tools for very large and international companies.
After months of work, we’re happy to announce that Elements Copy & Sync for Jira Cloud has arrived. For years, Elements Copy & Sync has helped Jira administrators and users reduce manual tasks by copying, linking, and synchronizing Jira issues automatically. As Martin Lalonde, Jira Admin at Bonduelle North Americas said about Elements Copy & Sync “The biggest advantage? The automation. It makes Jira easier and faster, so you can spend time on the issue and not trying to create more issues in Jira.”
And now those same benefits are available for Jira Cloud users.
Copy recipes: the new configuration of Elements Copy & Sync Cloud
Instead of replicating everything in the Server/Data Centre version, we looked at how we could make the configuration of copying, linking, and syncing issues easier. The result? Copy recipes, which combine the settings for the source issue, field mappings, and settings for the target issue. We focused on making the app admin very user friendly and straightforward. Configuring a custom copy and synchronization of an issue can be done in just a few clicks.
Powerful Jira issue copy and synchronization options
Elements Copy & Sync recipes are highly customizable, and allow Jira admins to create copy templates to apply to different use cases. Jira admins can configure where copy recipes will be available, for example for all issues in a project or only some or just 1 issue type. Similarly, you can restrict target projects and issue types. Or leave it up to the user to pick what they need. You control how your users can use copy recipes.
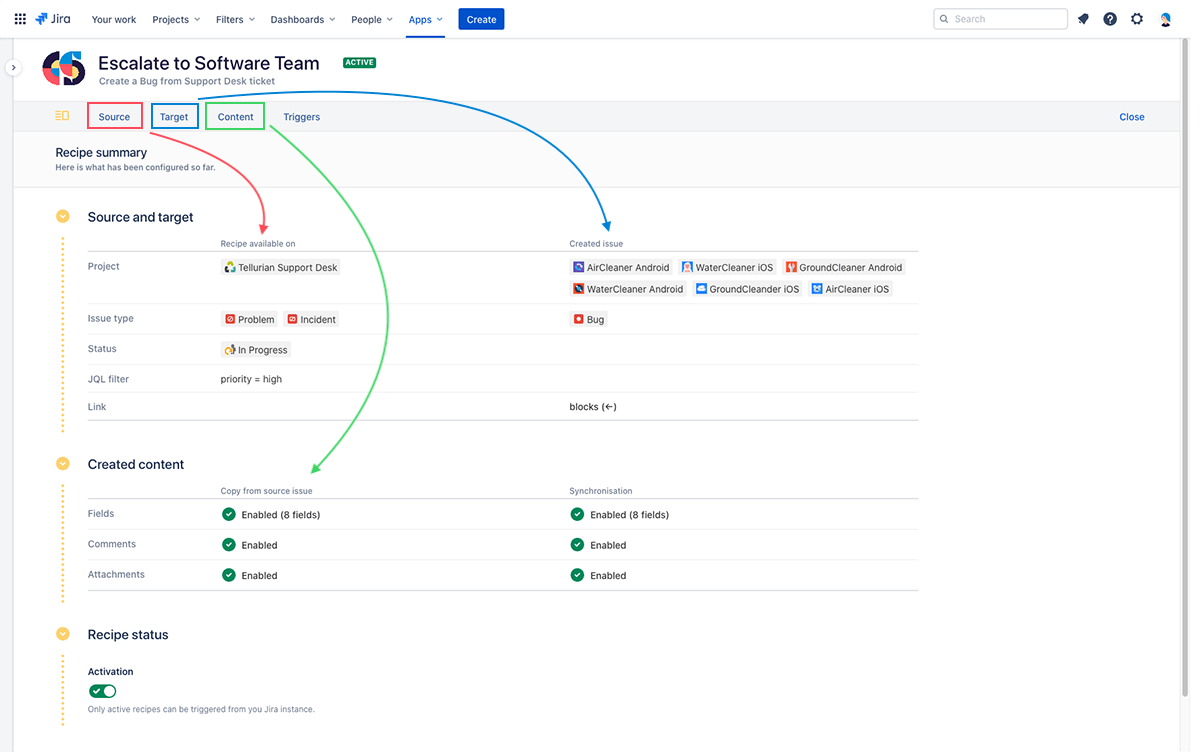
In addition to copying fields, you can also copy comments and attachments. The synchronize option can be one way or bi-directional depending on your use case, and it means changes to fields, comments, or attachments are automatically updated.
Integrate into your existing process seamlessly
We know every team is different: Classic projects, Next-gen, old issue view, new issue view… Elements Copy & Sync works on all of them.
Our goal is to help teams reduce manual tasks for common processes like
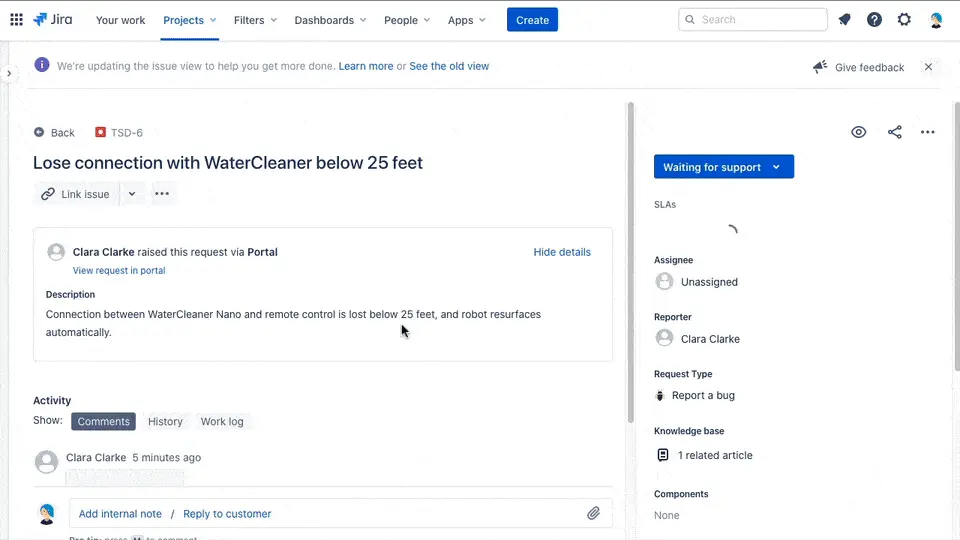
- Escalate issues from JSD to Jira Software with comments and attachments synced
- Copy issues to a different project on a workflow transition for incident management
- Create change requests from a Service Management Ticket
- Create Epics or Stories from a Support ticket and sync fields
- Create Stories from an Epic and link them
- Create a linked task with a pre-configured Summary or Description
Helping Jira users reduce manual processes
We have lots of features on our roadmap that will help you reduce manual processes even further. If you missed our webinar but want to see how Elements Copy & Sync works, we have a demo walk through available on our YouTube channel. We sure you’ll agree that copy recipes are very easy to set up.
Curious? Start your free 30 day trial today!
Larbi El Alami, senior consultant for Valiantys, leading French Atlassian Platinum Solution Partner, told us how they helped one of their major clients provide an efficient ITSM support with Jira Service Management & Elements Connect.
Context
As Atlassian Platinum Solution Partner, Valiantys provides its expertise to global companies since 2006 and guide teams during their agile transformation journey. Its consulting team’s activities go from project scoping to implementation, change management and training on Atlassian solutions.
IT Service Management (ITSM) is a frequent activity among their clients and we’ll present here how Valiantys helped a multinational manufacturing company improve their ITSM support.
The client’s IT Service team has to deal daily with the internal requests of thousands of employees in various countries around the world, on typical IT issues such as an incident on a computer, or an access request. Managing this volume of requests on a international level involved the use of a robust ITSM tool: Jira Service Management, to implement an efficient IT Service Management.
The hidden needs behind a Jira Service Management implementation
The use of Jira Service Management has 3 main benefits:
- it provides a structured client portal, separating the client side from the agent side while being user-friendly.
- it helps reduce costs, buying licenses only for agents, and allowing a free access to all users for them to be able to create directly tickets on the portal.
- it comes up with a complete native SLA management system.
However agents were facing a main pain point: the process of taking in charge one ticket was extremely long and tenious, for one main reason: the lack of information.
Each time a ticket was created on the portal, the only information provided about the reporter was his name. So agents had to leave Jira to look for all the reporter details on other tools and add manually the useful missing information in the ticket, creating data duplication. They were missing data and context, and losing time on manual actions.
As the consultant Larbi El Alami mentioned it “it was slowing down the process for Service Management agents and reducing the efficiency of using Jira Service Management.”
In the search of a solution, Valiantys consulting team used the advantage of the client of having all the data needed already available into an external data source: an user directory using LDAP. It gathered all key information about employees: contact details, but also country, business unit, position, etc.
The goal then was to get data from the user directory and display it into Jira Service Management on the agent side. That’s where Elements Connect comes into play.
Getting additional data from LDAP to contextualize ITSM requests
The app Elements Connect is a Jira add-on developed in the goal of centralizing all useful information into Jira by getting it directly from external data sources. Larbi El Alami gives us 3 main reasons why this app has been chosen for this project:
- its native LDAP management feature, making transparent the connection between LDAP and Jira.
- its robustness, especially on the big Jira instances multinational companies are working on.
- its ease of configuration, streamlining the work of consultants & Jira administrators.
The implementation of Elements Connect took 2 main steps: configuring the data source connection and displaying the fetched data in the corresponding tickets.
Once the connection is made, data retrieving is done by query based on the reporter’s name to get all useful linked information (first name, last name, email, phone, business unit, office, position). These details on the reporter populate custom fields displayed in the issue to contextualize the request for agents.
To go further in the Elements Connect implementation, it would also have been possible to sort a ticket in a specific queue or to grant it with specific SLAs depending on the VIP status of the reporter for example, status available in the user directory and added in a custom field on the ticket.
Improving request management process to decrease the time to resolution by 50%
Implementing this solution generated numerous functional benefits for IT agents:
- no more time loss due to looking for information outside Jira, and manual inputs (before, the agent had to manually enter data in 10 fields, fields which are now automatically populated thanks to Elements Connect) ;
- no more data duplication nor data entry errors because everything is fetched from another data source and kept up-to-date without any intervention needed.
Agents now have much more accurate information directly into the ticket, improving the communication with customers. A benchmark made by the client showed that the time to first response and the time to resolution were divided by 2 since the Elements Connect implementation by Valiantys, proof of a higher quality service.
Interested in working with Valiantys? Contact them here
Want to see Elements Connect in action? Visit our demo portal