


Change Management is one of the four ITIL modules supported by Jira service projects. To implement it successfully, you need to set up workflows that support existing best practices. In this article, we will cover just that: what is a workflow in Jira, how to set it up so that it supports the change management process and how to enhance it for a better experience.
Change management process in Jira Service Management (formerly Jira Service Desk)
A typical change procedure consists of five to six steps:
- Creating the change: Who raised it, the reason for it, which area it impacts and the priority it has
- Reviewing the change: Is the request complete, relevant, and correctly filled out?
- Assessment: What is the cost, benefit, risk and scope? Is it justified and what impact will it have?
- Implementation: Actually introducing the change on relevant assets
- Review: Was the change successful?
- EXTRA – Retrospective: What can we improve next time?
Atlassian has also nicely summed the procedure up in this article. You implement this into Jira through a workflow. But exactly what is a workflow in Jira?
Simply put, it’s an ordered set of steps necessary to complete a task. The steps are represented by statuses, and the order by transitions between statuses. For example, this is a very simple three-step workflow.
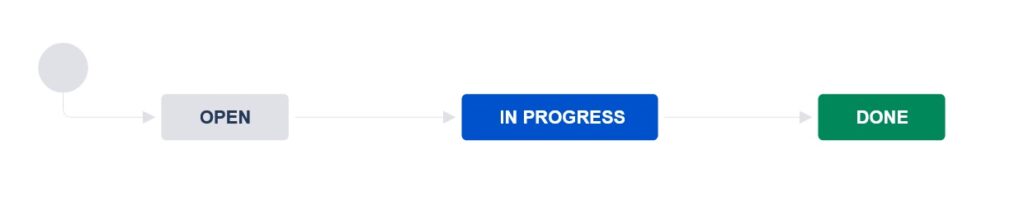
Open, In progress and Done are statuses, while the arrows pointing between each are transitions.
That said, what should you do to implement a change management workflow? It’s simple: transform the theoretical change management process into concrete Jira statuses and transitions!
Setting up change management workflows in JSM
Let’s present two possible ways you might want to approach this. A simple tracking of changes and a “true” ITIL change management.
Workflow 1: Simple change tracking
The first approach is for small teams that don’t need to adhere to a strict ITIL method, but they could definitely benefit from implementing a simple change management process in their Jira – they would see who requests, approves and implements which tickets and steer the whole procedure in the right direction.
For such a straightforward use case, they could use a workflow like this:
Workflow 2: ITIL Change Management
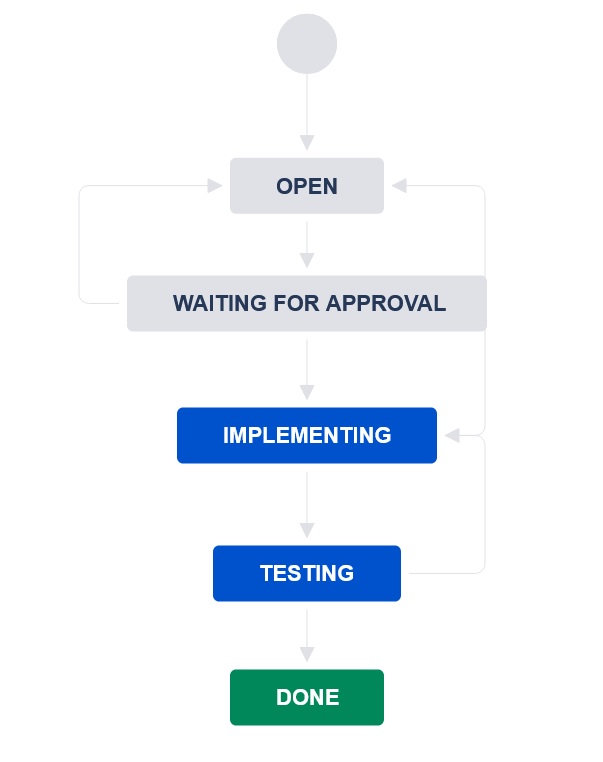
In case you’d need to configure a more robust solution, you could use the IT Service management project template. By default, a “Jira Service management change management workflow” is included in it, and looks like this:

This is the Cloud one; on-premise, it’s very similar. It has all the necessary change management steps, including various outcomes. The best part is that this is only a workflow template that you can adjust however you see fit. So how would you do that?
Editing workflows
This approach works if you already have a project created and you’d like to change its existing workflow. First, you need to having global admin privileges. In the project where you want to adjust the change management workflow, explore the project settings. Find the workflow you want to edit.

Choose the pen icon next to its name to enter the edit mode and display the workflow diagram.

To introduce a new status, choose the “Add status” button on the top left side of the editor. Once you add it, connect it to the workflow by choosing and dragging one of the circles on the status and dropping it to another one, as in the picture below. This way, you create a one-way transition.

If you want to remove a status, select it and choose “Remove status” on the right side.

Finally, you would save the workflow by choosing “Publish” at the top of the page.

Novice admins should modify existing workflows than create new ones, as they contain many detailed settings that you would need to keep in mind when creating a new workflow from scratch, such as automatic resolution screens, different notification events and proper workflow schemes.
In this article, Atlassian described several directions this default change workflow can take depending on the type of the created change, its risk and priority.
Emergency changes are those that need to be assessed and implemented as quickly as possible, and their process is shorter. Standard changes are frequent operations that have a pre-established procedure that needs less planning and approvals. Finally, normal changes require significant planning and assessing, as they cover important changes.
To use the default change management workflow to support these operations, you can either “hardcode” the three types of directions with Conditions depending on issue field values, or simply keep the workflow open for all change types.
Tips to improve change management workflows
Connect Jira to your asset management tool
Connecting changes to the relevant assets and stakeholders is key to successful change management.
Linking a Jira change ticket with the impacted asset helps both reporters and agents, by making the process simpler and adding the necessary context and a historical record that a change ticket had affected the device.
Now how to connect Jira to your Asset Management tool?
The Asset Management solution offer is wide: from Atlassian’s Insight (part of Jira Premium offer), to external CMDB (configuration management data base) and ITAM (IT Asset Management) tools.
If you are using Insight, you can add an Asset field from Insight on the Jira issue create screen (or a transition screen, depending on how complex your workflow is) to link the change with the asset. For external tools, you can use the app Elements Connect to retrieve data on your assets and populate Jira custom fields with it.

Set approvals automatically from the right stakeholders
Every asset usually have a responsible team or person that takes care of it. This stakeholder may be the approver for necessary changes. Or perhaps a Change advisory board (CAB) needs to approve the change.

Being able to automate the approval process and assign automatically the ticket to the right stakeholders can save a lot of time and repetitive work. To know more on how to get approvals automatically from the right stakeholders and set the assignation automatically, read this article.
Set your change management workflows up for success
Implementing a change management process in Jira is simple; you don’t have to start big. Try running your changes through a simple workflow like the one we proposed above, or leverage the Jira Service Management change management workflow provided with the default template. Modify it as you see fit, and remember that apps like Elements Connect can save you a lot of repetitive work.