


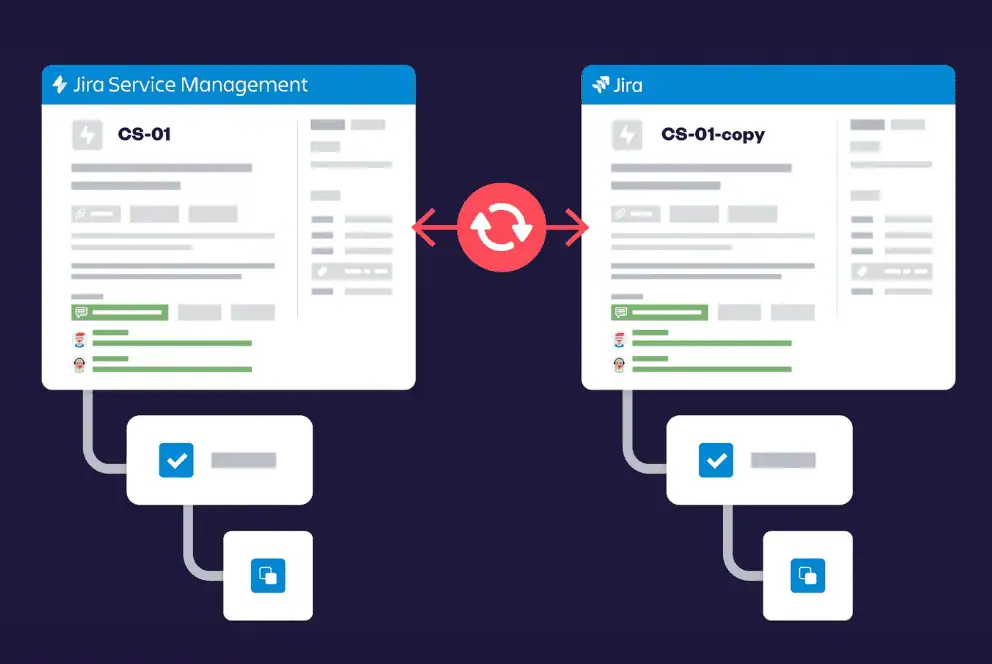
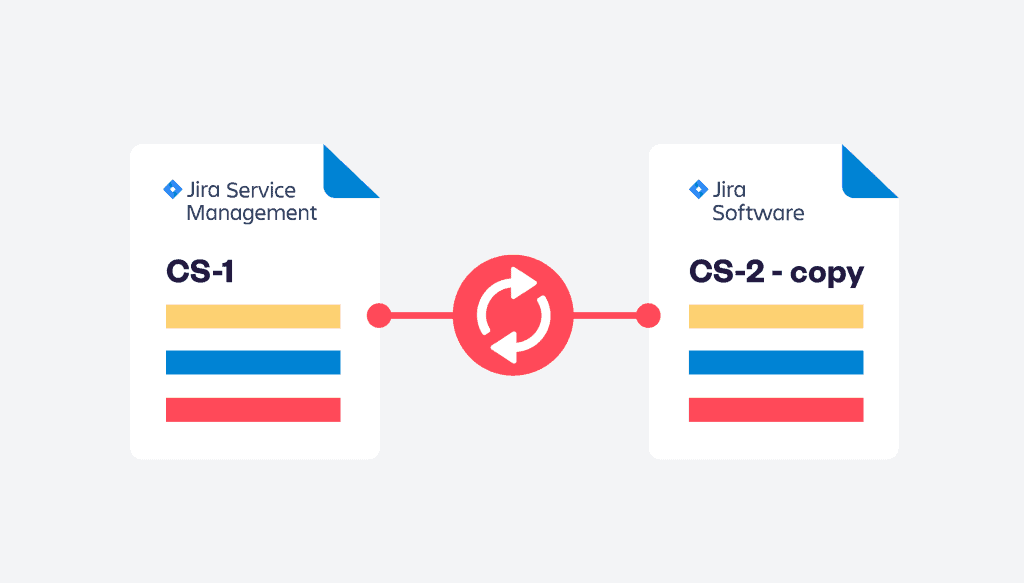
Synchronizing issues between Jira Service Management (JSM) and Jira projects can be a challenging task, especially when both teams rely on different workflows, issue types, and fields. This is where Elements Copy & Sync comes in, enabling you to seamlessly sync Jira issues across these two types of projects.
In this article, we will walk you through the process of using Elements Copy & Sync to sync Jira issues between projects efficiently, ensuring that your teams remain aligned and your data consistent.
Why synchronizing Jira Service Management and Jira issues?
Organizations often use Jira Service Management for handling customer support and Jira for development work. Although these platforms are tailored for different use cases, there’s often significant overlap in the issues managed by each.
For example, a bug reported by a customer in JSM might require attention from the development team in Jira. Without a robust synchronization process, this can lead to miscommunication, duplicated efforts, and delays in resolving issues.
Utilizing Jira to sync issues between projects ensures both teams have access to the most up-to-date information, enhancing collaboration and speeding up issue resolution. Elements Copy & Sync facilitates this by automating the synchronization of fields, comments, attachments, and more between JSM and Jira projects.
Setting up synchronization with Elements Copy & Sync
- Install and configure Elements Copy & Sync:
First, ensure that the Elements Copy & Sync app is installed and properly configured on your Jira instance. The app is available on the Atlassian Marketplace, where you can find installation instructions.
- Define synchronization recipes:
A recipe in Elements Copy & Sync defines the rules for how issues will sync between two Jira projects. When creating a recipe, you’ll specify the source and destination projects, the trigger for synchronization (e.g., issue creation or status change), and the fields to sync.

- Map fields between projects:
One of the key steps in setting up synchronization is mapping fields between JSM and Jira projects. For instance, you might map the “Summary” field in JSM to the “Title” field in Jira, ensuring that any updates in one project are reflected in the other.
- Enable comment and attachment syncing:
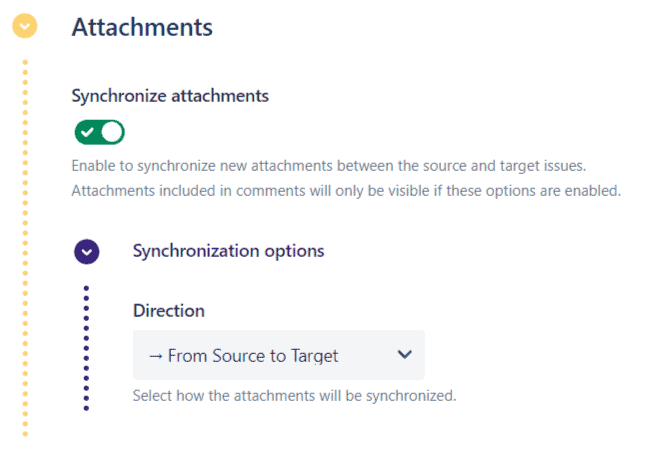
Elements Copy & Sync allows you to sync comments and attachments as well, which is especially helpful when multiple teams are collaborating on the same issue. By enabling comment syncing, any comment added to an issue in JSM will automatically appear in the corresponding Jira issue.
- Test the synchronization:
Before rolling out your synchronization setup to your team, it’s crucial to test the configuration. Create test issues in both projects to verify that all fields, comments, and attachments are syncing correctly. This step helps catch any potential issues before they affect your live data.
- Monitor and adjust synchronization settings:
Once synchronization is live, monitor its performance to ensure everything works as expected. You may need to adjust your synchronization settings over time, such as adding new fields or changing trigger conditions as your workflows evolve.
Check Elements Copy & Sync documentation
Benefits of using Elements Copy & Sync to sync Jira issues across projects
- Improved collaboration: By syncing relevant information between JSM and Jira, you enhance collaboration between support and development teams. Everyone has access to the same data, reducing the need for back-and-forth communication and minimizing the risk of errors.
- Time savings: Automating the process of syncing Jira issues saves your teams significant time, avoiding the need to manually copy and update issues between projects.
- Consistent data: Elements Copy & Sync ensures that data consistency is maintained across projects. When a field is updated in one project, it is automatically reflected in the other, reducing discrepancies and ensuring all teams work with the most accurate information.
- Customizable synchronization: The flexibility of Elements Copy & Sync allows you to customize your synchronization rules to fit specific needs. Whether syncing all fields or only specific ones, the app can be tailored to your workflow.
- Scalability: As your organization grows, so do your projects. Elements Copy & Sync scales with your needs, managing synchronization across multiple projects and even across different Jira instances.
Read how to sync Jira issues for better project management
Best practices for syncing Jira issues across projects
To maximize the effectiveness of syncing Jira issues between projects with Elements Copy & Sync, consider the following best practices:
- Regularly review and update recipes: As your projects evolve, your synchronization needs may change. Regularly review and update your synchronization recipes to ensure they continue to meet your requirements.
- Communicate with your team: Ensure all relevant team members understand how synchronization works, as well as what fields, comments, and attachments are being synced. This avoids confusion and keeps everyone aligned.
- Use naming conventions: Clearly name your synchronization recipes and mappings. This makes it easier to manage and update them as needed.
- Leverage reporting: Use Jira’s built-in reporting tools to monitor the effectiveness of your synchronization setup. Look for any discrepancies or issues that may arise and address them promptly.
Conclusion
Synchronizing issues between Jira Service Management and Jira is essential for organizations that rely on both platforms to manage different aspects of their work. By using Elements Copy & Sync, you can automate this process, ensuring that issues are consistently and accurately synchronized across your projects. This not only improves collaboration and communication between teams but also saves time and reduces the risk of errors.
Creating and managing projects in Jira can sometimes be a complex task, especially when you’re handling large projects with numerous issues, tasks, and hierarchical structures. That’s where Jira project templates come into play, offering a streamlined way to replicate project setups across different initiatives. With Elements Copy & Sync, you can easily copy entire projects from a template, ensuring consistency and saving time.
The importance of Jira project templates
Using Jira project templates allows teams to maintain consistency across projects. Whether you’re launching a new product, managing a marketing campaign, or setting up a software development project, starting from a well-defined template ensures that all necessary steps are included, and nothing is overlooked. Templates in Jira can include various elements such as issues, tasks, sub-tasks, epics, and even custom workflows.
However, creating these templates from scratch or duplicating existing projects manually can be time-consuming. This is where Elements Copy & Sync comes into play, simplifying the process by enabling you to copy all issues from one project to another while maintaining their hierarchy and relationships.
Try Elements Copy & Sync for free now
Setting up a template project in Jira
Before you can create a new project using Elements Copy & Sync, you need to have a well-structured template project in Jira. This template should include all the necessary components that your projects usually require:
- Issues and tasks: Define all the tasks and issues that are common across similar projects.
- Hierarchical structure: Ensure that the tasks are organized in a logical hierarchy, which might include epics, stories, tasks, and subtasks.
- Workflows and permissions: Configure custom workflows and set up the necessary permissions that will be replicated across new projects.
Having this template project ready means that every new project you create using Elements Copy & Sync will start with a solid foundation, saving you from having to set up these elements manually each time.
Using Elements Copy & Sync to duplicate projects
With your template project set up, you can use Elements Copy & Sync to create a new project based on this template. Here’s a step-by-step guide:
- Navigate to Elements Copy & Sync: As a Jira administrator, go to the Elements Copy & Sync administration page and select the relevant recipe designed to copy your project template.
- Configure the recipe: Ensure that your recipe is configured to copy the full hierarchy of issues from the source project. This includes selecting the “Copy full hierarchy” option in the recipe settings, ensuring that all issues, including epics, stories, and subtasks, are copied along with their relationships intact.

- Initiate the cloning process: In your Jira project, perform a search to list all the issues in the template project. Use JQL (Jira Query Language) to ensure that only the top-level issues are displayed. This is crucial for triggering the copy process correctly.
- Select the target project: Choose the destination project where you want the issues to be copied. Elements Copy & Sync allows you to maintain the same issue types in the new project, ensuring consistency.

- Monitor the copy process: Once initiated, you can monitor the progress in real-time. Elements Copy & Sync ensures that all issues are copied with their full hierarchy, so you don’t need to worry about missing any details.

Follow the complete guide here.
Elements Copy & Sync is compatible with both Automation and post-functions to make it easier for you and avoid manual efforts.
Benefits of creating Jira project template with Elements Copy & Sync
- Consistency across projects: By creating Jira project templates, you ensure that all your projects start with the same structure and standards. This is especially useful for large teams or organizations where uniformity is key to maintaining quality.
- Time-Saving: Manually copying and setting up projects can be tedious. Elements Copy & Sync automates this process, saving valuable time that can be better spent on project execution.
- Error Reduction: Manual setup is prone to errors, especially in complex projects. Automating the process with Elements Copy & Sync reduces the risk of missing critical components. Every component of your issues are cloned (summary, description, assignee, label, comments, attachments and much more).
- Scalability: For organizations that regularly launch new projects, having a streamlined process to replicate project setups ensures that scaling up operations doesn’t result in chaos.
Best practices for managing project templates in Jira
To maximize the benefits of creating Jira project templates, consider the following best practices:
- Regularly update templates: As your projects evolve, so should your templates. Regularly review and update your template projects to ensure they include the latest workflows, issue types, and best practices.
- Test the template: Before rolling out a new template, test it by creating a dummy project. This ensures that all elements are correctly configured and that the template will function as expected in a live project.
- Document the process: Documenting the process for using templates and Elements Copy & Sync can help onboard new team members and ensure that everyone follows the same procedures.
- Use naming conventions: Clearly name your templates and the associated Elements Copy & Sync recipes. This makes it easier for team members to identify the correct template and recipe when creating new projects.
Incorporating Jira project templates into your project management process can significantly improve efficiency and consistency across your organization. By leveraging the power of Elements Copy & Sync, you can automate the duplication of projects from these templates, ensuring that each new project starts with a solid, well-defined structure. This not only saves time but also reduces errors and helps maintain a high standard of project management across all your initiatives.
Managing complex workflows in Jira often requires teams to address multiple layers of collaboration, cross-project alignment, and efficient task management. Cloning and synchronizing issues in bulk are two powerful features that can streamline these efforts, allowing businesses to save time, foster collaboration, and maintain consistency across projects. Let’s explore why these capabilities are essential, common use cases where both cloning and syncing come in handy, limitations of Jira’s native solutions, and how an app like Elements Copy & Sync can enhance this process.
Why are cloning and synchronization capabilities powerful for your business?
Efficient issue management is critical for teams working on projects that span different departments or geographies. Here’s how you can empower your business operations:
- Eliminate manual work
One of the greatest benefits of cloning Jira issues is the ability to reduce manual work, which not only saves time but also minimizes the potential for errors. When tasks or tickets are consistently cloned and synchronized across projects, team members avoid redundant steps and can concentrate on their primary objectives. This efficiency ultimately saves both time and money by reducing task duplication and improving productivity.
For Atlassian users, minimizing manual steps is especially important when managing complex project structures across departments or business units.
- Enhance cross-functional collaboration
Often, different teams work on various parts of the same project across multiple Jira instances or projects. By utilizing copying and syncing capabilities, teams can ensure that tickets in different projects stay aligned, making it easier to track updates, share progress, and address dependencies. This leads to better collaboration between teams handling similar tickets, ensuring they work cohesively towards common goals.
This is particularly valuable in Atlassian environments where projects often extend across distributed teams using multiple configurations or custom workflows.
- Standardize and structure tickets
Cloning from existing templates or structured tickets allows for a standardized approach to task management. This consistency in structure can be especially valuable for repetitive tasks with defined procedures, such as onboarding new employees or recurring project setups. Cloning Jira issues ensures the right format and information structure is available, enabling teams to proceed without spending extra efforts on setup.
Standardization is often a key goal in enterprise Atlassian implementations, especially when compliance, auditing, or large-scale rollouts are involved.
👉 Read more about how to create Jira project templates
- Facilitate communication with stakeholders
Effective cloning and syncing not only aid teams working directly within Jira but also improve communication with stakeholders. Synchronized updates ensure that stakeholders receive real-time insights into project progress and potential blockers. This transparency results in more efficient workflows and smoother collaboration between all parties involved.
Many customers in regulated industries also value synced updates for providing clear audit trails and compliance visibility.
Use cases that require to clone and synchronize in Jira
For many teams, the ability to bulk clone and sync issues automatically is essential to keep up with the demands of modern project management. Here are some practical examples:
- 👉 Escalating issues from Jira Service Management to Jira
When customer-facing issues require development intervention, issue syncing and copying capabilities allow service teams to escalate an issue seamlessly. This provides developers immediate access to necessary details and keeps both teams in the loop with live updates.
These types of cases benefit greatly from syncing, ensuring nothing is lost between service and development teams.
- 👉 Project templating
Standardized templates of issues can be cloned across multiple projects, ensuring that all essential elements are maintained. This approach is helpful for companies managing numerous similar projects, enabling them to maintain consistency and efficiency by cloning the template structure and syncing necessary fields.
This is one of the more common cases where repeatability and consistency lead to long-term efficiency gains.
- 👉 Employee onboarding processes
Managing employee onboarding often involves multiple tasks across HR, IT, and department-specific roles. Copying templates for each onboarding process and syncing updates across teams helps to ensure no tasks are missed and provides a smooth onboarding experience.
- 👉 International collaboration or working with contractors
When collaborating with teams across countries or with external contractors, it’s essential to have clear visibility into project tasks. Cloning and syncing capabilities facilitate live updates, allowing all teams to stay informed and aligned on the project status, regardless of their Jira instance or geographical location.
Limitations of Jira’s native features
While Jira Automation provides some cloning and syncing capabilities, it can become overly complex, especially when both are required in tandem. Achieving a fully synchronized clone often requires creating multiple rules, which can be challenging and time-consuming. Furthermore, aiming to clone a hierarchy of issues, a common need for structured projects and templates, becomes even more intricate. Creating and managing these rules adds an extra layer of complexity, which could negate the time-saving benefits that cloning and syncing are supposed to provide.

The limitations of Jira’s native tools become particularly evident when:
- You need to manage both operations of clone and sync for an entire issue hierarchy.
- The project involves multiple workflows, which require continuous synchronization across cloned issues.
- There is a need to automate both manual and automated synchronization triggers without setting up multiple intricate rules.
Read more about Jira Automation limitations
A good alternative to Automation: using a single app to clone and synchronize Jira issues
To overcome these limitations, using an external add-on like Elements Copy & Sync can streamline the process. Designed specifically for Jira, it allows users to manage cloning and synchronization within a single solution, simplifying both setup and execution.
Key features of Elements Copy & Sync
- Clone and synchronize with the same recipe
Elements Copy & Sync provides the unique ability to combine the two operations within a single recipe. This means users can configure settings to automatically clone Jira issues in bulk with their desired fields and keep them synced effortlessly. This combined functionality minimizes setup time and helps users ensure that all clones remain up-to-date with their source tickets, without needing multiple automation rules. Each recipe can benefit from a two-way synchronization. Learn how to sync Jira issues from Jira Service Management to Jira - Flexible automation options
The app offers various triggering options, including a compatibility with Jira Automation, post-functions and manual triggers. Whether you need to clone Jira issues and sync them together when a specific action is taken or as part of a routine process, Elements Copy & Sync provides the flexibility to customize based on your team’s needs. - Workflow synchronization
By syncing workflows, the app ensures that updates made to the source issue’s status or fields are automatically reflected in the cloned tickets. This feature is invaluable for teams working in different instances or regions, as it enables consistency in issue management and status reporting across the board.
Try Elements Copy & Sync for free
Conclusion
For businesses aiming to enhance their project management capabilities in Jira Cloud, the ability to clone Jira issues in bulk and keep them synchronized efficiently can make a substantial difference. The process streamlines communication, facilitates cross-project collaboration, and ensures consistency across teams and stakeholders. However, relying solely on Jira’s native features can be complex and may not meet the full spectrum of needs, especially when there’s a layered hierarchy or cross-functional requirements.
Using an external add-on like Elements Copy & Sync allows Jira users to bypass these limitations and execute cloning and syncing seamlessly. With functionalities that cater to both automated and manual workflows, the app enhances the user experience, allowing teams to focus on what truly matters, delivering quality work and driving projects forward.
Try the app for free on the Atlassian Marketplace now
In the world of IT service management, understanding and improving user feedback is vital for long-term success. For teams using Jira, tracking and enhancing user sentiment becomes even more critical as it directly impacts the effectiveness of service delivery and project outcomes. By integrating performance metrics like Net Promoter Score (NPS) and Customer Satisfaction Score (CSAT), teams can gain valuable insights into their customers’ experiences and make data-driven decisions to improve their services. Thanks to Elements Pulse, an app available on the Atlassian Marketplace, the process is simplified, allowing you to evaluate and manage client perceptions in Jira seamlessly.
Understanding customer satisfaction in Jira
Client satisfaction is a crucial component of Experience Level Agreements (XLAs), which are becoming increasingly important in IT service management. While traditional Service Level Agreements (SLAs) focus on the technical aspects of service delivery—such as uptime, response times, and resolution times—XLAs shift the focus to the overall experience of the end-user. This shift recognizes that technical performance alone does not guarantee a positive customer experience. Instead, how clients feel about the service they receive, including their satisfaction with the support, communication, and outcomes, plays a significant role in their overall experience.
Customer satisfaction as part of XLAs
Experience Level Agreements (XLAs) take into account not only the service metrics traditionally covered by SLAs but also the subjective aspects of the user experience, such as client feedback. In the context of XLAs, it’s a key performance indicator (KPI) that reflects how well the IT services align with user expectations and contribute to a positive experience.
By measuring satisfaction through metrics like NPS and CSAT, organizations can gain insights into how customers perceive the value and effectiveness of IT services. These metrics provide a direct line of feedback from the users, indicating whether the services are meeting, exceeding, or falling short of expectations. High feedback scores suggest that the service is not only technically sound but also well-received by the users, contributing to a positive overall experience as defined by the XLA.
Why are XLAs important
- Holistic view of service quality: XLAs provide a more comprehensive view of service quality by combining both objective metrics (like those found in SLAs) and subjective experiences (such as customer satisfaction). This holistic approach ensures that IT services are evaluated not just on their technical merits but also on how they contribute to the user’s overall experience.
- Aligning IT services with business goals: XLAs help bridge the gap between IT services and business outcomes by focusing on user experience, which is directly tied to business success. When IT services contribute positively to customer satisfaction, they are more likely to support broader business goals, such as customer retention, loyalty, and brand reputation.
- Improving user experience: By emphasizing customer satisfaction as a part of XLAs, organizations can identify areas where the user experience can be enhanced. For example, even if a service meets all its technical SLAs, poor communication or a lack of empathy during support interactions can still lead to dissatisfaction. XLAs encourage IT teams to focus on these softer aspects of service delivery that significantly impact the user experience.
- Driving continuous improvement: XLAs promote a culture of continuous improvement. Regularly measuring and analyzing customer satisfaction helps organizations identify trends, uncover pain points, and implement changes that improve the overall experience. This ongoing feedback loop ensures that IT services evolve in line with user needs and expectations.
- Differentiating from competitors: In a competitive market, a strong focus on customer satisfaction through XLAs can be a key differentiator. Organizations that consistently deliver positive customer experiences are more likely to retain customers and attract new ones, giving them a competitive edge.
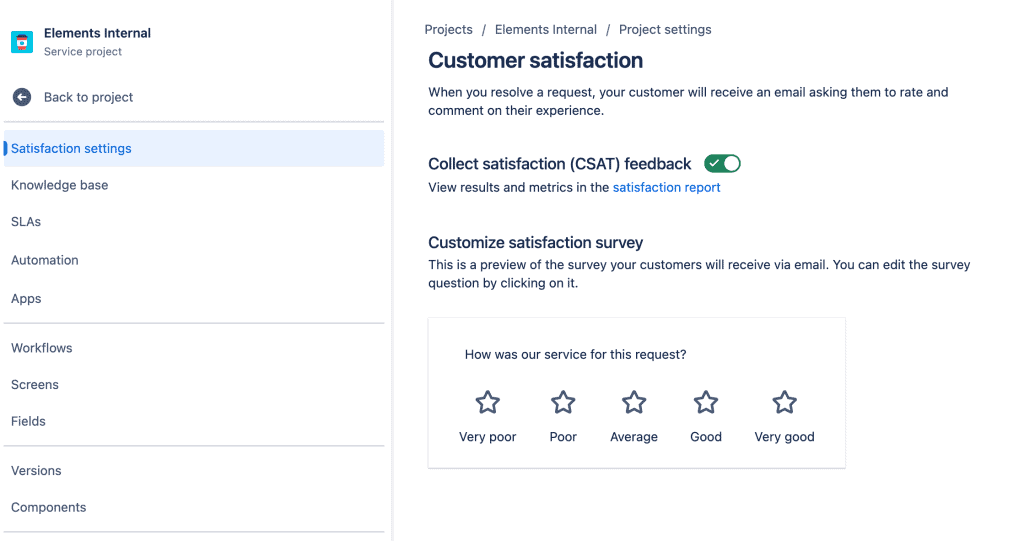
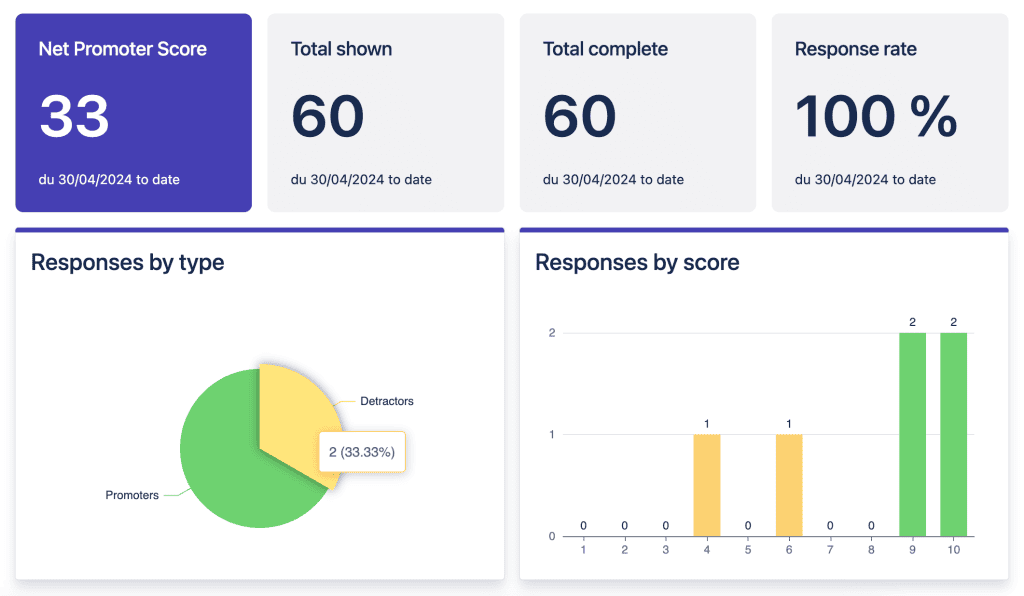
Why measure customer satisfaction in Jira with NPS and CSAT?
To effectively gauge user sentiment, two key metrics are commonly used: NPS and CSAT. Each provides a different perspective on customer sentiment and helps you understand how well your team is meeting customer needs.
- Net Promoter Score (NPS): NPS is a measure of customer loyalty and is calculated based on the question: “On a scale of 0 to 10, how likely are you to recommend our company/product/service to a friend or colleague?” Responses are categorized into Promoters (9-10), Passives (7-8), and Detractors (0-6). Your NPS is then calculated by subtracting the percentage of Detractors from the percentage of Promoters. In Jira, tracking NPS helps you understand the overall sentiment and loyalty of your customers related to specific projects or service interactions.
- Customer Satisfaction Score (CSAT): CSAT measures how satisfied customers are with a specific interaction or aspect of your service. Typically, clients rate their satisfaction on a scale, such as 1 to 5 or 1 to 10. The CSAT score is the average of these ratings. Unlike NPS, which gives a broader view of customer loyalty, CSAT provides a more detailed look at satisfaction with specific Jira issues, tasks, or services.
Measuring both NPS and CSAT allows you to gain a comprehensive understanding of customer satisfaction, helping you improve both overall loyalty and satisfaction with specific aspects of your service delivery.
If you’re looking for actionable strategies to implement NPS and CSAT effectively, check out this insightful video by Alex Ortiz. He shares expert tips on measuring and improving customer satisfaction, specifically designed for teams working with Jira. Watch the video now.
How to measure customer satisfaction in Jira with Elements Pulse
Elements Pulse is designed to integrate seamlessly with Jira. Here’s how you can set up and track NPS and CSAT in using Elements Pulse.
- Configure surveys in Jira: To begin with you have 2 options: you can activate native Jira CSAT survey or create a NPS survey directly from Elements Pulse. You can tailor these surveys to specific Jira projects, issues, or workflows, ensuring that the feedback you collect is relevant and actionable. For example, you might set up an NPS survey to be sent automatically after the closure of a Jira ticket, or a CSAT survey following the completion of a project milestone.
- Automate survey distribution: With Elements Pulse, you can automate the distribution of feedback surveys in Jira. Automation ensures that surveys are sent at the right times, such as after a ticket resolution or project delivery, without manual intervention. This helps you gather timely feedback consistently, allowing you to monitor user sentiment continuously.
- Collect and analyze feedback in Jira: Once your surveys are distributed, Elements Pulse collects the feedback and provides you with powerful analytics tools. You can view NPS and CSAT scores in real-time through customizable dashboards, making it easy to track sentiment trends and identify areas for improvement. This integration allows you to link user feedback directly to specific Jira issues or projects, providing context for the data and making it easier to act on.
- Interpret NPS and CSAT results: Elements Pulse provides detailed insights into your NPS and CSAT results within Jira. The app categorizes responses, allowing you to see how many of your customers are Promoters, Passives, or Detractors for NPS, and provides average satisfaction scores for CSAT. These insights help you understand the overall sentiment of your customers and identify specific issues or projects that may be affecting satisfaction.
- Take action based on feedback: Measuring sentiment in Jira is only the first step; the real value comes from using the data to drive improvements. Elements Pulse enables you to create workflows within Jira that trigger actions based on survey results. For example, you can automatically generate an issue for your support team if a customer leaves a low CSAT score, ensuring that the feedback is addressed promptly.
- Monitor trends and improve over time: Elements Pulse allows you to track sentiment trends over time in Jira. By regularly reviewing NPS and CSAT scores, you can monitor the impact of changes and improvements on overall user satisfaction. This ongoing analysis helps you continuously refine your service delivery processes.
Conclusion
Measuring customer satisfaction in Jira is essential for ensuring that your IT services and projects meet customer expectations and drive business success. By using NPS and CSAT, you can gain valuable insights into customer loyalty and satisfaction with specific aspects of your service delivery.
Elements Pulse provides a powerful solution for integrating client feedback measurement into Jira, offering tools to configure surveys, automate feedback collection, analyze results, and take action based on the data. By leveraging these features, you can ensure that your team is consistently focused on improving the client experience, leading to higher loyalty, better retention, and more successful project outcomes.
Investing in customer satisfaction in Jira is not just about collecting feedback; it’s about building a stronger, more customer-centric organization. With Elements Pulse, you have the tools you need to measure, understand, and improve client sentiment, driving your business toward long-term success.
Discover Elements Copy & Sync: your ultimate tool for cloning and synchronization in Jira
Cloning a project in Jira isn’t quite one-click simple. While Jira Cloud doesn’t offer a full “clone project in Jira” button, it does provide a native way to replicate your project’s settings: workflows, issue types, screens, and permissions via a “shared settings” option. This works well for some teams, but users working across multiple projects or dealing with frequent setups often need more robust tools to support their workflows.
Common challenges when trying to clone project in Jira manually
Many Jira users attempting to clone project in Jira using only native tools quickly run into frustrating limitations. While Jira Cloud allows you to duplicate a project’s setup by sharing settings from an existing project, this only covers structural aspects like workflows, issue types, and permissions. The actual project data (issues, subtasks, comments, attachments, and links) must be manually recreated or imported, often through error-prone CSV files.
This process is not only time-consuming but also introduces significant risk: issue hierarchies can break, custom fields may not map correctly, and dependencies between issues might get lost in translation.
On top of that, maintaining consistency across multiple clones becomes a logistical challenge when everything is done manually. For teams that need to clone project in Jira regularly, this native process simply doesn’t scale, leading to wasted time, inconsistent setups, and avoidable errors. Many users turn to third-party tools for support, automation, and control that go far beyond Jira’s out-of-the-box capabilities.
Step-by-step: How to clone a project in Jira using native features
- In Jira, go to Projects > Create project.
- Choose your project type: either company‑managed or team‑managed.
- Look for and check “share settings with an existing project.” Select the template to clone project in Jira from. This duplicates the structure: issue types, workflows, screens, fields, permissions, notifications, project lead, default assignee, project category, etc.
- Finish creating the workspace.
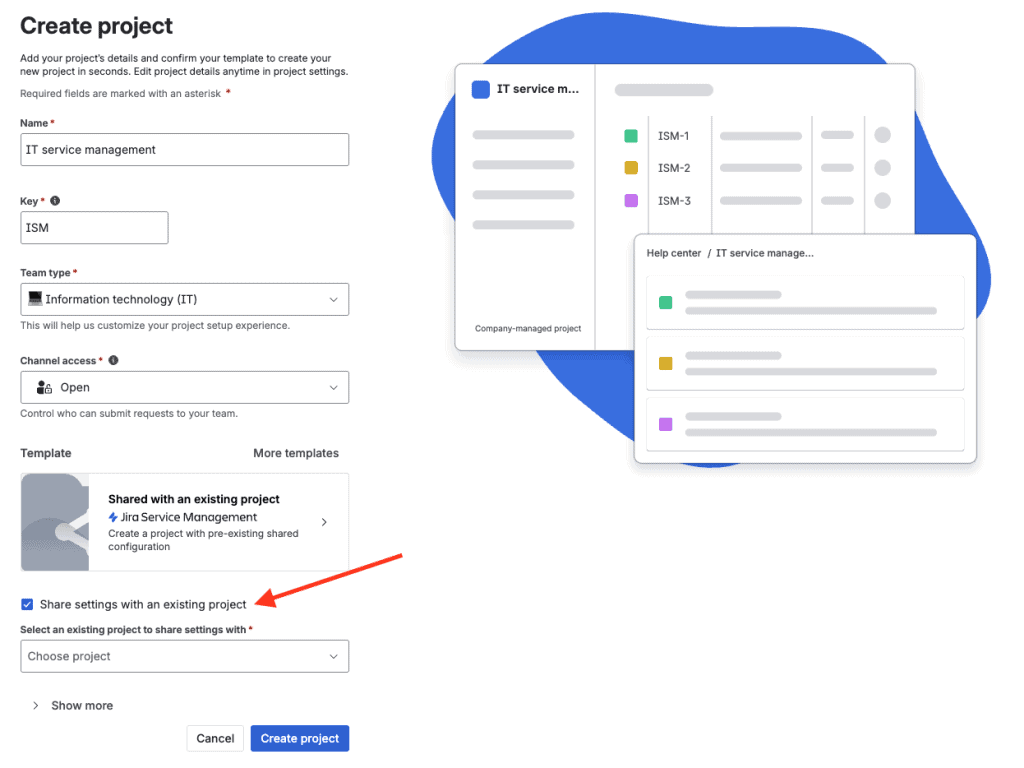
You’ve successfully cloned the structure: but not the issues.
To clone the actual data (issues), you need to export from the old project (e.g., via CSV), then import to the new one. For hierarchy support (parents and subtasks), you likely need to import parent issues first, then subtasks. This works, but it’s manual and error‑prone. Many users find this inefficient, especially when handling multiple projects at once or trying to standardize across departments.
This is where an app like Elements Copy & Sync takes it to the next level: effortless, reliable, and entirely integrated into your cloud environment.
Clone project in Jira smarter: introducing Elements Copy & Sync
When you’re cloning a project in Jira regularly, be it for templates, onboarding, client setups, or sprint repeats, you want more than just the structure. You need issues, attachments, comments, links, hierarchy, and automation. Elements Copy & Sync delivers all of that, and it does it easily.
It’s a tool designed to support modern teams by accelerating project creation, improving collaboration, and ensuring consistency, especially in company environments that demand scalable, repeatable setups.
Why use Elements Copy & Sync to clone project in Jira?
![]()
![]() It clones entire setup and content, including subtasks, comments, attachments, and issue links: not just the settings.
It clones entire setup and content, including subtasks, comments, attachments, and issue links: not just the settings.
![]()
![]() Bulk‑clone hundreds (even thousands) of issues in a few clicks using JQL or filters: no manual export/import.
Bulk‑clone hundreds (even thousands) of issues in a few clicks using JQL or filters: no manual export/import.
![]()
![]() Preserve issue hierarchy: epics, stories, tasks, subtasks all copied together.
Preserve issue hierarchy: epics, stories, tasks, subtasks all copied together.
![]()
![]() Powerful field mapping: clone all fields, attachments, comments, or selectively clear, modify, or map fields across projects.
Powerful field mapping: clone all fields, attachments, comments, or selectively clear, modify, or map fields across projects.
![]()
![]() Optional synchronization: keep cloned issues updated when the source changes: one‑way or two‑way.
Optional synchronization: keep cloned issues updated when the source changes: one‑way or two‑way.
![]()
![]() Easy template creation: maintain a master and clone it as needed.
Easy template creation: maintain a master and clone it as needed.
![]()
![]() Flexible triggers: run cloning manually, via Jira automation, post‑functions, or REST API.
Flexible triggers: run cloning manually, via Jira automation, post‑functions, or REST API.
![]()
![]() Cross‑instance cloning: clone between Jira cloud instances with the app installed in both.
Cross‑instance cloning: clone between Jira cloud instances with the app installed in both.
Elements Copy & Sync also helps support company operations by providing a centralized approach to replicating best practices across departments. Whether you’re onboarding a new team or delivering a new service line, it ensures that nothing slips through the cracks.
For any managed workspace that requires replicable processes across departments, Elements Copy & Sync offers unmatched consistency. It’s especially useful when teams are scaling and need to roll out standardized setups across multiple managed environments.
Step‑by‑step: How to clone a project in Jira using Elements Copy & Sync
Step 1: Clone project in Jira structure natively
As above: Create project > Share settings with existing project > Create.
This gives you a framework ready for issue insertion.
Step 2: Set up your first recipe
- Open the app in your Jira instance.
- Click Create a recipe. Name it something like “Clone project template.”
- Configure options:
- Copy full hierarchy (epics and all child issues): essential to clone project in Jira contents
- Copy all fields, including attachments, comments, web links: customize to include or exclude as needed.
- Copy subtasks: maintain full task structure.
Activate/save your recipe.
Read more on the documentation
Step 3: Bulk clone issues into your new workspace
- Go to the template project’s issue search (View all issues).
- Run a JQL query, e.g.,
parent = NULLto identify top-level issues (starts of hierarchies).
Select them and launch your recipe using “Copy full hierarchy” – this pulls entire trees into the new location.
Optionally enable synchronization: keep the copy synced with updates from the template.
Teams managing multiple rollouts can also use automation to trigger this cloning workflow as soon as a new workspace is created, reducing operational overhead. This saves both time and effort, freeing your team to focus on delivering services or new initiatives faster.
Watch demo on how to clone a Jira project
Step 4: Validate the cloned content
Confirm:
- Workflows, issue types, fields, screens, etc., copied from the template project setup.
- All issues, subtasks, attachments, links, and comments are in place in the new workspace.
- If sync is on, changes to template forward to clones.
How to clone project in Jira with consistency, speed, and ease: use cases
| Use case | How Elements Copy & Sync helps |
|---|---|
| Project templating | Clone a master template into a new space with full issue structure, fast and error‑free. |
| Client onboarding / implementations | Reuse structured checklists, tasks, epics per client, just clone and adjust. |
| Epic duplication | Clone an epic with all child issues in one action, not individually. |
| Issue escalation | Auto‑clone service requests from JSM to dev spaces, synchronizing comments and status. |
| Cross‑instance workflows | Replicate setup between Jira cloud environments for testing or staging. |
| Bulk cloning for sprints | Reuse backlog structures across teams without manual setup. |
Elements Copy & Sync has become an essential support tool for many organizations looking to scale their work across agile squads or company divisions.
Wrap‑up: choose the approach that fits you
Native approach pros and cons
Pros:
- Free, no add‑on needed.
- Quick config cloning via shared settings.
Cons:
- Issues not copied.
- Manual, error‑prone import required.
- No bulk or hierarchy support.
- Not practical for recurring or complex setups.
Elements Copy & Sync advantages
- Truly clones the workspace: structure + issues + hierarchy + attachments, comments, links.
- Fast bulk operations, JQL + recipe based.
- Reusable templates with configurable triggers.
- Optional synchronization keeps master and clone aligned.
- Handles complexity with elegance—no manual work or scripting required.
- Adaptable for every team size, from startups to enterprise teams working across departments.
- Designed to support multiple teams, services, and workflows across your entire company.
Learn more about Elements Copy & Sync
Conclusion: unlock seamless duplication when you clone project in Jira
When you need to clone project in Jira regularly, whether for templates, standardization, onboarding, or repeatable patterns, the native method is limited.
Elements Copy & Sync transforms that process into something fast, reliable, customizable, and even automated.
Start with native config cloning (“share settings with existing project”), then let the app take care of issues, hierarchy, attachments, links, and more. You’ll reduce manual effort, avoid errors, and scale your setup with confidence.
Ready to see it in action? Try Elements Copy & Sync for free and start cloning projects the smart way.