


We’re excited to announce that app editions are now available for both Elements Connect and Elements Copy & Sync on the Atlassian Marketplace.
Starting today, you can choose between Standard and Advanced editions, designed to better support the different ways teams use our apps: from simple, everyday workflows to large-scale, enterprise-grade setups.
In this article, we’ll explain:
- What app editions are
- Why we introduced them
- How to choose the right edition for your team
- And how to switch between editions
What is an app edition?
An app edition is a way to offer different levels of capabilities within the same app, depending on your needs.
With this launch, both Elements Connect and Elements Copy & Sync are now available in two editions:
- Standard edition → for core, day-to-day usage
- Advanced edition → for organizations operating at scale or with more complex requirements
Both editions are part of the same app. You’re not changing product, you’re simply choosing the level of capabilities that best fits your use case.
A quick reassurance
Before going further, one important point:
👉 Nothing changes for your current usage.
All existing customers are automatically placed on the Standard edition by default, with:
- no disruption
- no required action
- no impact on existing workflows
The Standard edition will continue to be:
- fully supported
- actively developed
- regularly improved with new features and enhancements
You will also keep your current support level, including the 8-hour response SLA.
Why we’re introducing app editions
Over time, we’ve seen our apps used in increasingly different ways.
Some teams use:
- Elements Copy & Sync for simple cloning and synchronization workflows
- Elements Connect to bring external data into Jira fields
At the same time, other organizations are:
- synchronizing multiple Jira instances at scale
- connecting numerous data sources and complex datasets
- collaborating with partners, subsidiaries, or subcontractors
- managing critical business workflows across systems
These enterprise use cases come with stronger requirements:
- higher performance expectations
- advanced security and privacy needs
- governance and compliance constraints
- faster support response times
Supporting these scenarios requires additional infrastructure, higher guarantees, and enhanced support.
Introducing app editions allows us to better serve both ends of the spectrum:
- keep the Standard edition simple, efficient, and accessible
- while enabling Advanced capabilities for enterprise environments
This approach ensures we can continue investing in what matters most: trust, security, scalability, and performance.
Standard vs Advanced: which one is right for you?
Choosing the right edition depends on how you plan to use the app, whether you’re exploring it for the first time or scaling an existing setup.
Here’s a quick overview to help you choose the edition that best fits your needs:
| Standard edition | Advanced edition | |
|---|---|---|
| Best for | Everyday usage | Scaling & enterprise needs |
| – Copy and sync data across several projects within a single instance – Occasional copy and sync operations between separate instances – Moderate number of recipes | – Sync data across multiple instances at scale – Handle a large number of recipes – Cross-instance and cross-team collaboration – Advanced control and improved performance | |
| – A few core datasources – Concise set of Connected custom field for main use cases » – Performance-driven cache configuration | – Multiple data sources – Configure Connected Custom fields at scale – Increased cache flexibility | |
| When to choose | Simple and efficient usage | Scale, flexibility, and advanced needs |
To explore which features are included in Standard and Advanced editions, visit our documentations pages for Elements Connect and Elements Copy & Sync.
Why some features are in Advanced
Some capabilities require additional infrastructure, higher performance guarantees, and enhanced support to operate reliably in complex environments.
Including these features in the Advanced edition allows us to efficiently address the needs of enterprise organizations, while continuing to invest in trust, security, scalability, and compliance.
At the same time, this ensures the Standard edition remains focused, efficient, and accessible for most teams.
How to choose your edition
If you’re unsure which edition is right for you, here’s a simple way to decide:
👉 Stay on Standard if:
- your current setup works well
- your usage is stable and not highly complex
- you don’t need additional scale or advanced controls
👉 Consider Advanced if:
- you’re reaching limits (scale, performance, complexity)
- your organization is growing
- your workflows are becoming business-critical
- you need stronger governance or faster support
If you’re still unsure, the best approach is to:
- review your current usage
- project your future needs
- and explore the detailed feature comparison in our documentation:
How to change edition
Switching editions is simple and can be done at any time.
From now on:
- Go to the Atlassian Marketplace listing of Elements Connect or Elements Copy & Sync
- Review the available editions
- Select the edition that fits your needs
👉 You remain in full control and can adjust your edition as your usage evolves.
FAQ
Do I need to do anything after the app editions are released?
No, you don’t need to take any action. If you’re already using Elements Connect or Elements Copy & Sync, you are automatically placed on the Standard edition, and everything continues to work as before.
Will the Standard edition still receive updates and support?
Yes. The Standard edition remains fully supported and will continue to receive improvements, new features, bug fixes, and support. It is not a limited or deprecated version of the app.
When should I consider upgrading to the Advanced edition?
You may want to upgrade if you:
- need to operate at larger scale
- manage many workflows, recipes, or data sources
- work across multiple systems or Jira instances
- collaborate with external partners
- require more security, control, or governance
Will upgrading to Advanced impact my current configuration?
No. Upgrading does not affect your existing setup:
- your configuration stays the same
- your data remains unchanged
- no migration is required
Why are some features only available in the Advanced edition?
Some features require additional infrastructure, higher performance guarantees, and enhanced support. Including them in Advanced allows us to provide enterprise-grade reliability while keeping the Standard edition simple and efficient.
Does priority support apply to all support requests?
Yes. With the Advanced edition, all your requests benefit from priority handling and faster response times, regardless of the type of request.
Can I switch between Standard and Advanced editions later?
Yes. You can change your edition at any time directly from the Atlassian Marketplace, depending on how your needs evolve.
Learn more
This article provides an overview, but each app has its own detailed breakdown of editions and features.
👉 For full details, check the documentation:
If you have any questions or need help choosing the right edition, our support team will be happy to help.
Summary
App editions for Elements Connect and Elements Copy & Sync are designed to better match how teams use our apps today, from simple use cases to large-scale environments. The Standard edition continues to provide a reliable and fully supported experience, while the Advanced edition unlocks additional capabilities for organizations with more complex needs. As your usage evolves, you can easily adapt your edition to match your requirements.
Cloning issues in Jira is an essential part of many teams’ workflows, whether to reuse ticket templates, escalate incidents, or replicate recurring tasks. But when duplication doesn’t go as planned, it can cause confusion and workflow delays.
If you’ve ever run into a Jira clone issue: for example, when a cloned ticket doesn’t include all expected content or fails to create altogether, this guide will help you understand why it happens and how to fix it using Elements Copy & Sync.
1. How cloning works in Jira and Elements Copy & Sync
In Jira, cloning creates a duplicate of an existing work item, copying key details such as the summary, description, and attachments. However, Jira’s native clone function is limited: it doesn’t clone custom information, links, or comments, and can’t synchronize future updates.
That’s where the app comes in. It extends Jira’s clone capabilities by allowing users to:
- Clone issues across projects or issue types,
- Include comments, attachments, and links,
- Synchronize information in real time between source and target issues,
- Customize what is cloned and what stays unique.
This enhanced flexibility means you can build a reliable duplication process, but if something goes wrong, understanding the cause of a Jira clone issue is key to resolving it efficiently.
Keep in mind that some limitations may still apply depending on your project configuration or workflow design. The app makes it easier to manage large-scale projects by helping teams keep related issues synchronized and accurate.
Watch a video about Elements Copy & Sync capabilities
2. Common causes of cloning problems
Here are the most frequent reasons why duplication may fail or behave unexpectedly when using Elements Copy & Sync.
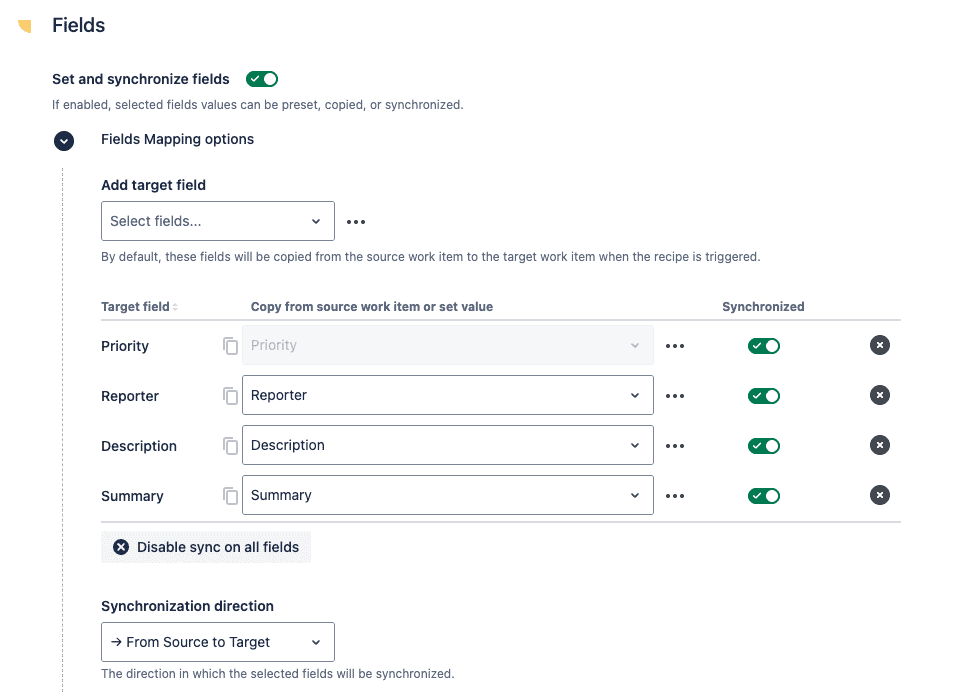
a. Missing or misconfigured field mappings
If required items like Summary, Work item Type, or Reporter are not mapped in your recipe, Jira may reject the new work item or skip certain information.
✅ Fix: Review the Fields section in your recipe configuration and confirm that all mandatory details are included. In larger projects, double-check that configurations are consistent between source and destination to ensure compatibility between issues.
b. Insufficient permissions
A cloning can also fail if the user doesn’t have permissions to view or create issues in the target project.
✅ Fix: Verify that the cloning user (or automation) has:
- Browse Projects and Create Issues permissions in both projects,
- Access to any restricted custom items or components.
Sometimes, a user might have limited rights on one project but full rights on another and that mismatch can prevent successful duplication.
c. Incompatible work item types or workflows
When the source and target projects have different workflows or work item type configurations, some values may not be valid.
✅ Fix: Ensure the destination project supports the same work item type and required information, or adjust your recipe mappings accordingly.
Keep in mind that such differences are one of the most common limitations when automating across multiple spaces.
d. Automation or webhook loops
Sometimes, other automation rules interfere with the process, causing loops or duplicate actions.
✅ Fix: Temporarily disable or modify any rules that trigger on issue creation to avoid conflicts. This is especially important when a cloned ticket triggers another automation that tries to clone it again. To keep processes stable, you can add checks or conditions that stop unnecessary duplication cycles in complex projects.
e. Attachments or comments not being cloned
If you notice that attachments or comments are missing in the cloned issue, synchronization might be turned off.
✅ Fix: In your recipe, check that Copy attachments and Copy comments options are enabled. This ensures every new ticket created through duplication carries all relevant content.


You can also adjust the app settings to synchronize attachments continuously between connected projects. For cloud instances, enabling background synchronization helps ensure attachments remain available across related issues.
3. Step-by-step guide to fix a Jira clone issue
If duplication doesn’t produce the expected result, here’s a structured way to diagnose and resolve it:
- Open the recipe used for cloning.
- Check mappings to ensure required Jira items are correctly configured.
- Review user permissions for both the source and target projects.
- Enable synchronization settings if you want attachments, comments, or links copied.
- Run a test clone to validate that the configuration works.
- Check logs or error messages in the dashboard for clues about missing fields or access tickets.
4. Using the audit log to troubleshoot tecipes
The audit log is one of the most valuable tools for diagnosing cloning failures or synchronization issues.
It provides a detailed history of all actions performed by the app, including every clone or sync event, with timestamps, status information, and potential error details.
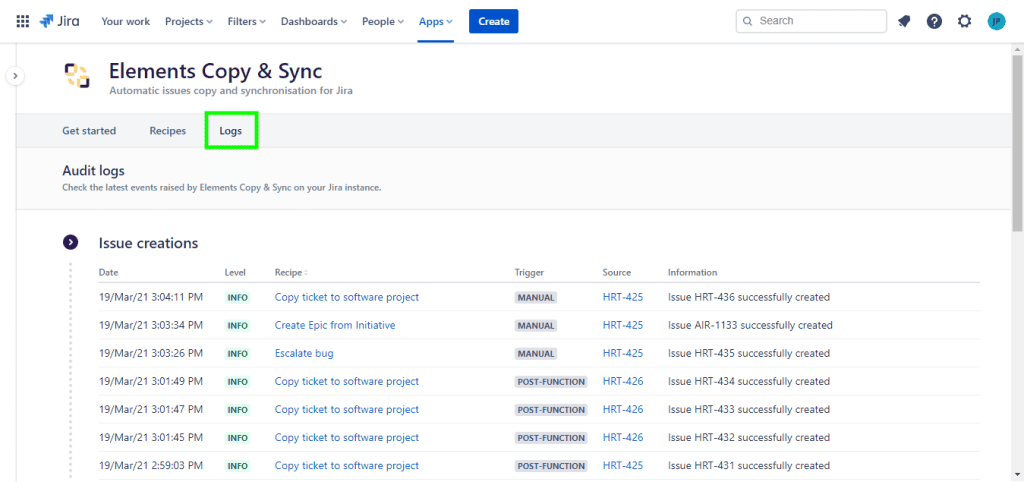
Regularly reviewing the audit logs is also a great way to ensure compliance and transparency: especially across multiple projects and teams using Jira Cloud.
Read more about audit logs
5. Best practices to prevent future cloning errors
To minimize the chance of running into another Jira clone issue, follow these best practices:
- Keep configurations consistent across projects and issue types.
- Test recipes whenever you update workflows or custom fields.
- Limit conflicting automations that might interfere with the clone process.
- Use synchronization features to keep cloned issues updated.
- Document your recipe setup so each user on your team understands how duplication works and what limitations exist in your environment.
- For larger project structures, regularly review your configuration to ensure the cloning logic still matches your workflow goals.
- When using Jira cloud, it’s wise to add automated validation checks before triggering duplication, helping maintain consistency.
6. When to contact support
If you’ve verified your configuration and duplication still fails, it might be time to reach out to the Elements team.
Before doing so, prepare:
- The name of the recipe used,
- Relevant logs or screenshots showing the issue,
- The source and target issue keys.
Providing this information will help support pinpoint the cause quickly and offer a precise fix for your project setup.
In some cases, Atlassian support can also help review permissions or cross-project configuration issues, especially when working in cloud environments integrated with other Atlassian tools.
7. Connecting with the Atlassian Community
When troubleshooting complex scenarios, the Atlassian ecosystem provides valuable resources to help you move forward. You can explore best practices shared by other Atlassian users directly in the community, where experts regularly post guides and real examples related to cloud environments and issue management. It’s also a great place to add questions, add feedback on existing discussions, or even add suggestions for improving cloud integrations within Atlassian apps.
The community remains one of the most active hubs for sharing solutions that apply across both OP and cloud versions of Jira, ensuring every Atlassian team can benefit from collective experience. You can also join smaller community groups that focus on Jira or JSM and project automation in cloud environments to exchange insights and discover practical configurations from other admins.
Final thoughts
Encountering a clone issue can be frustrating, especially when automation is critical to your workflow. Fortunately, most problems can be solved by double-checking mappings, permissions, and synchronization settings.
By following these troubleshooting steps and best practices, you can prevent future cloning failures and maintain a smooth, reliable process for duplicating and syncing work items in Jira.
Whether you’re duplicating tickets across teams, projects, or workflows, Elements Copy & Sync ensures your setup remains efficient and scalable, making the add-on a reliable companion for any Jira administrator working within the Atlassian cloud ecosystem.
TL;DR
- Three trigger modes: You can clone a Jira ticket manually from the issue view, automatically via Jira Automation rules, or through a workflow post-function on status transition.
- Recipe-based system: Elements Copy & Sync uses reusable “recipes” that define exactly what gets copied (fields, comments, attachments, subtasks) and how synchronization works between issues.
- Automatic cloning: Set a Jira Automation rule to call a recipe when conditions are met. For example, when a ticket transitions to “Ready for Development.”
- Workflow post-function cloning: Attach a recipe to a Jira workflow transition so the clone fires the moment an issue changes status, no manual action required.
- Why not native Jira clone: Jira’s built-in clone doesn’t sync fields after duplication, hits execution limits at scale, and requires complex rule maintenance. Elements Copy & Sync centralizes all of that in one recipe.
Cloning a Jira ticket in Jira can be done in three ways: manually from the issue view, automatically through a Jira Automation rule, or via a workflow post-function triggered on status change. Each method serves a different use case. This guide explains how to set up each one using Elements Copy & Sync, and when to choose one over another.

What is the difference between cloning a Jira ticket manually vs automatically?
Manual cloning puts the decision in the user’s hands. A support agent or project manager triggers the clone from inside the issue when they judge it necessary, for example, to escalate a customer request to a development team.
Automatic cloning removes that decision entirely. A Jira Automation rule watches for a condition (a field change, a status transition, a scheduled date) and calls a recipe to clone the issue without any human intervention.
Workflow post-function cloning is a tighter form of automation: the clone fires as part of a Jira status transition, making it inseparable from the workflow itself.
All three methods rely on the same building block: a recipe configured in Elements Copy & Sync.
What is Elements Copy & Sync and how does it work for cloning?
Elements Copy & Sync is a Jira app that lets you clone and link issues between projects, including across Jira instances, while keeping fields, comments, and attachments synchronized after the initial copy.

The core concept is the recipe: a reusable configuration that defines:
- What gets copied: summary, description, custom fields, attachments, comments, subtasks
- How synchronization works: which fields stay aligned between the original and the clone after creation
- Who can trigger it and under what conditions
Configure the recipe once. Then reuse it across any of the three trigger modes described below.
Why isn’t Jira’s built-in clone feature enough?
Jira’s native clone creates a copy of an issue, but it stops there. It does not:
- Keep the original and the clone synchronized after duplication
- Scale efficiently across large volumes of issues
- Let you define which fields to copy and which to leave blank
- Give users selective control over when cloning happens
When teams need to duplicate Jira tickets repeatedly, for escalations, recurring tasks, or cross-project workflows, the native clone becomes a manual bottleneck or requires complex, fragile automation rules.
Elements Copy & Sync addresses this with a dedicated recipe system that centralizes cloning logic, controls permissions, and handles field synchronization natively.
Read more in the comparison: Jira Automation vs Elements Copy & Sync – which to use?
How to clone a Jira ticket: the three methods
Method 1: How do you clone a Jira ticket manually (on demand)?
Manual cloning is appropriate when a human needs to decide whether and when to create the duplicate, for example, in support escalation or project hand-off workflows.
Typical use cases:
- A support agent escalates a customer request to the development project
- A project manager creates a follow-up task from a completed issue
- A service desk analyst mirrors a ticket into a second project for tracking
How it works:
Once a recipe is published and configured with the Work item action menu trigger, a button appears inside the Jira issue view. Any user with the right permissions can click it to generate the clone immediately.

Setup steps:
- In Elements Copy & Sync, go to Recipes and click Create a new recipe
- Define what to copy: summary, description, custom fields, comments, attachments, subtasks
- Configure synchronization rules (for example: keep comments aligned after creation)
- In the Triggers section, enable Work item action menu
- Publish the recipe

The recipe now appears as an action inside every eligible issue. Users click once, the clone is created and linked to the original.
See the documentation: How to trigger a recipe from a Jira issue view
Method 2: How do you clone a Jira ticket automatically with Jira Automation?
Rule-based cloning is the right choice when the duplication should happen without user intervention, based on a condition or a schedule.
Typical use cases:
- Clone a ticket automatically when it transitions to “Ready for Development”
- Generate a duplicate of a monthly maintenance task on a fixed schedule
- Create linked issues for every new feature request that meets certain criteria
How it works:
A Jira Automation rule acts as the trigger. The rule watches for an event (transition, field change, or scheduled time) and then calls a recipe in Elements Copy & Sync to execute the clone. The recipe still controls what gets copied, the rule only controls when.
Setup steps:
- Create and publish a recipe in Elements Copy & Sync defining what to clone
- In Jira Automation, create a new rule with the appropriate trigger (e.g., “Issue transitioned” or “Scheduled”)
- Add an action that calls your Elements Copy & Sync recipe
- Add any conditions needed (e.g., project = “Support” AND status = “Escalated”)
- Test and enable the rule
Why use a recipe instead of a native Jira Automation clone action?
Jira Automation’s own clone action does not synchronize fields after the fact, hits execution limits at scale, and requires duplicating rule logic for every variation. A recipe handles synchronization natively and can be reused across multiple rules.
See the documentation: How to trigger recipes with Jira Automation
Method 3: How do you clone a Jira ticket via a workflow post-function?
Workflow post-function cloning embeds the duplication directly into a Jira status transition. The clone fires the moment an issue moves from one status to another — no separate rule, no user action.
Typical use cases:
- When a bug moves from “In Progress” to “Done,” clone it to a QA project for validation
- When a change request is approved, automatically generate an implementation ticket
- When an issue is reopened, create a follow-up in the development backlog
How it works:
A Jira workflow post-function runs as part of a status transition. You attach a recipe to the transition, so every time an issue passes through it, the clone is created automatically.
Setup steps:
- Open the workflow editor for your project
- Select the transition where cloning should happen
- Click on + Rules inside the transition settings

4. Select your Elements Copy & Sync recipe

5. Save and publish the workflow
From that point, every issue that passes through the transition will trigger the recipe and generate a clone in the target project.
See the documentation: How to automatically copy an issue during a workflow transition
Frequently asked questions about cloning Jira tickets
Can you clone a Jira ticket across different projects?
Yes. When configuring a recipe in Elements Copy & Sync, you define the destination project. The clone can be created in any project the recipe has access to, including projects in a different Jira instance when using the remote connection feature.
Does cloning a Jira ticket copy all fields, attachments, and comments?
It depends on what you configure in the recipe. You can choose exactly which fields are copied at the time of cloning, and which fields remain synchronized between the original and the clone afterwards. Attachments, comments, subtasks, and custom fields are all supported, but each needs to be explicitly included in the recipe.
Can you clone multiple Jira tickets at once?
Yes. Elements Copy & Sync supports bulk cloning, which lets you select multiple issues and apply a recipe to all of them in a single operation. This is useful for duplicating a sprint’s worth of recurring tasks or creating linked issues in batches.
What happens to the original ticket when you clone it in Jira?
The original ticket is not modified. A link is created between the original and the clone (the link type is configurable in the recipe). After that, field synchronization rules in the recipe determine which data points stay aligned going forward.
Is there a limit to how many times you can trigger a cloning recipe?
There are no recipe-level limits imposed by Elements Copy & Sync. Jira Automation execution limits apply when you use the automation trigger method, which is one reason some teams prefer the workflow post-function trigger for high-volume cloning scenarios.
Summary
Cloning a Jira ticket goes beyond creating a copy. For teams managing escalations, recurring workflows, or cross-project processes, the real requirement is controlled duplication with ongoing synchronization.
Elements Copy & Sync covers the three scenarios where this is needed: on-demand cloning triggered by a user, rule-based cloning triggered by conditions, and workflow-embedded cloning triggered by a status transition. All three use the same recipe-based configuration, which means you define the logic once and reuse it wherever the duplication is needed.
When a customer raises a ticket, your team jumps in to diagnose and resolve the problem. But sometimes, the request goes beyond what first-line help can handle, for example, when a bug requires a developer’s intervention. In those cases, you need a reliable and efficient way to escalate an issue in Jira from your service desk to the development team.
A well-designed escalation process keeps your customers informed, your teams aligned, and your SLAs intact. In this article, we’ll explain what escalation means in Jira, why optimizing it matters, the benefits of a smoother handoff, and how to do it seamlessly with Elements Copy & Sync.
What does it mean to escalate an issue in Jira?
To escalate an issue in Jira means transferring responsibility or visibility of a ticket from one team: typically a Jira Service Management (JSM) project to another, such as a Jira Software project used by developers.
The goal is not just to “move” the item, but to ensure the context, history, and customer impact are all preserved as the request transitions from the service desk to development. Without this, your engineering team risks missing critical details, and your agents lose visibility on progress.
A typical Jira escalation process looks like this:
- An agent identifies an item that requires development assistance (for example, a bug).
- The item is transferred, usually via a status change, label, or custom field that triggers automation.
- A linked item is created in the dev project so the development team can start investigating.
- The two items remain connected, so updates, comments, and statuses can be synchronized both ways.
- Once the dev item is resolved, the original team is notified, validates the fix, and closes the initial ticket.
This setup ensures that the customer-facing ticket stays active and visible while internal work happens behind the scenes.
Why optimize the Jira escalation process?
If your escalation process is manual or inconsistent, you probably already feel the pain:
- Agents lose time copying and pasting details between tickets.
- Developers lack the context they need to reproduce the problem.
- Customers get frustrated because updates are slow or unclear.
- Managers have no clear view of which tickets have been sent to development or how long they take to resolve.
Optimizing how you escalate an issue in Jira transforms this chaos into clarity. It ensures every ticket is handled consistently, with automation doing the heavy lifting.
With an optimized process, you can:
- Save time by automating ticket creation and synchronization.
- Reduce errors by transferring data automatically, not manually.
- Increase transparency for both customer-facing and development teams with linked items and status updates.
- Maintain SLAs by ensuring escalations don’t get lost in the shuffle.
- Deliver better customer experiences, since communication remains fluid even during complex incidents.
Read Atlassian’s best practices for managing escalations
The benefits of a smooth process to escalate an issue in Jira
A clear way to escalate an issue in Jira is more than a process, it’s a collaboration tool between teams. Here are the key benefits your organization will see:
1. Faster resolution times
Automation removes friction between teams. Agents can forward an issue with a single click, and developers get all the context they need to act immediately.
2. Better cross-team collaboration
Linked items let teams communicate efficiently. Comments, attachments, and key fields stay consistent between projects, so everyone works from the same information.
3. Increased visibility
Managers and team leads can easily see which tickets are being handled by development, who’s responsible, and where bottlenecks occur, all without switching between projects.
4. Higher customer satisfaction
Customers stay in the loop. They don’t see your internal processes, but they benefit from quicker resolutions and timely updates.
![]()
![]() Read more about measuring customer satisfaction in Jira.
Read more about measuring customer satisfaction in Jira.
5. Data-Driven Improvements
Once your process is standardized, you can track key metrics like time to escalation and time to resolution, helping you continually refine your internal operations.
How to escalate an issue in Jira with Elements Copy & Sync
If you’re using both Jira Service Management and Jira Software for development, Elements Copy & Sync is the most efficient way to automate and streamline escalations.
Instead of manually creating a new item in the dev project and copying all the information, Elements Copy & Sync lets you manage the transfer in Jira instantly with just one action, while keeping everything synchronized.

Let’s walk through how it works.
Step 1: Identify when an issue needs escalation
When an agent determines that a ticket requires developer input, for example, a reproducible bug, they can trigger the transfer directly from the JSM view.
You can create a dedicated Send to Dev button or transition.
Step 2: Create an Elements Copy & Sync Recipe
In Elements Copy & Sync, you set up a recipe that defines how the escalation should work.
The recipe includes:
- Target project and item type (e.g., Bug in the development project)
- Content to copy (summary, description, comments, attachments, custom fields, etc.)
- Links between items (so both sides stay connected)
- Synchronize status updates (optional but highly recommended)
This recipe acts as your automation blueprint, once it’s configured, agents don’t have to worry about what happens behind the scenes.
Read documentation on how to escalate an issue in Jira
Step 3: Transfer with one click
When the agent triggers the recipe manually or via a transition, Elements Copy & Sync automatically creates a new item in the dev project with all relevant data copied over.
The two remain linked so both teams can easily track progress.

For example:
- The service desk can see when the dev ticket is “In Progress” or “Resolved.”
- Developers can refer back to the original customer report for context.
Step 4: Keep both teams connected
Here’s where the real power of Elements Copy & Sync shines: synchronization.
Whenever a comment or status changes in one item, it can be automatically mirrored in the linked one. This two-way connection keeps everyone aligned without constant messages or emails.

For example:
- If a developer adds a comment or requests more logs, it appears as an internal note in the JSM ticket.
- When the developer resolves the work item, the customer-facing team is instantly notified.
- The customer gets an update as soon as the fix is confirmed.
Step 5: Close the loop
Once the dev team delivers the fix, the agent validates it and closes the original ticket, confident that the customer got what they needed.
The escalation trail remains visible in both projects for auditing and reporting.
Why choose Elements Copy & Sync to escalate an issue in Jira?
Using Elements Copy & Sync to escalate an issue in Jira offers key advantages:
- Zero manual effort: Automations handle copying, linking, and synchronization.
- Full flexibility: You decide what data to transfer, when, and how.
- Cross-project or cross-instance: Works even if your service desk and dev teams use different Jira instances.
- Better communication: Two-way synchronization ensures updates flow naturally between projects.
- Audit-ready traceability: Linked items and synchronized fields provide a full record of the escalation history.
Whether you manage a few escalations per week or hundreds per day, the process remains consistent, accurate, and fast.
Conclusion: make escalation a strength, not a struggle
Escalation shouldn’t be a pain point, it should be a bridge between teams. By defining a clear process and using automation tools like Elements Copy & Sync, you can turn incident resolution into a seamless, transparent process.
When you escalate an issue in Jira efficiently:
- Agents spend less time on admin work.
- Developers receive richer context and act faster.
- Customers enjoy quicker resolutions and better service.
With the right setup, every escalation becomes an opportunity to improve collaboration, not a bottleneck.
Next step:
👉 Watch our YouTube tutorial on how to escalate an issue in Jira with Elements Copy & Sync.
An IT Service catalog is the storefront of IT: the place where employees come to request the tools, software, access, and help they need. But like any storefront, the catalog only succeeds if it delivers on expectations. A polished catalog with poor delivery is just window dressing. That’s why metrics and KPIs are critical, not just to measure performance, but to guide where IT teams should focus their improvement efforts.
When combined with Jira Service Management (JSM), service catalog metrics become more than reports. They provide a roadmap to identify bottlenecks, align IT services with business needs, and continuously evolve how IT delivers value. This is where ITSM best practices shine, turning metrics into actionable insights that improve the employee experience and demonstrate IT’s role as a trusted service provider.
Discover more about IT Service catalogs in Jira

Why metrics matter for service catalog management
The IT Service catalog is a cornerstone of IT service management. It helps IT teams standardize requests, clarify service delivery expectations, and provide visibility into available offerings. But without tracking its performance, the catalog risks becoming outdated or irrelevant.
Metrics and KPIs ensure IT can:
- Align services with business priorities.
- Improve customer experience by reducing delays.
- Identify bottlenecks in fulfillment workflows.
- Optimize resources across teams and departments.
In other words, a catalog is only valuable if its management is data-driven.
Key KPIs for IT service catalog performance
Before exploring how to act on them, here are the core KPIs organizations tend to monitor:
- Request volume by service: shows which services are most in demand.
- Average fulfillment time: indicates how efficiently requests move through the delivery process.
- SLA compliance: tracks reliability and trust.
- First contact resolution rate: highlights opportunities for automation or self-service portals.
- Customer satisfaction (CSAT): reflects user perception and overall quality.
- Cost per request: measures financial efficiency.
These metrics are common in ITSM, but their real power comes when tied directly to service catalog workflows in Jira.
Read more about IT service desk metrics
Turning metrics into action in Jira
KPIs are only useful if can be used as inputs to drive initiatives and improvements. Jira Service Management, which tightly map service requests to workflows, allows IT teams to act on these insights:
Dashboards for visibility
Create dashboards that track SLA breaches, fulfillment times, and catalog usage trends. This gives managers and business teams an overview of service delivery at a glance.
Automation for efficiency
If approval queues are slowing things down, automation rules can reroute or auto-approve common requests. This reduces friction and accelerates fulfillment.
Workflow optimization
By mapping KPIs to specific steps, IT can spot where workflows fail. Streamlining handoffs, simplifying approvals, or updating technical practices directly enhances the delivery process.
Reporting for stakeholders
Custom reports show executives how IT services align with business priorities, improving trust and reinforcing IT’s strategic role.
Practical scenarios: How KPIs drive improvements
Employee onboarding
- Challenge: Onboarding involves multiple catalog items: accounts, tools, laptops, and software. Long delays reduce productivity for new hires.
- Action: Bundle requests into a single workflow, automate approvals, and use a self-service portal.
- Result: Faster delivery, happier employees, and stronger cross-team collaboration.
Laptop requests
- Challenge: Fulfillment averages 10 days, frustrating end users and missing SLAs.
- Action: Maintain pre-configured laptops, automate routing, and improve communication.
- Result: Delivery drops to 3 days; CSAT improves significantly.
Software access
- Challenge: Many software access requests are misrouted, creating escalation work.
- Action: Improve forms with clearer categories, mandatory fields, and workflow rules.
- Result: Reduced errors and a smoother customer experience.
These examples show that service catalog KPIs are not just numbers: they guide IT toward meaningful, measurable improvements.
Service portfolio vs. Service catalog
A common source of confusion in ITSM is the difference between the service catalog and the service portfolio. While the catalog lists active offerings available to users, the portfolio includes all services across their lifecycle: planned, active, or retired.
- Service Catalog: employee-facing, operational, focused on daily delivery and support.
- Service Portfolio: management-facing, strategic, used for planning, budgeting, and evaluating solutions.
By measuring both, organizations gain full visibility: the catalog shows how requests are fulfilled, while the portfolio highlights long-term alignment with business management goals. Together, they help IT leaders prioritize investments and retire outdated offerings.
Best practices for service delivery
To maximize value from your service catalog in Jira:
- Engage business teams: collect feedback to align offerings with real needs.
- Leverage the portal: guide employees with clear categories and contextual help.
- Standardize workflows: consistency improves efficiency and transparency.
- Apply technical practices: integrate automation, templates, and configuration rules.
- Benchmark performance: compare against ITIL and industry best practices.
- Review regularly: quarterly reviews keep the catalog aligned with evolving priorities.
These practices help IT providers deliver reliable, scalable, and user-friendly services.
Technical practices for better fulfillment
Improving fulfillment is not only about speed: it’s about quality. Jira Service Management combined with ITSM principles allows teams to refine delivery with technical practices such as:
- Workflow templates for common requests (e.g., access management, software installation).
- Knowledge base integration to give users self-service answers through the portal.
- Automation triggers for escalations, reminders, and approvals.
- Customer feedback loops built into the platform to monitor satisfaction.
By embedding these practices into the service catalog, IT can scale delivery without sacrificing quality.
Collaboration across departments and teams
Managing a service catalog requires coordinated effort across IT and the wider organization:
- Service Owners define offerings and maintain relevance.
- IT Support Teams handle day-to-day fulfillment and incident resolution.
- Business departments provide input to keep offerings aligned with evolving needs.
- Customers and end-users validate whether the catalog truly improves their daily work.
This cross-functional collaboration ensures the catalog reflects reality and continuously improves the employee and customer experience.
How Elements Catalyst helps
Managing service catalog performance is easier with the right tools. That’s where Elements Catalyst comes in.
The app is built for Jira Service Management to help IT teams design and maintain a structured, scalable service catalog. Its key features include:
- Flexible building blocks to model business-specific services.
- Custom templates that standardize request forms and reduce errors.
- Guided request experience that helps end users submit accurate information through the Jira portal.
- Reporting integration that connects catalog items with SLA tracking, CSAT, and delivery data.
- Automation-ready design that links catalog items with Jira workflows for faster fulfillment.
- Cross-team visibility so departments can share insights and continuously improve solutions.

By combining these features, Elements Catalyst helps IT teams improve service delivery, reduce manual work, and enhance the overall customer experience. It’s more than a catalog manager: it’s a solution that connects platform, processes, and people.
Conclusion
An IT Service catalog should be more than a static list: it should be a dynamic tool that grows with the business. By tracking KPIs like request volume, fulfillment time, SLA compliance, CSAT, and costs, IT teams can pinpoint weaknesses and prioritize improvements that matter most.
With Jira Service Management as the platform, and Elements Catalyst as the structuring solution, IT can move beyond measurement to continuous improvement. The result is a catalog that not only organizes services but also improves the way organizations deliver value.
In the end, the goal isn’t just faster resolution: it’s creating a seamless, reliable customer experience, one that strengthens trust in IT and positions the service catalog as a strategic asset in the ITSM ecosystem. Backed by strong technical practices and business collaboration, the catalog becomes part of the broader service portfolio, helping providers align IT delivery with long-term business outcomes.

Migrating from Jira Server to Cloud is no small feat, especially when managing over 800 projects and 5,000+ users in a highly-regulated industry such as the Energy one. For this European major electricity provider, Elements Connect proved to be at the core of the migration by allowing them to simplify and scale external data integration, replacing custom-built solutions with robust, maintainable connections.
Background: a mission-critical migration
The migration of the utility company’s Jira environment to the Cloud was one of the most significant projects for Sngular, their long-time partner, had ever led. With over 32 Jira apps on their legacy Server instance, thousands of users, and strict data compliance requirements, the stakes were high. Bryan, a Technical Architect at Sngular, oversaw the project end-to-end, ensuring the system was modernized without compromising business continuity.
One of the most business-critical Jira initiatives at this utility company is the project where it is managed the global demand management program that captures and manages all requests for application development and modifications. But Jira is more than just a project management tool for them. It supports diverse workflows across marketing, sales, HR, and development, making it a backbone of their digital operations.
Consolidation and simplification
The migration from Server to Cloud took nearly 12 months and involved a true rationalization: the multinational went from 32 apps down to just 9 on Cloud. This consolidation was strategic, focusing on security, performance, and scalability. Custom-built solutions were phased out in favor of robust apps that offered out-of-the-box support for complex use cases, an easier maintenance and better integration to Jira, with Elements Connect emerging as a standout tool.

Two key use cases for Elements Connect
1. Seamless SQL integration
The first challenge was integrating Jira with a legacy SQL database. At face value, it might seem like a simple data connection but for this global player in the energy sector, it played a vital role in streamlining how information was surfaced across their workflows.
Using Elements Connect, the company configured dynamic fields in Jira that displayed live data from the SQL database, ensuring teams always have access to up-to-date information without duplicating data or requiring manual updates.
This setup significantly reduces maintenance, simplified reporting, and ensures a single source of truth for critical data points.
2. Component management via API
The second, and far more complex challenge was managing global components representing different internal teams. These components needed to be dynamically populated into Jira fields and accessible across various screens and workflow steps.
Here’s how Elements Connect helped:
● Two custom fields were created, each connected to a single API endpoint.
● Each API returned a structured list of components specific to a project or team.
● These fields were displayed in multiple workflow transitions and screens, empowering users with contextual, real-time data throughout the process.
This solution delivered flexibility to project administrators who could now update component lists autonomously, without involving the platform team or risking inconsistencies in data sources.
“We wanted to avoid high maintenance in our instance. By using one API as a single source of truth, we’ve greatly simplified the system.” — Multinational utility company team member
Reducing administrative overhead
One of the company’s primary goals was to lower the administrative burden on their Jira instance while empowering individual teams to maintain autonomy.
Before implementing Elements Connect, updating components meant changing multiple data sources, a time-consuming and error-prone process. Now, by centralizing control through a single API, any changes cascade automatically across all relevant projects.
This architecture also ensured that sensitive data remained secure and compliant with company policies, an essential requirement given the regulatory context in which this major utility company operates.
Overcoming technical and performance challenges
As with any large-scale migration, the project wasn’t without challenges. Two major hurdles emerged:
● Security concerns related to accessing external data under strict privacy policies.
● Performance delays when rendering dynamic field values via API, especially for complex datasets.
Thanks to the close collaboration between Sngular and Elements Connect’s support team, both issues were addressed within a couple of months. The app’s performance was optimized for large-scale use, and security configurations were fine-tuned to meet company standards.
“The experience related to the support was really helpful.” – Bryan, Technical Architect at Sngular
Migrating custom fields with Python automation
Before adopting Elements Connect, the electricity provider relied on custom apps to integrate external data into Jira. To ensure continuity and avoid data loss during the migration, Bryan’s team developed a Python script that mapped and migrated all values from the legacy custom fields into newly created Elements Connect custom fields in Cloud.
This scripting approach allowed the team to automate a large portion of the migration, reducing manual effort and minimizing downtime.
Why Elements Connect?
In Bryan’s view, Elements Connect wasn’t just a plugin, it was a core enabler of the migration. By centralizing data sources, reducing maintenance, and empowering local project administrators, the app played a critical role in simplifying the architecture of the company’s Jira Cloud instance.
Benefits delivered:
✅ Better Jira Integration, thanks to Elements Connect ability to be fully compatible with Jira native functionalities
✅ Faster maintenance handled by a Jira specialist team via centralized APIs and simplified field configuration.
✅ Improved scalability by empowering local admins to manage data.
✅ Compliance-ready setup, designed for the highest security standards in highly regulated industries.
✅ No tools switching, by accessing live external data without any manual actions and from a single source of truth
A successful partnership between Sngular and Elements
The success of the multinational migration is also thanks to the long-standing and trusted partnership between Elements and Sngular. With extensive knowledge of Elements apps and deep expertise in Atlassian solutions, Sngular has been a reliable partner for years, delivering tailored implementations and support for complex enterprise environments. Their strong collaboration ensures customers benefit from proven experience and seamless integration, helping organizations unlock the full potential of Elements’ products and drive successful digital transformations.
Looking ahead
With the successful migration behind them, the energy provider and Sngular are now looking at how they can extend the usage of Elements Connect to other parts of the organization. Given the app’s flexibility, they’re considering more API-based integrations and advanced field configurations to further streamline cross-functional workflows.
Reach out to us to discuss your use-case!
👉 Try Elements Connect for free on your Jira instance
👉 Read Elements Connect documentation
Managing tasks efficiently is key to delivering successful projects in Jira. One powerful feature that helps break down work into smaller, manageable units is subtasks. Whether you’re tracking software development, ITSM workflows, or business operations, they are essential to keeping issues granular and responsibilities clear.
In this article, we’ll walk you through how to create a subtask in Jira using the native functionality and show you how to do it faster, more efficiently, and with better control using Elements Copy & Sync.
What is a subtask in Jira?
A subtask in Jira is a smaller task that’s part of a larger parent issue, typically a story, task, or bug. Subtasks let you divide work into actionable pieces and assign them to different team members while maintaining the overall structure of the parent issue.
Subtasks are especially useful when:
- A story needs to be split among team members.
- A change request includes multiple steps.
- An ITSM ticket involves separate troubleshooting and resolution actions.
- A task must be handled by several roles in the same project.
- You need to assign different types of work within a single objective.
- You want to break down a story into structured, trackable actions across issue types.
How to create subtasks in Jira: native method
Creating subtasks in Jira is straightforward if you’re using a project where they are enabled. Here’s how to do it:
Step 1: Open the parent issue
Start by opening the Jira ticket where you want to create a subtask. This could be a story, bug, or task depending on your project type.
Step 2: Select “Create Subtask”
In the issue view, locate the “More” menu (three-dot icon) or scroll down to the Subtasks section. Click “Create Subtask.”

If the “Create Subtask” option isn’t available, it may not be enabled in your issue type scheme. A Jira admin will need to enable it.
Step 3: Fill in details
A new subtask window will open. Here, provide:
- Summary (title of the subtask)
- Description (details about the task)
- Assignee (who should do it)
- Priority, Due Date, or any other custom fields defined in your instance
- Optionally, add a comment to provide additional context for the subtask
Click “Create” when done. The subtask is now created and connected to the parent issue. Jira will automatically nest the subtask under the main ticket so you maintain structure.
Step 4: Track your subtasks
Once created, the subtask appears in the parent issue under the “Subtasks” section. You can view, edit, or transition it independently while preserving the connection to the main ticket. Use the comment section in each subtask to track updates or clarify deliverables. You can also add internal comments to guide collaboration as work progresses.
Check Jira documentation on subtasks

Limitations of the native subtask creation
While native subtasks work fine for basic scenarios, users often run into limitations:
- ❌ No way to bulk-create subtasks based on templates
- ❌ Manual entry every time slows down recurring workflows
- ❌ No advanced control over custom field mapping or syncing
- ❌ Not ideal for ITSM or change management processes that require standardization
- ❌ Not scalable for projects with high-volume task creation needs
- ❌ No automatic comment syncing between parent and subtasks
- ❌ Cannot easily add standard sets of subtasks across similar issues
- ❌ Subtasks are limited to the same issue type, restricting flexibility when dealing with diverse work
If you’re managing large or complex projects, these limitations can lead to wasted time, inconsistencies, and extra overhead for your team.
A better way: how to create subtasks in Jira with Elements Copy & Sync
To streamline your work, Elements Copy & Sync allows you to create subtasks in Jira with templates, automation, and syncing capabilities that go beyond what’s possible natively. This ensures your tasks are consistently structured across similar workflows and types of issues.
What is Elements Copy & Sync?
Elements Copy & Sync is a Jira app that lets you automate ticket and task creation, including subtasks, and sync information between tickets. It’s designed for teams who want to optimize repeated processes, like onboarding, bug triage, or service delivery across projects. It supports all issue types, making it versatile for every project.
Benefits of using Elements Copy & Sync to create subtasks
✅ Automatically generate a set of predefined subtasks
✅ Create subtasks from templates (with descriptions, priorities, assignees)
✅ Sync comments, statuses, and custom fields between parent and subtask
✅ Trigger subtask creation based on workflows or transitions
✅ Reduce errors with consistent structure every time
✅ Improve consistency across multiple projects and tasks
✅ Keep all collaborators aligned with real-time comment updates
✅ Easily add templates to ensure recurring tasks are never forgotten
✅ Select dynamic rules based on issue type to automate tailored subtask creation
✅ Recipes will adapt to different use cases and workflow needs

Try Elements Copy & Sync for free on the Atlassian Marketplace.
One‑click subtask creation with Elements Copy & Sync
To eliminate the repetitive manual effort of creating subtasks, Elements Copy & Sync lets you define subtask templates (called “recipes”) for one-click creation, up to 25 subtasks in a single action.
Here’s how to set it up:
- In Elements Copy & Sync admin, click Create a new recipe, choose Create subtasks from a source issue, and name your recipe.
- Under the Target tab, select the number of subtasks you want (e.g., three), and define each subtask’s type and summary (you can insert parent-issue fields if needed).
- In Content, enable Set and synchronize fields, then map parent fields like Description or Priority and choose whether each subtask gets the same or unique values.
- Save and Activate the recipe, it’s now usable from any compatible issue across your project space.
Once configured, select your recipe: multiple fully initialized subtasks are created, complete with synced fields. You can even automate this by attaching the recipe as a post‑function, launching on ticket creation or transition. And with comment synchronization enabled, updates and decisions stay visible across all subtasks and the parent. Don’t forget to add tags or notes via comments to support transparency and accountability. Your team will thank you for simplifying the process.
Check the documentation on how to create multiple Jira subtasks at once.
Real-world example: subtasks for a new employee onboarding
Native way:
An IT team manually creates 4 subtasks for each onboarding issue:
- Setup workstation
- Create email account
- Assign software licenses
- Schedule welcome meeting
That’s 4 steps × every new hire × time wasted across many projects.
With Elements Copy & Sync:
An onboarding issue automatically generates those subtasks using a recipe. Field values (like assignee and start date) are prefilled, and progress on subtasks is synced back to the main issue. The use of comment fields allows managers and HR to share notes and context directly within the subtasks. You can also add workflow-specific instructions in the comment section to ensure everyone knows what to do. Once the recipe is applied, every action is structured by issue type, and users simply select from a menu of standardized subtasks.
Result: Less manual work, fewer mistakes, faster onboarding, and smoother task handling across your team.
Watch demo on how to automatically create multiple issues in Jira for employee onboarding

Conclusion: choose the right tool for the job
If you’re just getting started and need to know how to create subtask in Jira, the native solution is a great entry point. It’s simple and works well for ad-hoc task splitting and small project use cases.
But for projects involving repetitive tasks, complex workflows, or large teams, Elements Copy & Sync offers a smarter, faster, and more scalable way to create and manage subtasks. With blueprints, automation, and synchronization, including comment syncing, you’ll save time and standardize work across your organization. You’ll also have the flexibility to select the right subtask structure by issue type, ensuring every work item is handled properly.
Final tips for Jira subtasks
🛠 Make sure subtasks are enabled in your project settings
🧱 Use Elements Copy & Sync to create structured, templated subtasks
🔄 Automate subtask creation with workflow triggers
💬 Sync comments to maintain clarity across all related issues
➕ Add templates and contextual notes using the comment field
📊 Sync fields between parent and subtasks for consistent reporting
Try Elements Copy & Sync today and take your Jira subtasks to the next level.
When managing large-scale projects in Jira, cloning issues one by one can be painfully inefficient. Whether you’re setting up recurring tasks, templating projects, or replicating complex issue structures across teams, you need a reliable solution to bulk clone Jira issues.
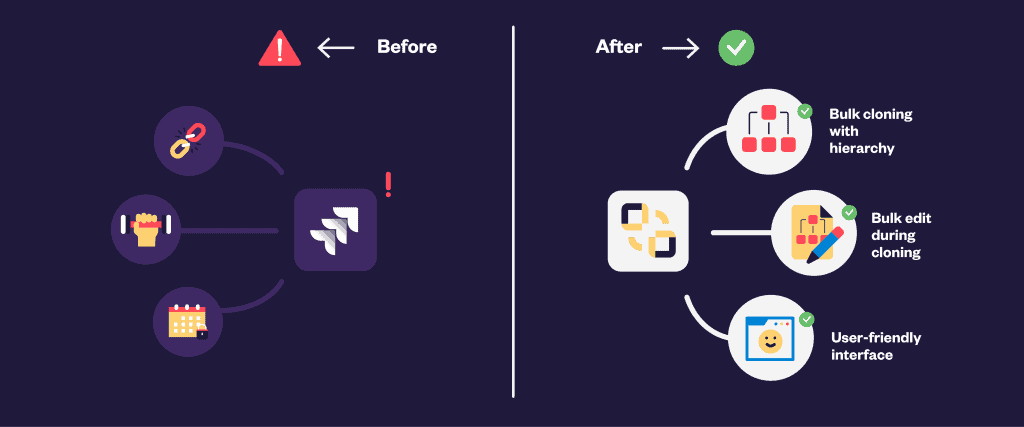
In this guide, we’ll explore the limitations of Jira’s native cloning, introduce the app Elements Copy & Sync for bulk cloning, and highlight the most common use cases where this functionality becomes essential.
1. Native Jira cloning limitations
Jira does offer basic issue cloning functionality, but it comes with notable limitations, especially for teams aiming to replicate multiple issues at once.
Manual and time-consuming
The default Jira clone option is available on individual issues. To clone multiple issues, users must manually open each issue and click “Clone.” This process is inefficient, especially for projects with dozens or hundreds of issues.

Read more about cloning a single issue in Jira
No support for cloning hierarchies or links
Jira’s native clone does not preserve issue hierarchies (e.g., epics with child stories or subtasks), nor does it maintain issue links such as blockers or dependencies. When duplicating multiple linked issues, users often need to re-establish these relationships manually, which is prone to error.
No automation or bulk actions
Bulk operations in Jira are limited to edits and transitions. While you can bulk move or update issues using Jira’s native bulk change feature, there’s no built-in “bulk clone” option. This restricts workflows for teams using projects as recurring templates or needing to replicate task trees periodically.
Missing customization
Jira cloning doesn’t allow for custom rules such as renaming issues with specific prefixes, copying only certain fields, or selecting a target project. These constraints make the built-in option unsuitable for advanced use cases.
Read more about Jira limitations on Atlassian Community
2. How to bulk clone Jira issues
To overcome the limitations of Jira’s native clone functionality, many teams rely on Elements Copy & Sync, available on the Atlassian Marketplace. This powerful tool is purpose-built to handle bulk cloning of Jira issues, offering a highly configurable and efficient experience.
What is Elements Copy & Sync?
It’s a Jira app that lets users clone issues, individually or in bulk, while preserving structure, issue links, field values, and even synchronizing changes between source and cloned issues. It supports both Jira and Jira Service Management, making it versatile for development, IT, and business teams alike.
Key features for bulk cloning
- Bulk cloning wizard: Easily select a group of issues (using JQL or saved filters) and clone them to the same or a different project in a few clicks.
- Preserve issue hierarchies: Automatically clone parent-child relationships between epics, stories, tasks, and subtasks.
- Maintain issue links: Choose whether to keep original issue links (like “blocks” or “relates to”) or create new links in the cloned set.
- Field mapping & customization: Configure which fields to copy, whether to apply custom prefixes or suffixes, and even map fields between projects with different configurations.
- Cross-project cloning: Easily copy issues from one Jira project to another while adapting to field and workflow differences.
- Automation triggers: Integrate cloning operations into your Jira workflows or automate them using Jira Automation rules.
How to bulk clone with Elements Copy & Sync
Here’s a quick walkthrough:
- Install the app: Go to the Atlassian Marketplace and install it in your Jira instance.
- Configure your copy recipe: Set up a template (called a “recipe”) defining what gets copied, how fields are mapped, and which links or subtasks to preserve.
- Select issues to clone: Use a JQL filter or select issues manually from your backlog or issue search.
- Execute the clone: Launch the bulk clone operation using the Elements interface and watch the tool replicate the issues with preserved structure and links.
- Optional syncing: Choose whether changes made to the source issues should be synced to the cloned issues (useful for audits or traceability).
The result? A perfectly cloned set of issues, customized to your team’s needs, delivered in seconds.
Check the documentation on how to bulk clone Jira issues
Watch the tutorial on how to bulk clone Jira issues
3. Use cases for bulk cloning
Bulk cloning isn’t just about convenience: it enables powerful workflows that scale across teams and business units. Here are some practical examples where bulk cloning with Elements Copy & Sync brings real value:
A. Recurring project templates
Teams that run standardized projects repeatedly (such as onboarding, software releases, audits, or marketing campaigns) can maintain a master project or issue tree as a template. With one click, they can clone the entire structure into a new project or sprint, saving hours of manual setup.
Watch the demo on how to automatically create Jira project templates
Read more about project templating in Jira with Elements Copy & Sync
B. Client implementation projects
Consulting, IT, and software implementation teams often replicate delivery plans across multiple clients. By using bulk cloning, they can quickly spin up a full set of tasks tailored to each client, while preserving relationships, estimates, and required documentation tasks.
C. Agile planning & sprint duplication
Agile teams may need to duplicate backlog structures or sprint plans across different boards or teams. Instead of manually recreating the tasks, they can clone an entire epic with its stories and subtasks, and assign it to a new team board.
D. Incident response or ITSM playbooks
In Jira Service Management, operations teams often follow repeatable procedures for incidents or problems. With the app, they can clone pre-defined issue structures with linked subtasks and SLAs for consistent execution and reporting.
E. Cross-project task distribution
Sometimes a master set of issues needs to be distributed across multiple teams or projects. With field mapping and cross-project capabilities, you can clone issues into various destinations with different configurations while maintaining the core structure.
Conclusion: Scale Jira productivity with bulk cloning
If your team regularly duplicates issues in Jira, the built-in tools will quickly show their limitations. That’s where Elements Copy & Sync becomes a game-changer, making bulk cloning Jira issues fast, accurate, and scalable.
From standardized processes to agile project replication, this plugin supports the most advanced Jira use cases with precision and customization. Stop wasting time on manual duplication and start enabling automation that fits your workflows.
Ready to get started? Try Elements Copy & Sync for free on the Atlassian Marketplace and bring efficient bulk cloning to your Jira instances today.
Nortera is a leading North American producer of canned and frozen vegetables, operating multiple facilities across the continent. To keep operations running smoothly, the company relies on Jira to manage a high volume of internal service requests and cross-team collaboration — especially across IT and HR.
The challenge: repetitive work slowing down key processes
Before adopting Elements Copy & Sync, Nortera’s teams faced a major productivity bottleneck: manually transferring tickets from the support project where they had been created into other Jira projects.
Whether it was escalating tickets to other teams, or triggering the creation of multiple linked tickets from an initial onboarding request, the process was time-consuming and error-prone. Each ticket had to be created by hand, which drained resources and distracted agents from higher-value tasks.
“It was tedious and repetitive. It limited our team’s ability to focus on resolving issues quickly.” — Martin Lalonde, Senior Application Support Specialist, Nortera
The solution: automating ticket routing with Elements Copy & Sync
Nortera was introduced to Elements Copy & Sync five years ago by the consulting partner that helped them implement Jira Server. What started as a tactical recommendation quickly became the backbone of their Jira usage — surviving even the migration to Jira Cloud.
Why Nortera chose Elements Copy & Sync:
- Automated ticket creation based on form selections in the Jira portal
- Customizable recipes to clone tickets across projects with predefined fields
- Syncing attachments and comments to maintain full context
- Manual or automatic triggers, depending on the workflow
Tools in use:
- Jira Service Management (for IT support and onboarding requests)
- Elements Copy & Sync (as the glue connecting multiple projects and teams)
Use-case: streamlining onboarding in Jira Service Management
One of the most impactful use cases is employee onboarding, where a single new employee request often results in multiple tasks: user account creation, access to systems, laptop provisioning, and more.
With Elements Copy & Sync, this complex workflow was fully automated:
- HR or hiring managers fill out a request via a Jira portal.
- Based on form fields, linked tickets are automatically created into multiple projects.
- Each related issue goes to the appropriate team (e.g. IT, security, facilities) with predefined fields
- No manual intervention needed from the Support team after intake.
This process significantly reduced lead time and freed up IT resources. What once required multiple manual steps is now handled automatically within Jira Service Management.
The impact: scalable processes across the organization
Nortera has used Elements Copy & Sync since 2019, starting on Jira Server and continuing on Jira Cloud. Adoption has expanded across departments, with HR, IT, and others now relying on it for issue creation and routing.
Outcomes:
- Time saved on manual ticket creation and transfer
- Improved collaboration between IT, HR, and other teams
- Faster processing times for onboarding and internal service requests
- Reduced context loss with synced comments and attachments
- Scalable service delivery, powered by automation
“Elements Copy & Sync is a time saver and provides so much automation in the daily process we wouldn’t be able to work with Jira without it.”
— Martin Lalonde, Senior Application Support Specialist, Nortera
The support experience: reliable, responsive, expert
“Whenever I had issues with the app, support was knowledgeable, quick, and courteous. I’ve always had a great experience with them.”
— Martin Lalonde
From setup to day-to-day use, Nortera has found Elements Copy & Sync stable, flexible, and continually improving. Product updates have followed Nortera’s evolving needs, making it a dependable long-term solution.
Why it matters
This is a textbook example of ESM automation done right. Nortera’s use of Elements Copy & Sync shows how Jira Service Management can power structured service delivery,cross-team collaboration can be scaled without friction, and a single, well-configured app can unlock serious operational value.
Whether you’re handling onboarding, support, or internal escalations, even across multiple Jira instances — automating ticket copy and synchronisation in Jira can transform how teams work.