








TL;DR
- What it is: A Jira bulk clone copies multiple Jira issues in one operation instead of duplicating them one by one.
- No native option: Jira’s built-in clone works one work item at a time, bulk cloning requires a Marketplace app such as Elements Copy & Sync.
- Scale: With Elements Copy & Sync you can bulk clone Jira issues from the issue navigator, up to 1,000 at a time.
- Stay in sync: Jira issue sync keeps chosen fields (status, assignee, custom fields) aligned between the original and its clones.
- Best for: Repetitive project management in Jira — onboarding checklists, recurring releases, and replicating task structures across teams.
A Jira bulk clone lets you copy many work items in a single operation instead of recreating each one by hand. Native Jira has no built-in bulk clone action, so teams use an app like Elements Copy & Sync to clone multiple Jira issues at once, decide which fields carry over, and link every clone back to its source. You can also keep the copies synchronized, so an update to the original work item flows automatically to its clones. This is useful for repetitive structures such as onboarding checklists, recurring releases, or duplicating a task layout across several teams or departments.
What is bulk cloning in Jira?
Bulk cloning means creating copies of one or more Jira issues simultaneously, rather than duplicating them individually. It is most useful for repetitive setups, spinning up similar projects, replicating a standard task structure for multiple teams, or rolling out the same checklist every sprint. The payoff is twofold: it saves time and it keeps work items consistent across your project management in Jira.
Can you bulk clone issues natively in Jira?
Not directly. Jira’s standard clone action duplicates one work item at a time, and the bulk-change screen does not include a true clone operation that preserves links, custom fields, and structure. To bulk clone Jira issues in a single pass, you need an app from the Atlassian Marketplace. If you want a refresher on the manual approach first, see how to clone issues in Jira natively (and its limitations).
Why use Elements Copy & Sync for bulk cloning?
Elements Copy & Sync duplicates work items and links them together in the same action. Changes made to the original can then be synchronized to its clones, which keeps data consistent and removes manual rework, especially valuable in fast-moving environments where the source work item changes often.
How do you bulk clone Jira issues with Elements Copy & Sync?
You can bulk clone Jira issues directly from the issue navigator in four steps:
- Select the issues: Start by selecting the issues you want to clone. This can be done from the issue navigator by applying the appropriate filters.
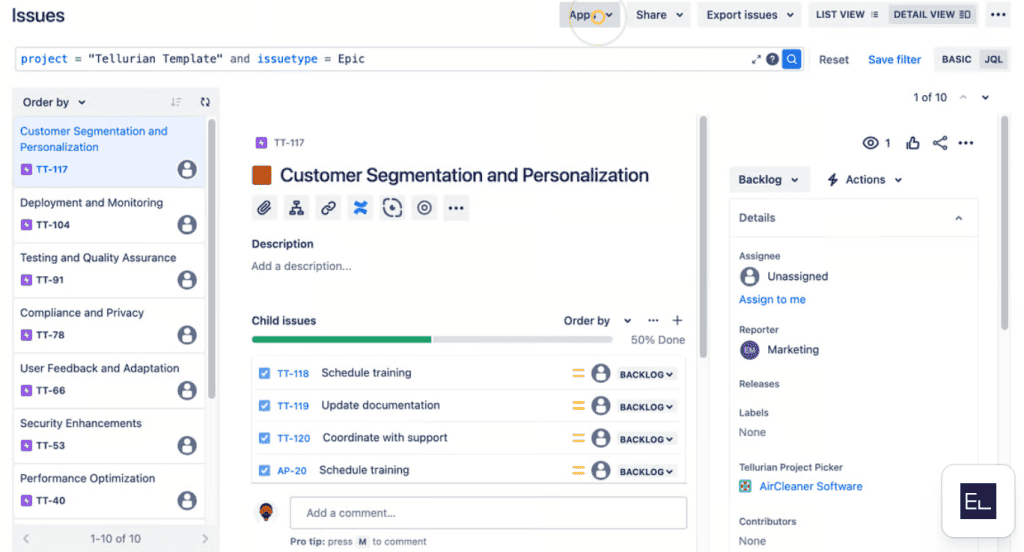
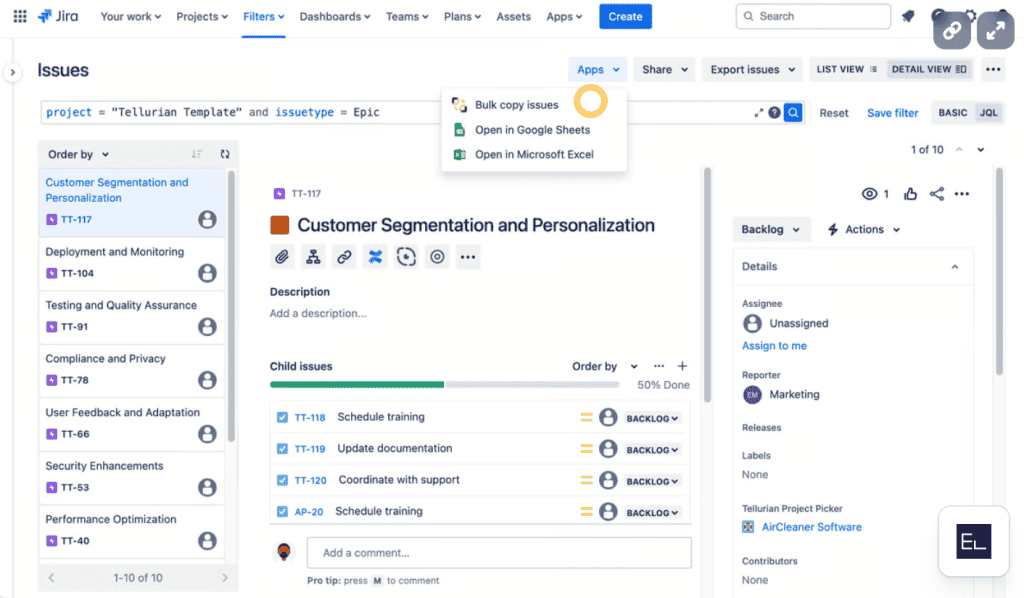
- Clone and link: With Elements Copy and Sync, you can choose to clone issues directly from the issue view or through bulk change options. During cloning, specify the link type to establish a connection between the original and cloned issues.
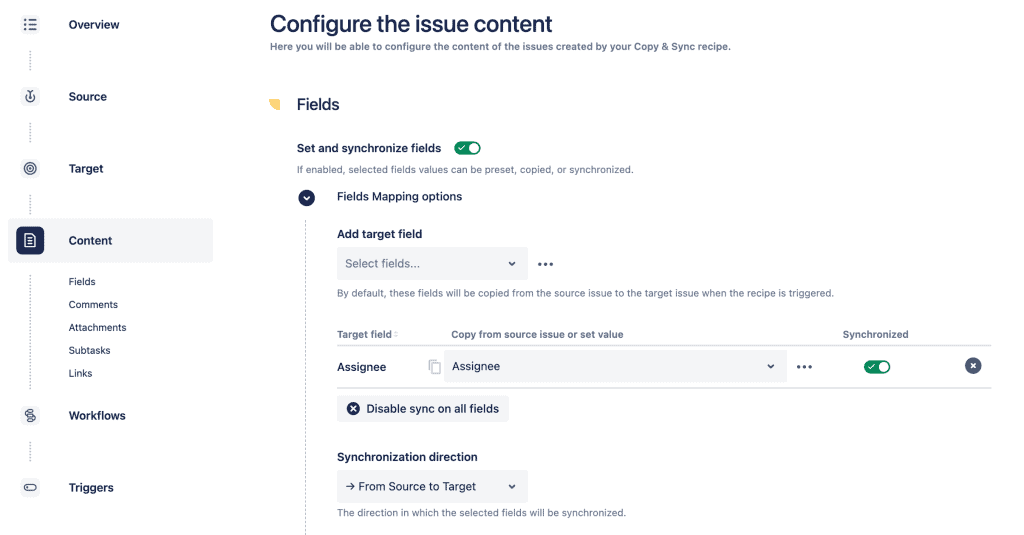
Configure synchronization: Begin by defining the synchronization settings. Prior to cloning, choose which fields, including status, assignees, and any custom fields, should be synchronized between the original and its clones. This setup is crucial to ensure that any updates to the original issue are automatically mirrored in the clones, maintaining consistency across your projects.
- Execute and verify: Once configured, execute the cloning process. After cloning, it’s important to verify that all issues are linked correctly and that synchronization settings are applied.
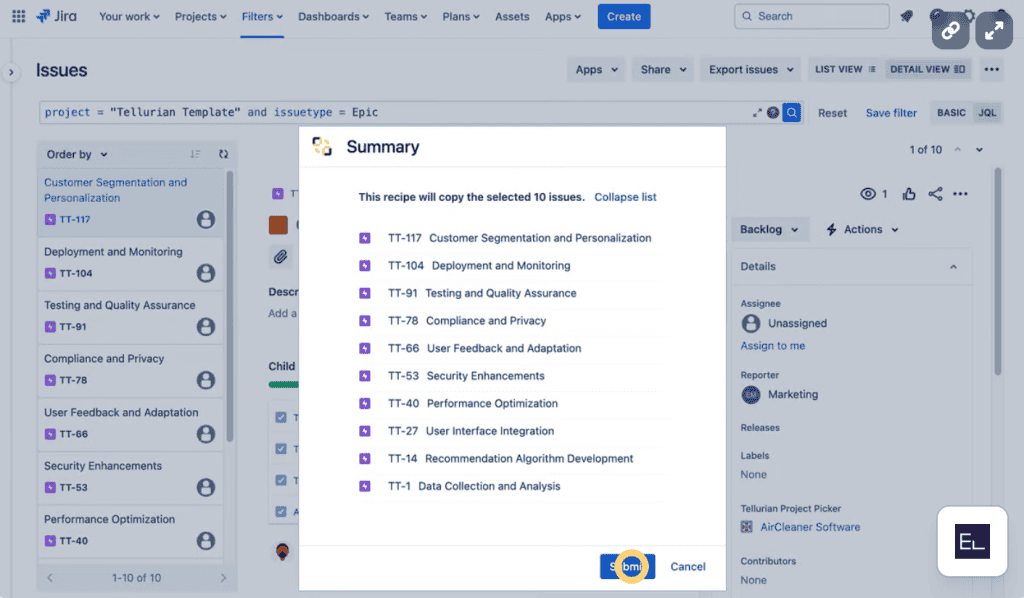
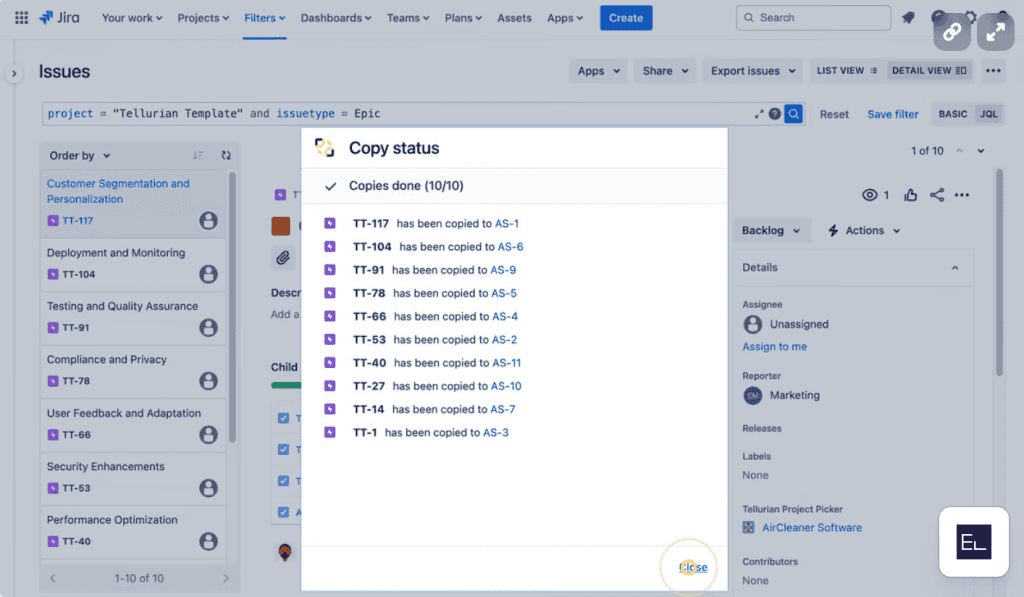
You can repeat this process at scale. The documentation covers how to bulk copy up to 1,000 Jira issues at once
Prefer to watch? There’s a video tutorial on how to bulk clone Jira issues
What can you keep in sync between cloned Jira issues?
This is where bulk cloning differs from a one-off copy. With Jira issue sync, you select the fields that should stay aligned after cloning; commonly, status, assignee, priority, and custom fields. When the original work item changes, the linked clones update to reflect the change, so a single source of truth drives every copy. You decide the scope: sync everything for tightly coupled work, or only a few fields when clones should evolve independently.
What are the best practices for a clean Jira bulk clone?
- Plan before you clone: Be clear on why and what you are cloning; this drives which fields you set up for synchronization.
- Clean the source first: Remove outdated or irrelevant data from the original work items before cloning to avoid carrying clutter into every copy.
- Use meaningful link types: Pick a link type that reflects the real relationship between original and clone, such as “is cloned by.”
- Document your sync rules: Write down which fields are synced and why, and keep that note updated as your workflow evolves.
What common bulk clone problems should you watch for?
- Performance during large runs. Cloning many work items at once can briefly slow Jira; schedule large operations during off-peak hours.
- Over-complex sync rules. Synchronization logic can grow tangled — keep rules documented and review them periodically so behavior stays predictable.
Frequently asked questions
How many Jira issues can you bulk clone at once?
With Elements Copy & Sync you can bulk clone Jira issues from the issue navigator, up to 1,000 at a time, which makes it practical for large recurring setups.
Will my cloned work items stay updated?
Only for the fields you choose. During setup you define which fields are synchronized; updates to the original then flow to its clones automatically, while unsynced fields remain independent.
Can I bulk clone an entire Jira project?
Yes cloning is not limited to individual work items. To duplicate a full project structure, see how to clone a project in Jira.
Bottom line
A Jira bulk clone removes the repetitive work of recreating similar work items by hand. Using Elements Copy & Sync to clone in bulk and synchronize the copies creates a connected, consistent workflow that scales with your project management in Jira. For a deeper walkthrough, read our guide on how to bulk clone Jira issues.
Jira’s built-in clone feature lets you duplicate a work item in a few clicks; summary, description, assignee and priority are copied automatically into a new work item. It works well for simple, recurring tasks. But for teams managing epics with stories and subtasks, or work items linked by dependencies, the native feature has hard limits: subtasks are not cloned, links are dropped, and hierarchies are ignored.
This article explains exactly how to clone Jira issues using the native feature, what gets copied (and what doesn’t), and when you need to go beyond it.
TL;DR
| Native Jira clone | Duplicates the summary, description, assignee and priority of a work item in a few clicks. |
| What is not copied | Subtasks, issue links, comments and history are excluded from the native clone. |
| No hierarchy preserved | Cloning an epic does not clone its stories or subtasks — each level must be cloned manually. |
| When native is enough | Simple recurring tasks or bugs to retest in a different environment. |
| For complex cases | Apps like Elements Copy & Sync handle full hierarchy cloning, including links and attachments. |
What does “clone Jira issue” mean?
When you clone an work item in Jira, you’re essentially creating a duplicate of an existing ticket. This duplicate carries over key data fields such as the work item summary, description, assignee, and priority. Cloning allows teams to quickly replicate tasks without manually re-entering the same information again and again.
For example:
- A QA tester might clone a bug work item to retest it in a different environment.
- A project manager may clone a task that recurs monthly, like “Generate performance report.”
- Developers could clone Jira issues to use as templates for similar feature requests.
Instead of starting from scratch, cloning ensures consistency and saves time.
How to clone an issue in Jira (step-by-step)
Copying in Jira is built into the core functionality and is accessible to all users with the correct permissions. Here’s how it works:
Select “Clone”
In the work item’s action menu (usually represented by the “…” icon), select Clone.
Open the work item you want to clone
Navigate to the work item you’d like to duplicate.
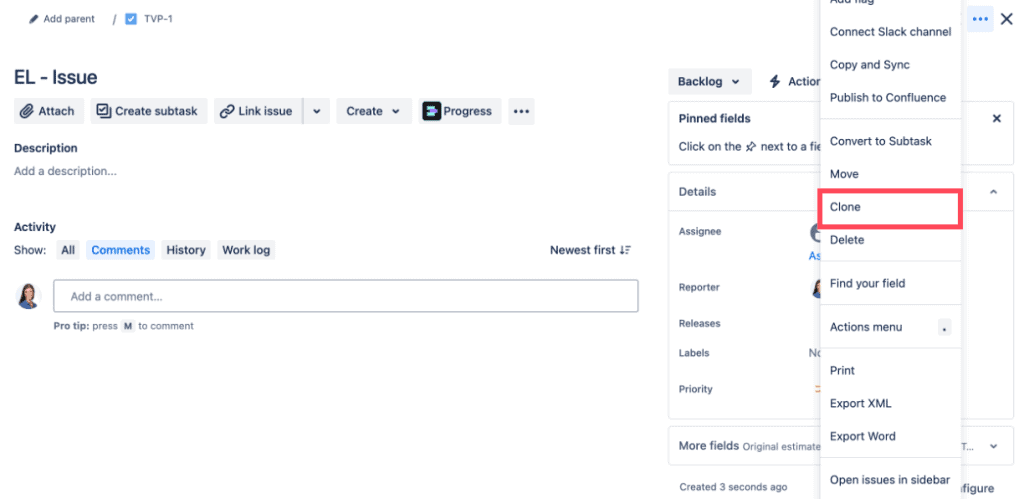
Adjust the details
A dialog box appears, allowing you to modify certain fields. Jira will automatically add the prefix “CLONE – ” to the summary of the new work item, but you can adjust this or edit other fields if necessary.
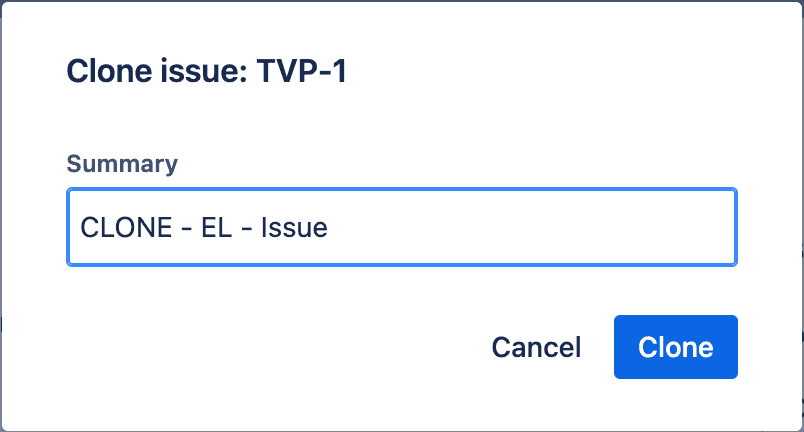
- Save and create
Once you confirm, Jira generates the new work item with the selected fields copied over.
👉 Tip: If your admin has configured custom prefixes or additional clone options, you may see slightly different settings depending on your Jira instance.
What information gets cloned in Jira?
When you clone a Jira issue, the following elements are typically copied:
- work item summary (with the “Clone” prefix)
- Description and custom fields
- Assignee and reporter
- Attachments
- Priority
- Labels
However, not everything carries over. By design, Jira avoids duplicating certain aspects to prevent confusion. For example:
- Time tracking data (e.g., logged hours)
- Comments
- work item history and activity log
- Links to other work items
This makes sense if you’re using cloning to spin up a new piece of work, but it quickly becomes limiting when dealing with more complex work item hierarchies.
Limitations of Jira’s basic cloning
At first glance, cloning in Jira seems like a productivity booster. But once you move beyond simple tasks, you’ll start to notice the drawbacks. Let’s look at the most common ones.
1. No subtask duplication
Cloning does not automatically copy subtasks. If you clone a parent task or epic, Jira will only duplicate the top-level work item. All subtasks or child work items remain behind, requiring you to clone them manually.
Example:
If you clone an epic with 15 user stories and each story has 3 subtasks, you’ll need to create nearly 60 clones by hand.
2. No linked work items
Cloning doesn’t replicate links between work items. If your task is connected to dependencies, blockers, or related tickets, those connections vanish in the clone.
3. Manual effort and human error
Because you must manually replicate subtasks and links, the process is time-consuming. More importantly, it’s prone to errors, teams might forget to clone a related bug or misplace dependencies, leading to inconsistent workflows.
4. Lack of hierarchy preservation
Large projects often rely on work item hierarchies (epic → story → subtask). Jira’s cloning ignores this structure, which can be a serious barrier for teams managing scaled Agile projects.
When is basic cloning enough?
Despite its limitations, it can be useful in simpler scenarios:
- Duplicating a single recurring task
- Re-testing a bug in a different environment
- Spinning up a new feature request similar to an existing one
If your workflow doesn’t involve subtasks, dependencies, or large hierarchies, the built-in cloning may be sufficient.
How to overcome Jira cloning limitations
For teams that need more than just a copy of a single work item, Jira Marketplace apps can extend cloning capabilities dramatically.
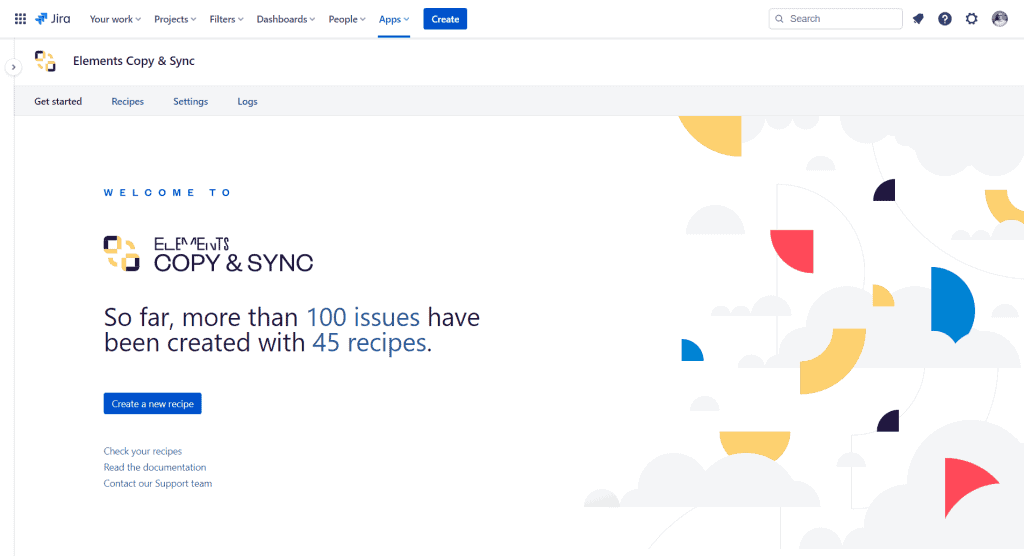
Elements Copy & Sync
One of the most popular tools for enhanced copying is Elements Copy & Sync. The app allows you to:
- Copy and synchronize Jira work items recipe (epics with all stories and subtasks)
- Preserve links between issues
- Duplicate attachments and comments
- Automate cloning to reduce repetitive work
- Sync changes between the original and cloned issues to keep them aligned
This means instead of spending hours manually recreating structures, you can duplicate them in seconds while ensuring nothing gets lost in the process.
Best practices for cloning Jira issues
If your team frequently clones Jira issues, here are some tips to keep your projects tidy and efficient:
- Use clear naming conventions
Customize the “Clone” prefix to something more meaningful (e.g., “Template,” “Recurring,” or “Copy”). - Document your process
Standardize when and why cloning should be used across your team to avoid cluttering your Jira instance with unnecessary duplicates. - Leverage apps for complex cases
If you regularly clone hierarchies, invest in a tool like Elements Copy & Sync to save time and reduce errors. - Review cloned work item carefully
Always check cloned tickets for missing subtasks, links, or context before assigning them.
Read our guide on cloning Jira issues
FAQ: cloning Jira issues
Can I clone multiple Jira issues at once?
Not with the native feature. It only clones one work item at a time. Bulk cloning Jira issues (selecting multiple work items and duplicating them in a single action) requires a Marketplace app. Elements Copy & Sync supports bulk cloning via Jira’s work item search or board views.
Can I clone a Jira issue to another project?
The native clone creates the duplicate in the same project. Cloning across projects or across Jira instances requires a dedicated app. Elements Copy & Sync supports both cross-project and cross-instance cloning, with field mapping to handle differences in project configuration.
Does cloning a Jira issue create a link between the original and the clone?
Yes. By default, Jira adds a “cloned by / clones” link between the original work item and the new duplicate. This link is visible in both work items and can be removed manually if not needed.
Is there a way to automate cloning in Jira?
Not natively. Jira Automation does not include a built-in “clone work item” action. Apps like Elements Copy & Sync integrate with Jira Automation to trigger cloning based on conditions. For example, automatically cloning a template work item when a new sprint starts or when a specific field value is set.
Conclusion: should you clone Jira issues?
The ability to clone Jira issues is a simple but powerful capability. For small, recurring tasks, it helps teams save time and maintain consistency. However its limitations, particularly the lack of subtask and link duplication, make it less effective for large projects.
If your team needs to clone complex work item hierarchies or ensure dependencies remain intact, relying on Jira’s native clone feature alone may not be enough.
Tools like Elements Copy & Sync fill this gap, enabling complete, automated duplication and synchronization.
By understanding both the strengths and weaknesses of Jira cloning, you can make better decisions about when to use the built-in capability and when to upgrade your workflow with dedicated apps.
Try Elements Copy & Sync for free now
Leveraging Jira and Confluence for knowledge management: A guide for IT teams
Atlassian’s Jira and Confluence are two tools that, when used together, can significantly enhance a team’s knowledge management capabilities. This article delves into strategies for integrating Jira and Confluence to build a robust knowledge management system that serves your team’s needs effectively.
Understanding Jira and Confluence tools
Jira, primarily a project management tool, excels in tracking issues, tasks, and projects. It provides teams with the agility to adapt to changes, manage workflows, and ensure that every task is accounted for and progresses as planned. On the other hand, Confluence operates as a content collaboration tool where teams can create, manage, and share documentation, project plans, and increase team collaboration.
The synergy between Jira and Confluence lies in their ability to offer a unified system where project tracking and documentation complement each other seamlessly. Here’s how you can leverage this synergy for effective knowledge management:
1. Documenting projects in Confluence
Start by creating a space in Confluence for your project documentation. This space should serve as the central repository for all project-related knowledge, including project plans, requirements, meeting notes, and retrospectives. For each project tracked in Jira, link directly to these Confluence pages to ensure that team members can easily navigate between task tracking and relevant documentation.
2. Embedding Jira issues in Confluence pages
Confluence allows you to embed Jira issues directly into your pages. This feature is incredibly useful for creating dynamic reports, sprint plans, or project summaries that automatically update as the status of Jira tickets change. Use this to keep documentation current without manual updates, ensuring that team members always have access to the latest information.
Nevertheless, while Jira and Confluence are powerful tools for project management and collaboration respectively, they have some native limitations. Jira can sometimes be too rigid for teams needing flexibility in their workflows and issue tracking, making it less adaptable to more dynamic project methodologies. Confluence, while excellent for documentation, can become complicated to deal with information as the amount of content grows, leading to navigation and retrieval difficulties. These native constraints may require additional customization or integration with other tools to fully meet user needs.
Discover how Elements Publish can enhance your Jira and Confluence integration
3. Utilize Confluence for meeting notes and decisions
Meetings are often where decisions are made, directions are chosen, and ideas are brainstormed. Use Confluence to document these meetings, and link relevant Jira issues to these notes. This provides a historical account of how decisions were reached and ensures that actionable items are tracked in Jira, closing the loop between decision-making and task execution.
4. Creating a knowledge base in Confluence
Beyond project-specific documentation Confluence can be an effective tool for ITSM. In ITSM, Confluence can be used to manage service catalogs, detailed documentation on incident management protocols, problem management guidelines, and change management procedures. Furthermore, Confluence also serves as a knowledge base for your team or organization, facilitating information sharing and collaboration. This can include coding standards, design guidelines, onboarding materials for new hires, and FAQs. Linking to Jira issues or projects from these pages can help illustrate guidelines with real-world examples or provide quick access to ongoing projects relevant to the knowledge base topic.
5. Encouraging collaboration and feedback
Leverage Confluence’s collaborative features to encourage team members to contribute to documentation, share feedback, and ask questions. This improves the quality of your knowledge management efforts and fosters a culture of openness and collaboration. Integrating with Jira, team members can discuss issues, update ticket statuses, and link back to Confluence pages for in-depth explanations or discussions.
Discover how Elements Publish can help your IT team streamline their knowledge management
6. Automated workflows and notifications
Both Jira and Confluence offer automation and notification features. Therefore, utilize these to alert team members about updates, new articles, or feedback requests. This ensures that knowledge management is proactive and engages the entire team in maintaining and enhancing your documentation.
The integration of Jira and Confluence offers a powerful combination for knowledge management. By effectively using these tools together, teams can ensure that project documentation is comprehensive, up-to-date, and accessible. This not only streamlines project execution but also builds a culture of knowledge sharing and continuous improvement. Start by mapping out your team’s knowledge management needs and configure Jira and Confluence to work together to meet these needs, laying the foundation for sustained success and growth.
In the bustling world of project management, the harmony between tools can often be the most important element for success. Atlassian’s Confluence and Jira stand out not just for their individual capabilities but for their synergistic potential when used together. This article explores how integrating Jira and Confluence can streamline workflows, foster collaboration, and ultimately, drive project success.
Seamless integration, streamlined workflow
Jira, renowned for its agile project management capabilities, excels in tracking issues, tasks, and deadlines. Confluence, on the other hand, serves as a robust content collaboration tool that helps teams to create, share, and manage all forms of content. When Confluence and Jira are used in tandem, they create a seamless workflow that bridges the gap between task management and information sharing.
This integration allows for the automatic linking of Jira tasks within Confluence documents. Teams can thus easily reference detailed project plans, requirements, or reports housed in Confluence directly from their Jira dashboard. This direct linkage not only saves time but also ensures that relevant information is readily accessible, reducing the need for constant back-and-forth communication.
Are you ready to revolutionize your approach to project management? Explore Elements Publish, the app designed to simplify your process and increase your team’s productivity.
Enhanced collaboration for a successful project
The Jira-Confluence integration enriches this collaboration by providing teams with a shared context. Confluence’s strength in content management becomes even more powerful when combined with Jira’s task tracking. Teams can collaboratively work on documents in Confluence while keeping track of their progress in Jira and also convert a Jira issue into a Confluence page. This ensures that every team member is on the same page, literally and figuratively.
For example, during project planning, Confluence requirements can directly become Jira tasks, ensuring all are accounted for and easing the transition to execution.

Empowered decision-making with data-driven insights
Decision-making is important at every stage of a project. The combination of Jira’s analytics and reporting capabilities with Confluence’s content management provides teams with a comprehensive overview of project health. Teams can create dynamic reports in Confluence that fetch real-time data from Jira, offering insights into project progress, resource allocation, and potential bottlenecks.
This integration empowers project managers and stakeholders to make informed decisions based on up-to-date project data. Whether it’s reallocating resources to address bottlenecks or adjusting timelines to meet deadlines, the combined insights from Jira and Confluence enable a proactive approach to project management.
Streamlining knowledge sharing and documentation
One of the challenges in project management is ensuring that knowledge is effectively shared and documented. Confluence’s capabilities as a knowledge base complement Jira’s operational efficiency by providing a centralized repository for all project-related documentation. From technical specifications to meeting notes and best practices, Confluence serves as the single source of truth for project teams.
Integrating Jira and Confluence not only facilitates access to this information but also encourages a culture of documentation. As tasks are completed in Jira, related documents in Confluence can be updated simultaneously, ensuring that project documentation remains current and relevant.
Integrate and synchronize your Jira issue into a Confluence page now and transform your project management with Elements Publish.
The synergy between Jira and Confluence offers more than just convenience; it embodies a strategic approach to project management. By bridging the gap between task management and content collaboration, this integration streamlines workflows, enhances collaboration, empowers decision-making, and streamlines knowledge sharing. In the dynamic world of project management, using Jira and Confluence together can significantly boost team efficiency and success.
When navigating the complexities of incident management, leveraging the integrated capabilities of Jira Service Management (JSM), Jira, and Confluence can transform challenges into opportunities for improvement and efficiency. These tools, when used in harmony, create a robust framework for managing incidents that reflect the reality of today’s fast-paced project environments. Here’s how to tailor best practices to make the most of JSM, Jira and Confluence.
1. Leverage JSM for Proactive Incident Prevention
Before incidents arise, use JSM to set up a preventive maintenance schedule and automate regular checks. Its advanced monitoring capabilities can alert you to potential issues, allowing for preemptive action. Incorporating a knowledge base with Confluence can also help in educating your team and users on avoiding common pitfalls.
2. Streamline Identification with JSM Alerts
Utilize JSM’s alerting system to ensure swift incident identification. Configure it to send notifications through various channels, ensuring that critical information reaches the right people without delay. The goal is to create a seamless flow of information that aids in quick response times.
3. Efficient Logging Practices in Jira
When logging an incident in Jira, ensure that all relevant information is captured succinctly. Use custom fields and issue types to categorize incidents accurately, making it easier for teams to understand the scope and scale at a glance. This streamlined approach to logging helps in initiating a swift response.
4. Prioritize and Categorize with Precision
Employ Jira’s capabilities to categorize and prioritize incidents based on predefined criteria such as impact and urgency. This enables your team to address the most critical issues first, optimizing resource allocation and ensuring that efforts are focused where they are needed most.
5. Conduct Thorough Diagnosis with Confluence Integration
For comprehensive incident analysis, integrate Jira with Confluence to document and share findings across teams. This collaboration can lead to a deeper understanding of the incident’s root cause, fostering a culture of shared knowledge and collective problem-solving.
If you want take your incident management to the next level, learn more about Elements Publish

6. Implement Solutions and Monitor Recovery in Jira
Use Jira to track the resolution process, assigning tasks and monitoring progress towards recovery. This centralized tracking ensures that all team members are aligned and informed, facilitating a coordinated response to incidents.
7. Ensure Closure with Feedback Loops through JSM
Incorporate feedback mechanisms within JSM to gauge the effectiveness of the incident resolution. This can involve surveys or direct feedback from affected parties, ensuring that the incident is fully resolved to their satisfaction and gathering insights for future improvements.
8. Foster Continuous Improvement with Jira and Confluence Reports
Finally, use Jira’s reporting features in conjunction with Confluence’s collaborative documentation to review and refine your incident management process. Analyze trends, identify areas for improvement, and document best practices and lessons learned to continuously evolve your incident management strategy.
By tailoring these best practices to the specific capabilities of JSM, Jira, and Confluence, project managers and Jira admins can create a more resilient, efficient, and effective incident management process. This approach not only addresses the immediate challenges of incident resolution but also builds a foundation for ongoing improvement, reflecting the Elements commitment to innovation and excellence in project management.
To get more information about Elements Publish :

Schedule an appointment with our Head of Product, Julien Peyrade
Whether you’re a seasoned project manager or new to the field, this guide aims to empower you with the knowledge and strategies needed to harness Confluence’s capabilities for successful project outcomes: ensuring they are completed on time, within scope, and with the desired quality. By integrating Confluence into your project management workflows, you can enhance collaboration, streamline communication, and centralize essential project information.
In the upcoming sections, we’ll address fundamental questions about project management and Confluence’s role within it. We’ll discuss the benefits of utilizing Confluence for project management and provide step-by-step guidance on how to set up, customize, and make the most of Confluence’s features for your projects.

What is Project Management?
Project management is the systematic application of processes, methods, and tools to initiate, plan, execute, monitor, control, and close projects. It involves the coordination of various resources, including time, budget, people, and materials, to achieve specific goals and objectives within defined constraints.
At its core, project management revolves around:
- Defining Objectives: Clearly outline the goals and outcomes the project aims to achieve.
- Planning: Creating a roadmap that outlines tasks, timelines, resources, and potential risks.
- Execution: Implementing the planned tasks and activities to bring the project to life.
- Monitoring and Control: Keeping track of project progress, identifying deviations, and making necessary adjustments.
- Closure: Finalizing all project activities, evaluating their success, and documenting lessons learned.
Effective project management is essential for ensuring projects are delivered on time, within budget, and to the satisfaction of stakeholders. By implementing structured project management practices, teams can minimize risks, optimize resource allocation, and enhance collaboration among team members.
Is Confluence a Project Management Tool?

Confluence, developed by Atlassian, is primarily known as a collaboration and documentation platform. While it may not be a traditional project management tool in the same vein as dedicated project management software, Confluence plays a vital role in supporting project management workflows.
We use Confluence for managing for most of our projects, because it makes all project information accessible and findable in one place.
Stefan Kleineikenscheidt, K15T CEO
Confluence offers features that are highly beneficial for project management, such as:
- Document Collaboration: Confluence provides a centralized space where team members can collaboratively create, edit, and review project-related documents, requirements, and specifications.
- Knowledge Sharing: With Confluence’s wiki-like structure, teams can share knowledge, best practices, and project-related information in an easily accessible format.
- Task Tracking: While Confluence doesn’t offer robust project scheduling capabilities, it does enable task tracking through its integration with tools like Jira, allowing teams to monitor and manage project tasks.
- Communication: Confluence’s commenting and @mention features facilitate seamless communication among team members, ensuring everyone stays informed and engaged.
- Customizable Workspaces: Teams can create customized spaces for each project, tailoring them to suit the specific needs and requirements of that project.
- Templates: Confluence offers various templates for meeting notes, project plans, and more, providing a consistent structure for project-related documentation.
While Confluence might not replace comprehensive project management tools, its collaborative and documentation-oriented features make it a valuable asset in the project management toolkit. Integrating Confluence with specialized project management tools can lead to a holistic approach that combines efficient collaboration and effective project execution.
Benefits

Utilizing Confluence for project management offers a range of benefits that contribute to more organized, collaborative, and successful project outcomes. Here are some key advantages:
- Centralized Information: Confluence serves as a central repository for all project-related documentation, reducing the chances of information silos and ensuring that team members have access to the latest updates.
- Enhanced Collaboration: With Confluence, team members can collaboratively work on documents, share insights, and provide feedback in real-time, fostering a culture of collaboration and innovation. Also, Confluence’s cloud-based nature facilitates remote collaboration, enabling team members to work together regardless of their physical location.
- Improved Communication: Confluence’s commenting, @mention, and notification features facilitate efficient communication, ensuring that team members are aware of updates, discussions, and decisions.
- Knowledge Retention: As projects evolve and team members change, Confluence preserves institutional knowledge by documenting decisions, rationale, and processes, making onboarding smoother.
- Customizable Templates & Workflows: Confluence offers a variety of templates tailored for project management, allowing teams to start with a structured framework and adapt it to their specific project needs.
- Task Tracking Integration: Through integration with task and project management tools like Jira, Confluence allows teams to link project documentation with tasks, keeping project context and documentation closely connected.
- Transparency: Confluence provides transparency into project progress, allowing stakeholders to access project documentation and updates, which aids in accountability and decision-making.
- Scalability: Whether it’s a small project or a large-scale initiative, Confluence’s flexibility accommodates projects of varying complexities.
By harnessing Confluence’s capabilities, project managers and teams can streamline their processes, enhance communication, and create a well-documented project history that contributes to future successes.
How to Use Confluence for Project Management

Using Confluence for project management involves a series of steps that empower teams to collaborate, track progress, and maintain organized project documentation. Here’s a step-by-step guide to help you leverage Confluence effectively:
- Structure your spaces & documents
- Set Up Project Spaces: When new team members join, direct them to the project space in Confluence. This allows them to quickly understand the project’s context, goals, and documentation. Create dedicated spaces within Confluence for each project. These spaces serve as the hub for project-related documents, discussions, and updates. Customize the space to reflect the project’s identity and objectives.
- Define Document Structures: Lay out the structure of your project documentation. Create pages for project plans, requirements, meeting notes, and more. Utilize Confluence’s templates to maintain consistency across different types of documentation.
- Integrate with your task-tracking tools Integrate Confluence with task-tracking tools like Jira. Link project documentation with tasks, user stories, and issues. This integration ensures that project documentation is directly connected to the tasks being worked on.
- Foster collaboration Encourage team members to contribute to project documentation. Collaboratively create and edit documents, capturing insights, decisions, and progress updates. Leverage Confluence’s real-time collaboration features.
- Communicate regularly (updates, decisions, etc)
- Visualize with Charts and Diagrams: Use Confluence to create charts, diagrams, and visuals that communicate project timelines, dependencies, and progress. Visual representations help stakeholders grasp complex information quickly.
- Regular Updates and Communication: Encourage regular updates within Confluence. Document project status, achievements, and challenges. Use @mentions and comments to facilitate discussions and keep everyone informed.
- Document Decisions and Rationale: Capture key decisions made during the project lifecycle. Document the rationale behind decisions, as this knowledge becomes invaluable for future reference and learning. Use Confluence’s review and approval workflows for critical documents. Ensure that project documentation undergoes proper review before being finalized.
By following these steps, you can harness Confluence’s capabilities to optimize your project management workflows, enhance collaboration, and create a repository of valuable project knowledge.
Case Studies
In this section, we’ll delve into fictional examples of organizations that can effectively use Confluence for project management. These case studies highlight how Confluence’s features and functionalities can be applied to diverse projects, leading to improved collaboration, streamlined processes, and successful project outcomes.
Case Study 1: Tech Innovators Inc.
Tech Innovators Inc., a software development company, use Confluence to manage their product development projects. By creating dedicated project spaces for each product, they centralize requirements, design documents, and user stories. Through integration with Jira, they link project documentation with development tasks, ensuring alignment between documentation and execution. This approach leads to reduced communication gaps, faster decision-making, and a more efficient development cycle.
Case Study 2: Markven Agency
Marketing Maven Agency, a marketing firm, employ Confluence to coordinate their client campaigns. They use Confluence’s customizable templates to create campaign briefs, content calendars, and performance reports. Team members collaborate in real-time on these documents, ensuring everyone has the latest information. By using Confluence’s @mention feature, they facilitate quick feedback and approvals. This strategy results in improved client communication, better campaign tracking, and enhanced client satisfaction.
Case Study 3: Infrastructure Innovations Ltd.
Infrastructure Innovations Ltd., a construction company, leverages Confluence to manage its construction projects. They establish project spaces for each construction site, housing blueprints, progress photos, and safety protocols. With Confluence’s version control, they track changes to blueprints over time, ensuring that all stakeholders are working with the latest information. This approach improves collaboration among architects, engineers, and construction crews, leading to smoother project execution and reduced rework.
Case Study 4: Healthcare Hart Group
Healthcare Hart Group, a healthcare provider, uses Confluence for its process improvement initiatives. They document current processes, identify bottlenecks, and collaborate on solutions within Confluence. Through the use of diagrams and flowcharts, they visualize process changes and track their implementation. By integrating Confluence with their project management software, they align process improvements with project timelines. This approach results in enhanced patient care, optimized workflows, and increased operational efficiency.
These case study examples demonstrate the versatility of Confluence in different industries and project contexts. By adapting Confluence’s features to their specific needs, these fictional organizations are able to enhance collaboration, communication, and project outcomes.